

 janukke


North Sea Mist
Choose four of my designs, and pay only three! The least expensive one will be free. Make sure to put all four patterns in your shopping basket before you check out.
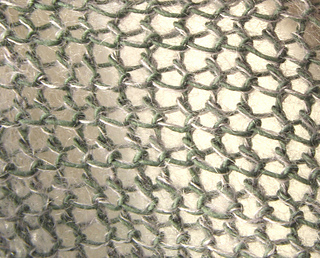
Delicate and ethereal, North Sea Mist is knit in two halves that radiate from the centre of the shawl out along the long axis. Formed by first adding stitches, then using short rows, the increases create a subtly curved crescent moon for each half. The veil stitch pattern produces a light and open fabric.
The mist is evoked in both, the colour and the sensual texture of Ito Sensai’s mohair-silk and Urugami’s wool-paper yarns.
MATERIALS
Yarn
Lace 1: ITO Sensai; 60% mohair, 40% silk; 240 m (262 yd)/20 g; colour 304 Crocus
Lace 2: ITO Urugami; 72% wool, 28% paper; 240 m (262 yd)/40 g; colours 212 Mint and 217 White
You will work with Lace 1 and Lace 2 held together.
Yardages
ITO Sensai: 480 m (524 yd)/40 g or 2 balls
ITO Urugami mint: 240 m (262 yd)/40 g or 1 cone
ITO Urugami white: 240 m (262 yd)/40 g or 1 cone
Needle
4 mm/US#6 circular, 100-150 cm (40-60 in)
Notions
A piece of waste yarn, 220 cm (86.5 in) long, or a
spare cable
21 green and 21 purple stitch markers or 21 each of two
different colours/styles
FINISHED DIMENSIONS
Length: 206 cm (81 in)
Width: 32 cm (12.5 in)
Disclaimer: Please make sure that the veil stitch pattern goes well with your yarn before you buy the pattern. It can be worked in the English or Continental knitting style. I recommend mohair yarn or any other fibres with an intense halo, such as mohair, cashmere and alpaca. Also make sure you enjoy working the veil stitch. While it creates a gorgeous and open fabric, it can be tricky to master those wraps around the needles. There is a photo tutorial for the veil stitch in the pattern PDF to ensure that you´ll do it right. The tutorial in the pattern will show the stitch in the continental style, i. e. you will be holding the working yarn in your left hand.
If you enjoy the pattern and would like to chat about it or about all kinds of other stuff with like-minded knitters, have a look in my Ravelry group.
۰•● ●•۰
Wer vier meiner Muster ersteht, bekommt das günstigste von ihnen geschenkt. Dazu alle Muster vor dem Bezahlen zusammen in den Einkaufswagen legen.
Das leichte, fast durchscheinende Schaltuch besteht aus zwei sichelförmigen Hälften. Sie werden vom Mittelpunkt der Längsachse aus nach außen gestrickt. Für die erste Hälfte werden am Ende jeder Reihe jedes Mal einige Maschen hinzugefügt. Die zweite Hälfte wird gegengleich, aber diesmal mit verkürzten Reihen, geformt. Gestrickt wird im Schleiermuster, was ein offenes Maschenbild erzeugt.
NORDSEENEBEL erinnert mit seinen Farbtönen und dem luftigen Lacemuster in zarten ITO-Fasern an den Nebel über der See, daher der Name.
MATERIAL
Wolle
Lace 1: ITO Sensai; 60 % Mohair, 40 % Seide; 240 m/20 g; Farbe 304 Crocus
Lace 2: ITO Urugami; 72 % Schurwolle, 28 % Papier; 240 m/40 g; Farben 212 Mint und 217 White
Es wird immer ein Faden Lace 1 zusammen mit einem Faden Lace 2 verstrickt.
ITO Sensai: 480 m/40 g oder 2 Knäuel
ITO Urugami Mint: 240 m/40 g oder 1 Kone
ITO Urugami White: 240 m/40 g oder 1 Kone
Nadel
Rundstricknadel Nr. 4, 100-150 cm
Sonstiges
1 Hilfsfaden, 220 cm lang oder ein Nadelseil
21 grüne und 21 lila Maschenmarkierer bzw. 2 unterschiedliche Sorten Maschenmarkierer
MAßE
Länge: 206 cm
Breite: 32 cm
Disclaimer: Das Tuch wird im Schleiermuster gestrickt, das ein wunderschönes, leichtes und offenes Maschenbild erzeugt, aber nicht zu jeder Wolle passt - flauschiges Garn wie Mohair, Alpaka oder Kaschmir eignet sich besser als glattes - und nicht jeder arbeitet das Schleiermuster gern. Deswegen stellt bitte vor dem Kauf unbedingt sicher, dass eurer Wolle und euch das Muster gefällt. Die Anleitung enthält noch einmal ein Phototutorial, das die Schleiermasche Schritt-für-Schritt erklärt. Es ist im “Continental Style” geschrieben, die Wolle wird also in der linken Hand gehalten.
Wem das gefällt, der ist herzlich eingeladen, in meiner Ravelry-Gruppe vorbeizuschauen!
12230 projects
stashed 8301 times
488 projects
stashed 471 times


