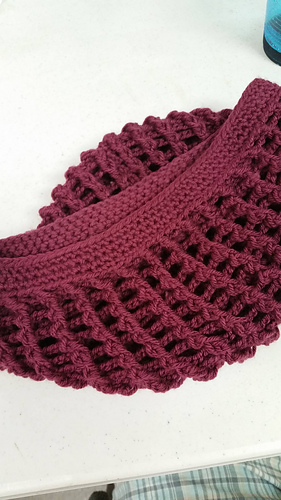
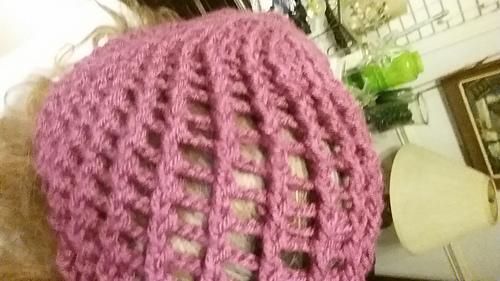
I started the Phannie pattern and realized by the end of Row 8, I would try to skip all the DC between FPDC and instead chain the same number of stitches to create a fish net or market bag breathable “spring/summer” hat.
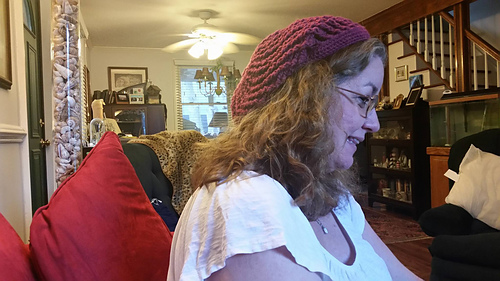
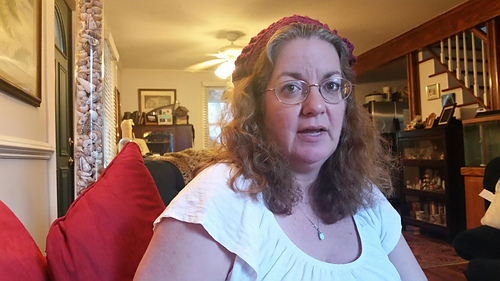
Saddened by the tragic death of Prince, I had to make a raspberry beret.
This is the first time I have EVER gone off the grid from a pattern as I am a novice. Any feedback on how I wrote these adjustments/directions is appreciated.
RASPBERRY BERET
Phannie pattern is here http://www.ravelry.com/patterns/library/phannie
START PATTERN EXACTLY AS WRITTEN THROUGH RND 8.
Rnd 9. Follow the pattern, but instead of dc in each stitch between FPDC, ch 2. So from the beginning: Ch 3 (counts as 1 dc), FPDC in next st (fpdc from previous row), ch 2, FPDC, ch 2 all the way around, then end on slst like normal.
Rnd 10. Same thing. Ch 3 (counts as 1 dc), FPDC in next st (fpdc from previous row), ch 3, FPDC, ch 3. Repeat * all the way around. Increase made on this round.
Rnds 11 and 12. Ch 3 (counts as 1 dc). FPDC in next st. Ch 3. FPDC. Ch 3. Repeat * until the end of the round and slst into 3rd ch of beginning dc. (same on every round).
Rnd 13. Ch 3 (counts as 1 dc). FPDC in next st. Ch 4. FPDC. Ch 4. FPDC. Ch 4. Repeat * until the end of the round and slst to join. Increase made on this round.
Rnd 14: (the same as the previous round). Ch 3 (counts as 1 dc). FPDC in next st. Ch 4. FPDC. Ch 4. Repeat * until the end. Slst as before.
HERE IS WHERE I ADDED 4 more ROUNDS of ROUND 14. This is to make up for the length. These rounds without the DCs in between isn’t as thick and shrinks in length. You can make this section as long as you want.
Rnd 15: (decreasing stitches now). Ch 3 (counts as 1 dc). FPDC in next st. Ch 3. FPDC. Ch 3. FPDC. Ch 3. Repeat * until the end and sl st to join round. Decrease made.
Rnd 16: Ch 3 (counts as 1 dc). FPDC in next st. Ch 2. FPDC. Ch 2. Repeat until end (sl st). Decrease made.
Rnd 17: Ch 3 (counts as 1 dc), FPDC around post of next st, ch 2. Repeat until the end and slst. Decrease made.
Rnds 18, 19, and 20: Ch 1 (counts as 1 sc), sc in each st around, join with a sl st in beg ch-1. Check for fit. More rows of sc may be added.
I added one more row of sc. Note: in Rnd 18, I had to use the back loop to make my first round of sc. After that, I used the whole loop for Rnds 19, 20 and my extra round.
Rnd 21: Change to larger crochet hook. Ch 1, work 1 sl st in each st around, join with a sl st in beg ch-1. Fasten off.
Be careful in this last row not to make it too tight because what fit pretty good after Rnd 20 can totally change. I had to frog out about 15 stitches toward to end of my round to purposefully let up on my stitch.
Enjoy!
Thank you to Phannie for a beautiful pattern to inspire me and start. You can find her profile here http://www.ravelry.com/designers/phoebe-gaughan
I will look forward to making the full Phannie pattern a little closer to winter, which you can find here http://www.ravelry.com/patterns/library/phannie].
God Bless You!


 jeanniebluemel notebook
  handspun
 queue
queue favorites
 friends
 needles & hooks
 library