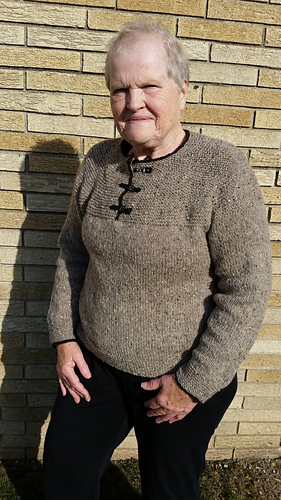
Critique of pattern This is a lovely pattern. It’s a great guy sweater almost as is, and a nice woman’s sweater with a few mods.
- I’m surprised that the yoke is not done with a size smaller needle. It is the nature of garter stitch to grow, and if the sweater is fitted perfectly to begin with, I’m certain it will become baggier as it is worn. This problem would likely be worse with a superwash yarn than it is with this lovely sticky wool..
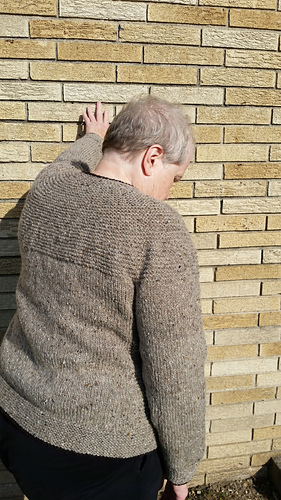
- A small detail, but Jared was a very new designer when he did this pattern. There should be a full repeat of knit/purl rows (a garter stitch rib) before beginning the short rows. This way, the first turning end is hidden in the garter ribs rather than sticking out unattractively on one’s chest.
My version: Cobblestone for design details; CustomFit for proportions, sizing.
stockinette swatch on#7 bamboo needles before blocking:
5.125” = 21 sts
5” = 32 r
after blocking:
5” = 21 sts
5” = 32 r
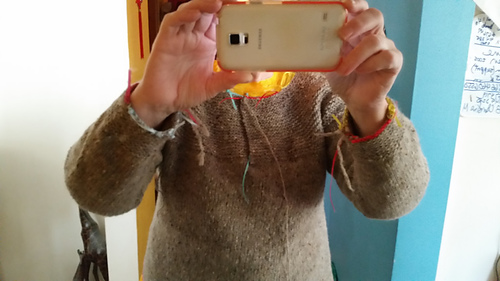
- Provisional CO’s were used so all edges will match when black is added. The colored edges in the photo in the mirror are the 1/8” satin ribbons I used for provisional CO and temporary BO.
- Garter Stitch in the round for bottom and sleeves, on #6 needle, using two balls of yarn.
- Sleeves. CO 40 sts for gs band, increase to 46 sts in first stockinette row. Increase every 6 rows to 56 sts, then every 8 rows.
- When joining body and sleeves, there were 8 sts extra from a yoke multiple. Decreased at “raglan points” in first row to make sts equal to smallest size yoke stitches multiple. (For this reason, I decided not to go down a needle size for the yoke, which I ordinarily would have done as I’m using the second size of sweater for the body and the smallest size numbers for the yoke. Worked OK)
- When I knitted the yoke the second time, I worked 1”, 6 rows, in stockinette stitch before establishing opening and beginning garter ribs, to make it a bit more flattering and make front opening length better fit the fasteners I plan to use. This was equivalent to 4 garter ribs for my length calculations. In retrospect, I wish I’d done 2-3” stockinette here.
- For Henley neck, I (provisionally) cast on 6 sts for underlay at center front. These live stitches were later stitched to underside of yoke.
- Center front became beginning of rows. (Location of short rows was still calculated from center back.)
- Math for yoke decreases A blocked garter stitch swatch of 17 ribs measured 4” before and 5” after (this is a surprisingly large amount, perhaps this is why yoke was a bit short and neck needed to be raised several ribs for my desired neck location/size). I used this info to determine the number of ribs between each decrease row. First decrease row: 2.5” x 17 ribs/5” = 9 ribs (I did a couple of extra ribs because of the short rows, and the fact I had done some stockinette first. This added a little fullness at underarm that I’m not crazy about. Que sera sera) Second decrease row: 5” x17 ribs/5” = 24 ribs Third decease row: 8.5” x17 ribs/5” = 29 ribs Fourth decrease row: 9.5” x17 ribs/5” = 32 ribs
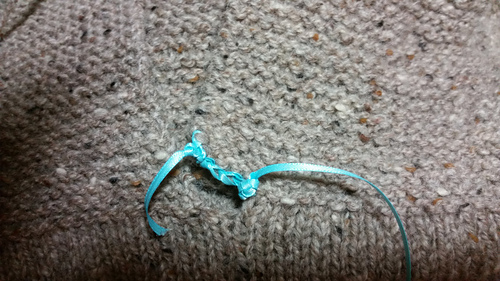
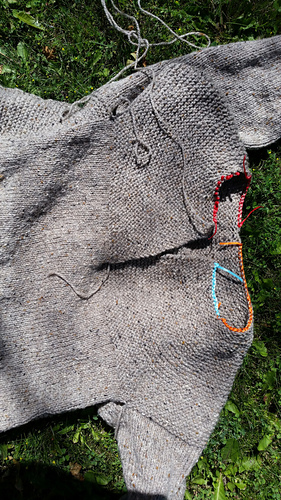
- The first time I knitted the yoke I didn’t take into account that it’s a lovely round yoke and it gaped seriously at center front. See photo 4 {blue is CO stitches added for underlay.} Sigh. To make a Henley, opening, it needed to be a straight opening at center front. I marked the 6 sts for the underlay + 6 stitches on each side of center front which would also be free of decreases on all rows. This meant that after first decrease row, there were 7 front stitches each side between markers; the next two decrease rows added two undecreased stitches to each side, and the fourth 1 stitch, for a total of 11 each side. It looked weird on the needles, but the finished front lies flat for my fasteners with a several-inch-wide unshaped portion in front. The 6-stitch underlay is straight, also.
The interesting fasteners are button box treasures I purchased in Iceland in 2010. As they are a bit heavy, I stabilized under them with 1” grosgrain ribbon.


 knotjusthats notebook
  handspun
 queue
queue favorites
 friends
 needles & hooks
 library