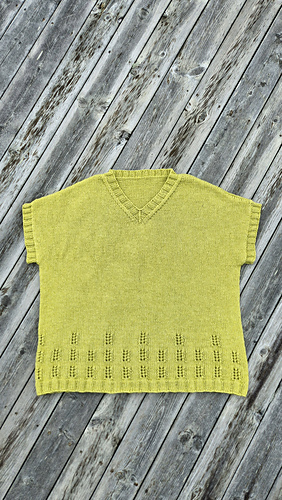
This is a test for Elizabeth Smith, one of my favorite designers. She creates classical and versatile patterns, easy to make and to understand, like this lovely V-neck top with drop-shoulder construction and cute eyelet stitch details on the lower body, worked bottom-up.
I’m very happy with the final result. I made size 4.
It was an interesting journey also because of the changing gauge from swatching, during the process and then measuring the final gauge. My top actually turned out about one size smaller at the hem, and measurements are between size 3 and 4 at the bust. Armholes and V-neck are slightly smaller than in pattern. All this fits me perfectly.
The yarn, Sandnes Duo, worked great for this top, and it will be perfect for summer.
My final sweater gauge, measurements and ease in cm, washed and dry. Pattern measurements in ( ), with my sweater measurements behind:
My final gauge, washed and dry, with needle 3.5 mm:
- Mid body (plain stockinette above the eyelets), worked in rounds: 21 sts and 28 rounds
- Upper body (plain stockinette), worked in rows: 20.5 sts and 28 rows
Ease: 16 cm at bust
A: Body Circumference: (119) 112 cm
B: Body Width: (60) 55 cm
C: Armhole Depth (19) 18 cm
D: Shoulder Depth (8) 7.5 cm
E: V-Neck Depth (without
ribbing) (17) 14 cm
F: V-neck Ribbing Width (3) 2.5 cm
G: Shoulder Width (24) 26 cm incl. ribbing/ 21 cm without ribbing
H: Underarm to Hem Length (25) 35 cm
I: Total Garment Length: 59 cm
Main needle: 3.5 mm.
Rib needle: 3.0 mm.
Bind-off with needle 3.5 mm for the neck and armhole ribbing.
Process notes for swatching and project (for final gauge and measurements, see above):
Swatching with needle 3.5 mm/ gauge:
- Before washing: 22 sts/ 29 rows.
- Wet blocked to 20.5 cm as in pattern/ and 28 rows (pattern row gauge is 32 rows and will probably be difficult for me to reach, so I’ll try to get as close as I can).
- Washed/blocked/dry: 20.5 sts and 27.5 rows.
- Conclusion: My stitch gauge is spot on with needle 3.5 mm, knitted flat. Row gauge is 4.5 rows looser per 10 cm, so I had to adjust the length and skip some rows. The designer worked out an alternative plan adjusting the row count and the decreases to my row gauge, which was very helpful.
Progress body gauge, washed:
21 sts and 27 rows.
After washing the body, it did grow a bit. I forgot to measure before washing, but it had probably grown about 5-6 %.
Yarn used: Sandnes Duo.
Skeins:
(1) 52 g, used for swatching and reused. Used up 9 cm from start.
(2) 53 g, used up 17 cm from start.
(3) 51 g, used up 28 cm from start.
(4) 51 g, used up 8 cm (3”) above armhole separation, left front.
(5) 51 g, 8 g left unused after working both fronts, 43 g used of this skein).
(6) 51 g, used for upper back. Used up at upper back right before short rows.
(7) 50 g, 31 g left after shoulder join. Continued with neck and armhole ribbing, 10 g left unused at the end, 40 g used of this skein.
Used total: 341 g = 6.82 skeins = 784.3 meters (858.0 yards).
(52+51+53+51+43+51+40)
Project notes:
- Hem: 8 rib rnds worked as described = unwashed 1 3/8”/ 3.5 cm.
Modifications:
- Body lengthened to 33 cm (+ 8 cm), measured washed, before separating front and back.
- Upper body shaping was adjusted to match row gauge.
- I skipped 4 rnds of the V-neck ribbing (ribbing measures 2.5 cm). Since I had less rows at the fronts than described in pattern, I picked up 34 sts (instead of 42) down the neck.
- Ribbing edges for V-neck and sleeves were made with the same width and round count, 7 rnds total, 2.5 cm width.
Notes from designer to center the eyelets, using the early test pattern version:
At the underarm you move the existing BOR marker 7 sts towards the Back and this will then place your Front Center a bit more symmetrically above one of the eyelets. So at the start of the Underarm Divide row, you would remove the BOR marker, then slip 7 sts from LN to RN, then place BOR marker at this new point, and then knit 120 stitches for your Front (and follow remaining instructions).
If you would prefer to have it centered over the space in-between eyelets, you could instead slip 17 sts…
My thoughts: Instead of slipping the sts, I did knit 7 sts right after the eyelet section, and moved the BOR to this point. So, I could continue without cutting the yarn.
Survey sent april 19.


 Lysstreif notebook
  handspun
 queue
queue favorites
 friends
 needles & hooks
 library