Swatch edging used in Norah Gaughan’s Knitted Cable Sourcebook
I believe they are a column of garter on either side of a column of stockinette. With the last stitch in the row slipped.
Even Edges
An important thing on the way to the perfect knitted garment is even edges. Not only do they look better but it also makes the sewing together easier.
Source of Error
Especially in pieces worked in stocking stitch the stitches at the edges, directly next to the “edge stitch”, are often uneven. In one row they are too tight, in the next one too loose. This is often more noticeable at the left side.
The reason for this lies in the row before. When putting the needle through the stitch in the previous row the yarn is usually too stretched. This little piece of yarn goes unnoticed over into the next stitch, then the next one and so on. This doesn’t stand out within the row, but at the end of the row this “extra” yarn is divided over the last 3 - 4 stitches.
Schöne Ränder stricken Schöne Ränder stricken
Here’s how it’s done
In every row knit the first 3 - 4 stitches very tight and the last 3 - 4 stitches somewhat looser. This way you’re counteracting the chain reaction described above. The too loose first stitches (the last ones from the previous row) are reduced to a normal size if you pull them up a little when you put the needle through the loop. The too tight last stitches (the first from the previous row) are then extended by the “extra” piece of yarn. This little trick has a great effect! With a little practice uneven edges are soon a thing of the past.
Schöne Ränder stricken Schöne Ränder stricken
Edge Stitches
How you knit your edge stitch is left up to you, it doesn’t really make a difference. If you are unsure which one to use, try out the various methods.
Another Tip
In rib patterns it’s often enough to purl one stitch after or before the edge stitch. So if you’re doing knit 2, purl 2, that would be edge stitch P1, * K2, P2* K2, P1, edge stitch, repeating from .
Assess similar and difference stitch and row gauges for different stitch patterns.
Check same elasticity between CO and BO and that it is not too loose or too tight.
Same length between side edges.
KNITTING TIPS
So you can have even more fun knitting in future and the results are even better. Here you’ll find knitting tips to download on a regular basis. These tips - some with descriptive diagrams - can be saved in PDF format, printed and collected.
Basic principles for beginners will be explained as well special professional tricks for those who want to learn more.
gutters/ridges, edge stitches next to selvesdge stitches for even size. Tug on 2nd and 3rd st at beginning of row.
BO: reverse mount the 2nd and 3rd sts on previous row,
Left running strand as M1L and K2tog.
Bring yarn tail through last BO loop.
Check elongated last BO stitch, or knit before purl on ribbing/Cables, or holes on seed stitch. Tug yarn forward completely and nudge base of stitch forward with free index finger to shorten amount of yarn brought forward on first purl after knit.
Check blocked edges are uncurled, flat, square corners, straight rows and columns.
Weave yarn tails away from edge on swatches in duplicate stitch and slightly split yarn on reverse stockinette,
Adjusted duplicate stitch on garter stitch where you duplicate stitch but go up through a frown bump to smile bump on ridge above.
Zig-zag purl bumps finishing w duplicate stitch at top on seed stitch : go through frown of purl bump, locate frown purl directly couple rows above and go through bar on either side of the purl bump then through original purl bump below. The start new purl bump stair step up or down from original purl bump.
https://youtu.be/UgJzfZsPozc
Go up right leg on ribbing.
Cables: check elongated knit before purl and check elongated knit due to slipping stitches. Work on tips.
Consider if CO/BO are included or not when working to a length. Remember that the cable crossing row the stitches are crossed below and then worked so it appears to have one less row below and one more row stitches worked above where stretches cross when balancing vertically.
9/10 Increases
Mirrored Increases use same number of stitches between side and increase, same type stitch, stitches are uniform in size and untwisted, and lean opposite directions. The bar follows the knit stitch so balance horizontally by kfb on last of the edge sts on the right side and on the stitch before the edge sts on left side. M1R/L can mirror placing M1R along right side blended or on left side full fashion. The LIfted Increases can only be made with RLI on right side and LLI on left to mirror each other—if RLI is on leftside, it is ropey and smooth but the LLI on right side the stitches are very bumpy.
Bar Increase place so the bar blends into area of purls.
The bar follows the knit stitch so balance horizontally by kfb on last of the edge sts on the right side and on the stitch before the edge sts on left side.
Be careful that the knit stitch before the bar isn’t too big. On the Kfb, after you knit, tighten it on the needle before you ktbl.
M1R/L leave a small hole at base of increase. Named for direction of elongated stitch. Be careful w M1R that the stitch on the previous row to the right isn’t made smaller when pulling up the bar. Make sts have more even tension, on WS row before increase, make a small yo (opposite mount for the M1R).
M1o, instead of lifting bar onto L needle tip, insert R needle tip front to back into bar between previous row stitches and knit. Can check that you have the correct bar by pulling on the bar and seeing if it tightens the loop on the left needle.
Lifted Increases are most blended. Named for slant of elongated stitch. Lift leg of stitch in previous row so need to have one or more rows between increase rows. Be careful on the LLI, that the stitch before increase is not too large and poofy —after you knit to get to the left leg tighten that stitch up by tugging on the following bar before making the increase. Always work incr/decreases on needle tips.
M1—Make 1: Make a st by inserting the left needle, front to back, under the running thread between the st on the right needle and the next st to be worked. Knit the running thread through the back to create a new st.
Stitch Patterns
Seed Stitch (worked over an even number of sts in the round)
Rnd 1: K1, p1; rep from to end.
Rnd 2: P1, k1; rep from to end.
Rep Rnds 1 and 2 for pat.
Seed Stitch (worked over an odd number of sts in rows)
Row 1 (RS): K1, p1; rep from to last st, k1.
Row 2 (WS): As row 1.
Rep Rows 1 and 2 for pat.
Decreases
Reverse mount the sts for SSK on previous row.
SSP is tidier and closer match to K2tog but on different row
SKP has larger loop than SSK
Use tapestry needle to even out stitch shape and size before blocking.
2 color duplicate stitch cross and continue dup st, one runs upper row and one runs lower row. Light matches top light frowns.
Double YO, work WS purl front leg and purl back leg but twist back leg or it won’t remain as two sts.
Mitten M1O dug out running strand and check that it continues to loop on left needle
Mark cables by full repeats and full multiples without balancing sts. Marking thread goes through frowns of reverse st st on RS
Mark seed skipping first row after ribbing.
Seed start counting with knit stitch and end will purl sts.
RS: frowns are stitches and smiles are running thread between sts. place marking thread above frown above CastOn. And below smile before Bindoff.
Mark sides between selvedge and edge stitches.
Close thumb gusset gaps: lift up running strand, take new working yarn and pick up stitches through center V along CastOn edge, lift up running thread, twist and K2tog with adjacent sts on left needle. Work around, slip last held st to twist running strand, transfer held stitch back and work together as a SSK tbl.
Jogless Jog
https://tkga.org/wp-content/uploads/issue_archives/2012/J...
https://youtu.be/yDNG9b5mj2U
https://www.socknitters.com/kickback/joglessjog.htm
Method 1 (TechKnitter): Knit one round in new color. Then slip purlwise the first color change stitch and move marker to after the slipped stitch. This moves beginning of round one stitch to the left.
Method 2 (Meg Swansen):Knit one round in new color. Lift leg of stitch below first st worked in the new color up on left needle and K2tog with that first stitch.)
Weave in stripe ends: new color is up and woven right to left toward its same-color stripe. Go under old color frown bump (end st of old color on upper row of jog area and last bump row of old color) and up through new color smile which is the 2nd ridge of new color bumps.
Old color tail bring down at angle toward its color stripe; go under frown bump of own old color which is 2nd ridge of old color bumps and up through smile of first new color ridge of bumps.
To understand how this works, let’s take a look at the basic stitch. The knit stitch has a smooth side and a bumpy side. The smooth side of the knit stitch looks like a V. When all the stitches have the smooth side facing to the front, stockinette stitch is the result. The bumpy or purl side of the stitch resembles little bars. If all of the purl stitches face to the front, reverse stockinette is the result.
The tendency of the knit stitch is to curl toward the V side. This curling can be enhanced or reduced depending on how the stitches are aligned. When all of the stitches face the same direction, as seen in stockinette and reverse stockinette, this curling effect is enhanced.
When the stitch curls, it will recede on the V, or knit, side and stand out on the purl, or bar side. This phenomenon also occurs in garter stitch. The rows of knit stitches are curling inward, forcing the purl stitches to stand out. This is why garter stitch appears as ridges.
You will notice in ribbing the exact opposite occurs: purl stitches recede and knit stitches stand out. The curling effect of the knit stitch can be mitigated by placing columns of knit stitches next to columns of purl stitches. By supporting the V both above and below, the curling effect is eliminated, the knit stitch become dominant, and the bar side of the stitch recedes.
Level 2
Swatches 1-9, 12-13, SIS and Q&A
Seaming
https://youtu.be/c4yU2jP15TY
https://youtu.be/KbGOrJbSn7g
https://youtu.be/wMbKET673VQ
https://youtu.be/h9msfPWL9MQ
https://youtu.be/2Y5w5A25OXE
Joining mid row
https://youtu.be/fzhT-Y_9sgU
Enlarged last Bindoff
https://youtu.be/-yzNX5FGQSE
Kitchener in garter st.
https://youtu.be/NOFcIiDg_hI
Cable Flare
Stitch Equivalency. https://youtu.be/TKp-OgRB2EU
Cable Flare Reduction CO.https://youtu.be/I8127E4kDVE
Cable Reduction BO. https://youtu.be/EvKMDdnhY2M
Enlarged k before p. https://youtu.be/ravgF2nmc5I
Chose vest pattern and yarn with oldest son before he headed back to college. Yarn’s on back order.
January 14
Ordered yarn for wristlet and argyle socks
Bought Fingering weight 2 yarn for lace
Swatches 14-19, SIS and Q&A
Pick-up stitches
https://youtu.be/9A1ateS95qY
Picking Up Sts on Curved Edge
https://youtu.be/9A1ateS95qY
Arenda Holladay’s OYWTTM article https://tkga.org/article/picking-up-stitches/
Pocket
https://youtu.be/1Xfsazasx68
https://youtu.be/zQWMOrKmi4k
Buttonholes: knit at tight gauge
https://youtu.be/LqiKTbgvO-o
https://youtu.be/dk4ShgDj6Wo
https://youtu.be/KjZTvCvZwmk
January 21
Swatches 10-11, SIS and Q&A
Chose Superwash wool for lace swatches as the non-elasticity helps open up the yo and the fluidity helps give the lace drape and swing.
I would normally use US6 for working up lace in non-superwash wool. With Superwash fingering weight, I preferred US5 knit at tighter gauge to help give seed stitch structure.
https://www.moderndailyknitting.com/its-not-you-its-the-y…
https://roundtableyarns.com/blogs/knitting-tips-and-trick…
https://pattern-duchess.com/choosing-yarn-for-lace-project/
Wristlet
Used the Purl Long-Tail CastOn with US 2 and Finullgarn by going under finger yarn, down bun finger and thumb pairs to go under the inside thumb yarn, draw yarn through finger loop, take finger out and tighten it.
https://youtu.be/z1iHlK_RfOg
Did not vertically carry up the yarn if it wasn’t used within two rows so it wouldn’t distort the end stitches.
I had 30 ends to weave in. Wove them in with one duplicate stitch to anchor, then weave through a strand’s plies.
Color Dominance https://paper-tiger.net/2013/11/09/stranded-knitting-the-...
Color Hue
Mucklestone https://www.interweave.com/article/knitting/select-colors...
Yarn butterflies for Intarsia or small nostepinne balls.
https://www.edieeckman.com/2019/11/26/how-to-wind-a-yarn-...
Weaving in Ends in Intarsia
https://yarnsub.com/articles/techniques/twist-and-weave-c...
https://youtu.be/gz-itGT2X3w @23 min.
https://youtu.be/53JRY709GAg
https://blog.weareknitters.com/knitting-tips/how-to-perfe...
Twist the yarns before picking up the stitch for the new color--helps in not stretching the stitch. Courtesy of Sally Melville on her Craftsy Intarsia class.
When the heel and gusset are done, stitch up the inseam to ensure I have enough gusset rows to match the instep. Courtesy of Connie Mellette’s Argyle Socks , Cast On Magazine, winter 2003/2004.
When changing colors give the two yarns a slight tug which helps to even the stitch. Rowanknitter
I wove in all of the ends before I joined the stitches in the round. Much easier to weave them in when the fabric is flat. I also wove the last row of color ends right after I knit a few rows in the round--I think this helped when it came time to sew the instep seam--the stitches were already neat and tidy.
Duplicate Stitch: check each stitch as you go along that it covers and even tension/size, and that it is open at the bottom and not Twisted close by inserting needle tip in direction you are going or if vertical, you alternate direction you point tapestry needle. Best working bottom upward.
https://youtu.be/94e_56L-g2U
Heel Flap and gusset
https://www.moderndailyknitting.com/socks-whats-all-the-f...
Cable flare: It doesn’t have to cross on the exact first row or exact last row, but if you cross near the beginning and end it will pull the fabric in rather than splay it out. If the widest part of the pattern is near the beginning it adds to the splay.
It’s in Janet Szabo’s Aran Sweater Book.
Duplicate Stitch argyle lines: you would start 4 separate strands at the top for the lines. So the row starts with one st of color b then work Color mc, add one line st, then a new strand for the other line, continue with the same strand of color mc, one st of color a, a new bobbin of color mc, work with the same color mc, then add two strands for the next two lines , continue with color mc, end with one st of b. A total of 9 separate threads.
I would add that for the lines I used one long strand and folded it in half and started with the middle of it, each end going off to create a separate line. So there were 4 less ends to weave in on that end of the design.
Lace w Seed St Border: I ended up using three different yarns-- mostly to experiment and see how different yarns worked the swatch. Before working the swatch. I worked each yarn in seed st to see what the largest needle I could use and still get decent seed stitch, my criteria was “would this be acceptable on a lace scarf as a border?”
Then I “aggressively” blocked the swatches to open up the lacework.
Pattern writing: when you use repeat symbols, you delineate the multiple that is going to be repeated across the row, with the extra sts out side of the symbols. This shows other knitters where to place st markers when working that pattern. It makes it much easier to visualize the multiples in relation to the row.
eta: sometimes charting the pattern helps you to see the multiples.
A repeat is repeated over rows.
A multiple is repeated across stitches.
Level 3
Brioche tutorial for honeycomb brioche http://www.briochestitch.com/archives/onecolorbrioche/bri...
Suzanne Bryan
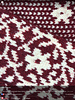
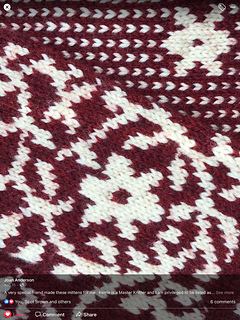
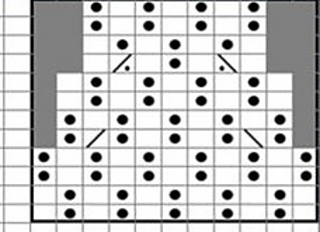
Mosaic Knitting and carrying yarn up sides https://youtu.be/ZnY3qby6mhQ
How to Read Chart in Mosaic —Garter Stitch Base
https://youtu.be/7NYuNudLBNE
Changing Color at Side and Carrying yarn up Side
https://youtu.be/05Xz9ja5kjc
Slip Stitch Knitting and Reading Chart
https://youtu.be/80zBqFUNSNU
Icelandic Bindoff https://youtu.be/PYLBNQCGU7E
Everything about LongTail CO
Stretchy LTCO. https://youtu.be/aPS3OKx1dQ0
LTCO in Pattern. https://youtu.be/t3Jkfjr4JCk
Everything about German Twisted LTCO
https://youtu.be/tLGWXtxEF8w
Twisted LTCO in Pattern https://youtu.be/a3XH8kS_Eks
Italian CO in One Color. https://youtu.be/s_IT9dAvG98
.
2 Elastic Bindoffs K2tog and K2tog tbl
https://youtu.be/k7hTBIp5WBw
.Channel Island CO in Two ways.
tblhttps://youtu.be/YmKBTBbMdaE
Invisible Italian CO for Double Knitting
https://youtu.be/3lrn3qoZzfo
Invisible BO for 1x1, Tubular v Italian
https://youtu.be/p5CB95qtV_I
Invisible BO / Kitchener on One Needle
https://youtu.be/HqBGeKLlucA
How to knit Corregated Ribbing in the Round. Includes the purl edge that looks like a trimI-cord
https://youtu.be/iN4nWJd61Mw
Catching Floats at Edges. https://youtu.be/b2A-aZWpArY
Catching floats in the round. Bring resting yarn under and over working yarn. https://youtu.be/HPGFrdqQR8Q
Catching and Trapping Floats Invisibly
https://youtu.be/0AEfAlLPx4U
Ladderback knitting. https://youtu.be/iLtuGY_M-ds
M1 Increases in StrandedKnitting
https://youtu.be/9k-0LduIU-M
Steek Preparing and Cutting
https://youtu.be/RsIC3woIGxI
Reinforce, cutting, and Picking up Sts from Steek
https://youtu.be/Ln-retrG2Zw
Italian BO for Brioche. https://youtu.be/zmqCMX3W_5I
L and R Twisted Decreases (knit side)
https://youtu.be/BhiyyRFInKU
How to Ktbl and ptbl. https://youtu.be/gioMoxPQWzo
Twisted sts, Bavarian Knitting
https://youtu.be/Hl5-D8Cddpk
Blocking a Sweater Knit in Pieces:
https://youtu.be/jTfLm_NO--Q
Tidy Ribbing in the Round https://youtu.be/32R6S5x14HA
Mattress Seam
https://youtu.be/c4yU2jP15TY
Seaming Garter Rows to Stockinette
https://youtu.be/bpzL0AqEVZs
Mattress Seam in Seed St
https://youtu.be/2Y5w5A25OXE
Seaming Sts to Rows: https://youtu.be/wMbKET673VQ
Seaming Sampler. https://youtu.be/e9Es68bpJK0
Picking Up Sts along Garter Ridge
https://youtu.be/GUVjfGmaWuo
Picking Up Stitches Along a Curve
https://youtu.be/9A1ateS95qY
3-Needle Join in Stst and Garter St, Part 1.
https://youtu.be/fKaF7kH4vL0
Part 2. https://youtu.be/H1SvqM5sk9A
Tubular CastOn in Round for 2x2 Rib
https://youtu.be/q7xq_KxF-6k
Invisible BO Tubular v Italian. https://youtu.be/mvqp8R02RQA
How to Count and Measure Rows to Process v Finished Piece. https://youtu.be/q0csdruMBnE
Lace Basics. https://youtu.be/
Tips for Lace Chart Reading
https://youtu.be/oe9WpgtfUcU
Circular CO for Round Lace:
Pinhole with two circulars
https://youtu.be/LKiyYJNzXus
Pinhole provisional crochet CO
https://youtu.be/fBr7AJtLO4g?si=CkPyfD4hXHW7Mugu
Pinhole w crochet hook
https://youtu.be/4Vkpqdea-6o?si=d_V49D-E0kF6_Bq0
Lace Knitting in Round
https://youtu.be/O7_4yT3elnE
https://ysolda.com/blogs/journal/disappearing-loop-cast-on
https://blog.tincanknits.com/2012/05/25/pinhole-cast-on-t...
YOs in Lace
https://youtu.be/MbDk9spbo6Q
Motion in Lace. https://youtu.be/_5N4OTk_5qI
Pick up Missed YOs. https://youtu.be/apV46rB_yvI
Binding Off Loosely and Weaving Ends in Lace. https://youtu.be/0U2YE5Z7NLM
Measuring Gauge in Lace. https://youtu.be/vthfa8ibP
Central Double Increase. https://youtu.be/kQCO00rr0rg
Central Double Decrease. https://youtu.be/9oBQLjfcXrY
How to SK2P. https://youtu.be/oW0L3-_sf50
Intarsia Basics. https://youtu.be/gz-itGT2X3w
Intarsia. Adding Mult Strands. https://youtu.be/DVlQe4EQ-mc
Intarsia Mult Color Changes btw Sts. https://youtu.be/aFzPtX8NO8o
Intarsia Switching Colors across a Row
https://youtu.be/llPAyKhmvSE
Heather Sorta
Chinese Waitresses CO untwisted
https://youtu.be/W85t2eW66DM
Chinese Waitress CO w Crochet Hook
https://youtu.be/0ED52nFUf00
Chinese Waitress BO. https://youtu.be/DT_qR9Tmakc
Picot CO. https://youtu.be/1V48GE8NSMA
Picot BO. https://youtu.be/7Vik86ibITE
Invisible Ribbed BO. https://youtu.be/rwYWux2XVc0
Channel Island CO. https://youtu.be/jobLBQzyJ_U
Icelandic BO https://youtu.be/HQghOyxd2w8
Entrelac. minimizing Color Peek.
https://youtu.be/Yj3_B9LYVTQ
Entrelac: Picking Up Stitches
https://youtu.be/yVn63RFwkM0
Cutting a Steek. https://youtu.be/DYr8smP_YDw
Nerdy Knitter Tonia
Twisted Decreases
https://toniaknits.com/knitting-twisted-decreases/
Bavarian Diamond and L&R Rope
3 sts before and after selvedge, 2 sts between panels
Start on set up and one central twist before twist at start diamond, rep twice end twist. About 37 rows.
https://youtu.be/Hl5-D8Cddpk
ktbl—Knit through the back loop
ptbl—Purl through the back loop
tbl—through the back loop
Left Twist—(RS) Sl st to cn, hold to front, ktbl, ktbl st on cn. (WS) Sl st to cn, hold to front, ptbl, ptbl st on cn.
Right Twist—(RS) Sl st to cn, hold to back, ktbl, ktbl st on cn. (WS) Sl st to cn, hold to back, ptbl, ptbl st on cn.
Left Twist, purl bg—(RS) Sl st to cn, hold to front, p1, ktbl st on cn. (WS) Sl st to cn, hold to front, ptbl st on cn, k1.
Right Twist, purl bg—(RS) Sl st to cn, hold to back, ktbl, p st on cn. (WS) Sl st to cn, hold to back, k1, ptbl st on cn.


 HeyKerrieAnn notebook
  handspun
 queue
queue favorites
 friends
 needles & hooks
 library