patterns >  Etsy NerdyBirdyco
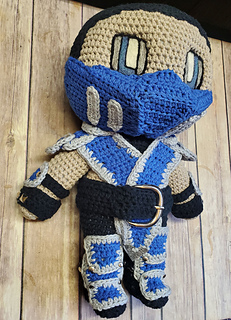
> Amigurumi Sub Zero


Amigurumi Sub Zero
Materials
Yarn, Stuffing, Crochet Hook, Safety Eyes, Felt
Who doesn’t want their very own adorable Subzero to help them protect Earthrealm? I know I did, so I made one and you can too! With this pattern I will walk you through step by step how to make Sub Zero. This is a rather large Amigurumi, he stands at 14 inches tall! But don’t let that stop you! I’ve made this exact same doll with crochet thread. (ya know, to torture myself) The size of yarn, the brand of yarn, none of that matters, as long as you use the appropriate hook size you can make him with extra bulky yarn and have a massive Sub Zero, and if you do, I want to see the pictures!
Everything I used or did is listed below so you know what you’re getting yourself into.
I’m listing this pattern as Intermediate to Expert. It is 44 pages long and a PDF file. It is in US crochet terminology.
If you can’t open the file after you have downloaded it, not a problem, go here and download this so you can see it, It’s free:
https://get.adobe.com/reader/
THIS LISTING IS FOR THE PATTERN ONLY! IF YOU BUY THIS YOU WILL RECEIVE THE DIGITAL FILE TEACHING YOU HOW TO MAKE SUB ZERO, NOT THE ACTUAL DOLL!
All of the information listed below is also listed in the pattern.
Hook size: 3.75mm or a US F-5
Yarn I used:
Sugar n’ Cream – Black, Jute, Dazzle Blue
I Love This Cotton – Dove (also you could leave this color out and make anything calling for silver in black, it would look really good as well)
(The brand of the yarn however does not matter, I like to use cotton yarns when I make Amigurumi, I like the way it looks and feels, but you could use Red Heart, or any other brand that is comparable in size. You will need black, a blue, a silver color, and a light tan.
The main body, head, arms, legs, are all worked in continuous rounds. While I do use a Magic Circle/Ring to start my rounds this isn’t necessary. You can chain two and work all the stitches of your first round into the second chain from your hook.
I also like to use needle felting for my eyes and any facial hair my doll may have, and the completed pictures do show this, that isn’t necessary either. I will show you how to crochet the facial hair or other parts required, and where to place safety eyes. Alternatively you could use felt, cutting out the shapes you need and gluing them on in layers. But, if you want to try your hand at needle felting, I promise it’s super easy, I was terrified of it at first and didn’t want to ruin all the hours of hard work I spent on my creation, but you can do it. I included a short little tutorial at the end of the pattern just to show you how I get the process started.
While the patterns looks as if it might be too complicated and I do list it as Intermediate to Expert, I haven’t used any crazy techniques or hard to understand stitches. However this pattern does not teach you to crochet, you will need to know all the stitches listed below before you can make him.
You will need to know how to:
CH – Chain
SC – Single Crochet
HDC – Half Double Crochet
DC – Double Crochet
BLO – Back Loops Only
FLO – Front Loops Only
DEC - Decrease
INC – Increase
* * - Repeat
Some optional things to know:
M/C - Magic Circle
FHDC – Foundation Half Double Crochet
(I will give you to alternatives to these where it is necessary)
I’ve also used some other optional materials. You don’t need them. They were simply for decoration and if you planned on making this for a child I wouldn’t recommend using them. But I will show you pictures of what I have used and where. Everything I did use I picked up at my local craft stores or it could easily be ordered online. I will give you alternatives as we go.
162622 projects
stashed
90026 times
- First published: December 2019
- Page created: December 18, 2019
- Last updated: May 1, 2022 …
- visits in the last 24 hours
- visitors right now


