

 Champagne Anarchist
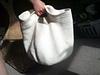


Champagne Anarchist Bag
You will need:
• F5/3.75mm crochet hook or size needed to obtain gauge
• yarn needle to weave in ends
• 5 balls of 70g/110m Sugar & Cream yarn Doesn’t have to be this brand, but it should be cotton (or linen or jute or another plant fibre that won’t stretch -- quirky ones like paper will probably be fine, too) and “category 4” weight, like worsted or aran or else you will need to use a differently sized hook and your bag will turn out a different size.
Gauge: 18.5 sts x 18 rows = 4”/10cm of sc worked in the round in a spiral (exact gauge is not hugely important, but you want your work to be tight)
Intro: Basically, you are going to crochet a flat circle to a certain diameter (this is the base of the bag, like a big crochet plate) and then you are going to continue to crochet in the round a bunch of times so the outer edge of the “plate” will kind of curve up into the side of a cylinder. We’re leaving some gaps for the handles, then continuing the cylinder until the end of the bag.
I staggered my increases so the shape of the base stays circular, because if you do, say, 8 increases per round for a great number of rounds, the shape will end up a bit octagonal. This is not a huge deal, just a matter of personal preference. If you don’t like the way I did the increases, do them a different way. As long as you end up with a flat plate-shaped piece with a diameter of x=144/162 stitches at the end of round y=21/24, you’re good to go.
If you want your bag to be smaller, stop increasing sooner and if you want your bag to be bigger, add more increases at the end of the increasing section.
If you want the bag deeper, do a few more rounds before you make the handles (round 60/70). If you want the handles wider or narrower, adjust the number of rounds after round 60/70.
Want longer handles? Ch a few more stitches in round 60/70.
This pattern is so easy to customise. I’ve added photos of other bags I’ve done all in the same way, but differently sized.
Notes:
You will be crocheting in the round in a spiral -- use a stitch marker to keep track of your rounds. place your stitch marker into the last stitch of the previous round and move it up as you complete each round
After the first round (the magic loop round) begin crocheting over the tail until a few cm remain, then begin crocheting over a second strand from now on (this is a good alternative to weaving in your tail -- crochet over it until a few stitches before it is going to run out and then add a second strand -- for more information on this technique, google tapestry crochet) -- this will add strength and structure to your work.
If you want to do the striped version, attach another colour (anywhere on the outer round except in the stitch you’re working on in the original colour!) and start crocheting. When you get to where the original colour working stitch is, start crocheting around in that colour until you reach the new colour again, then start crocheting in the new colour. You are basically crocheting two spirals at once. Keep going around like this for as much or as little as you like -- if you want to end the stripe before the bag is done, make your last stitch a sl st and when you get to that stitch with the original colour, you just crochet right over that sucker and then keep crocheting around in a spiral just like you did at the beginning of the bag.


