

 Knit Picks Website
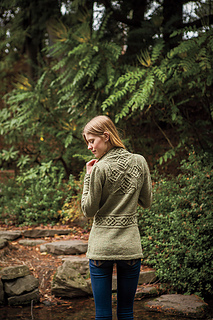


Dealla Cardigan
Featuring a cabled medallion on the upper back and cabled bands, edgings and waist, the Dealla Cardigan is a rich and luxurious knit. Make it in a jeweled color for an elegant look, or a bright color for an unexpected twist. Any way you make it, the Dealla Cardigan will be the pièce de résistance of your wardrobe.
2/10/2017: If you have purchased the pattern after this date, corrections have been made. The only error is in the legend, the 2/2 RPC and 2/2 LPC directions are reversed.
Errata:
Legend:
The empty box symbol should be knit on RS, purl on WS.
The dot symbol should be purl on RS, knit on WS
In the far right column, the third stitch from the bottom is 2/2 LPC not 2/2 RPC.
The 3-stitch cables on Row 5 & 25 of the Cable Panel Chart are missing from the Legend. They are:
2/1 LPC:
Sl 2 sts to CN and hold in front of work, P1, K2 from CN.
2/1 RPC:
Sl 1 st to CN and hold in back of work, K2, P1 from CN.
Cable Panel Chart:
Rows 22 and 24, stitch #18 should be purl
Row 25: P3, 2/1 RPC, 2/2 LPC, p1, 2/2 RPC, 2/1 LPC, p3.
Medallion Chart:
Rnd 8, stitches 24, 25, 27, 28 (the 1/1 cables on the previous round) should be knit, not purl.
Rnd 21, the last 15 sts should be: 2/2 RPC, 2/2 LPC, 2/2 RPC, p3.
Lower body increase row: The asterisk is missing, and should be at the beginning of the instruction.
FAQs
21 sts cast-on for the waistband is correct. While the cable panel chart eventually becomes 21 sts wide, it begins with 17 sts, so you will be able to work edging plus the chart.
“No stitch” literally means there is no stitch to be worked in that box, so move on to the next stitch. “No stitch” boxes are necessary because the number of stitches varies from row to row.
The button loop instructions can be found in the Notes section.
RLI and LLI instructions can be found in the Notes section. A tutorial for working lifted increases can be found on my website
107410 projects
stashed 81829 times


