

 Melisa Guerra's Ravelry Store


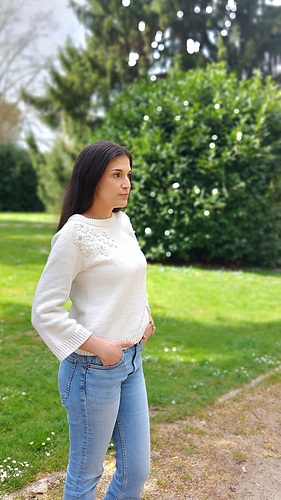

Hana
NOTA
Este patrón contiene vídeos de apoyo.
El jersey Hana se teje sin costuras de arriba a abajo usando agujas circulares.
El cuello se teje doble, al terminarlo, se aumentan algunos puntos repartidos (en algunas tallas) y se hacen algunas vueltas cortas a un lado y a otro para conseguir un escote más alto por detrás y más bajo por delante.
Se continúan haciendo aumentos repartidos por el canesú para conseguir los puntos necesarios para cada talla, al terminar el canesú las mangas quedan en espera se añaden puntos en la sisa y se sigue con el cuerpo en circular hasta llegar al elástico.
Al finalizar el cuerpo se empieza el bordado y al terminarlo se retoman las mangas levantando puntos en la sisa, se continúa tejiendo la manga recta en circular.
TALLAS
1, 2 (3, 4, 5) 6, 7 (8, 9)
MEDIDAS AL FINALIZAR
Circunferencia de pecho: 84, 92 (100, 106, 115) 125, 134 (144, 153) cm
MATERIALES
Agujas circulares 3mm
Agujas circulares 3,5mm
1 marcador para inicio de vuelta (MIV)
8 marcadores para vueltas cortas
BORDADO:
Tijeras
Aguja de coser
Hilo crudo
53 perlas
Rotulador borrable con agua
Autoadhesivo para bordar soluble al agua
LANA
Comfort Cashmere de Katia 94m/50g.
10,12 (13, 14, 14) 15, 16 (18, 19) ovillos col 60 crudo.
MUESTRA
10 x 10 = 23 puntos x 34 vueltas, tejido en punto liso con aguja de 3,5mm.
NOTE
This pattern contains help videos.
Hana sweater is knitted seamless in the round from top down, using circular needles.
The collar is worked double. When finished, increase a few stitches evenly (in some sizes) and make a few short rows on both sides to achieve a higher neckline at the back and lower
at the front.
Continue making increases around the yoke to get the stitches needed for each size.
When the yoke is finished, the sleeves are put on hold. Stitches are added to the armhole, and the body is continued in circular until the rib is reached.
When the body is finished, the embroidery is started.When finished, the sleeves are picked up by picking up stitches at the armhole. Continue working the sleeves straight in the circular.
SIZES
1, 2 (3, 4, 5) 6, 7 (8, 9)
FINISHED MEASUREMENTS
Circumference under arm: 33, 36.2 (39.4, 41.7, 45.3) 49.2, 52.7 (56.7, 60,2)” / 84, 92 (100, 106, 115) 125, 134 (144, 153) cm
NEEDLES
Circular needles US2.5 / 3mm
Circular needles US4 / 3.5mm
OTHER NOTIONS
1 marker for beginning of round (BOR)
8 markers for short rows
(for embroidery):
Scissors
Tapestry needle
Ivory sewing thread
53 pearls
Water-soluble marker
Water-soluble embroidery paper
YARN
Comfort Cashmere from Katia 103yd / 94m-50g.
10,12 (13, 14, 14) 15, 16 (18, 19) skeins col 60 ivory
GAUGE
4 x 4 / 10 x 10 = 23 sts x 34 rows on US4 / 3.5mm in stockinette stitch.
210 projects
stashed 144 times
723 projects
stashed 630 times
425 projects
stashed 286 times


