

 Tinna Thórudóttir Thorvaldsdóttir's Ravelry Store


Indiana Afghan
pattern available here:
https://tinnacrochet.com/collections/all
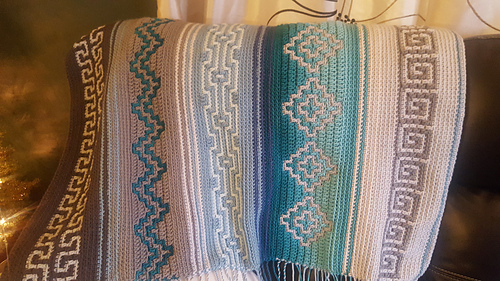
The Indiana Afghan is a very versatile mosaic crochet blanket pattern, that can also be used for many other projects like purses or pillows.
Yarn
Aran or worsted weight yarn.
For example, if using Stylecraft Special Aran (100 % acrylic, 100 g = 196 m), you will need a total of 23 skeins. 15 skeins for the body of the blanket, and 8 skeins for the border (6 skeins of color A and 2 skeins of color B).
Or, if using Caron One Pound (100% acrylic, 453 g = 742 m), you will need a total of 3.050 g. 2.200 g for the body of the blanket and 850 g for the border (700 g of color A and 150 g of color B).
Or approx. 12 cakes of Plotulopi from Istex.
For my blanket I used 1 ply Plotulopi from Ístex. This is pure, unspun Icelandic wool that comes in cakes. I am aware that this yarn is not in common use out of Iceland, but here we use it quite a lot. Since it is unspun it can be a bit tricky to get the hang of working with it because it breaks very easily. This is not a problem when you get used to working with it because you can just as easily twist it together again. My favourite quality of the plotulopi is that since it is unspun, it is extremely light weight, although you work it with hook no 5 mm. The mosaic crochet technique gives a very dense texture and I really like how light this big mosaic afghan is using this yarn.
You can of course use another yarn types, but if you want to make a single bed blanket like this one, take into consideration the gauge given here.
Size
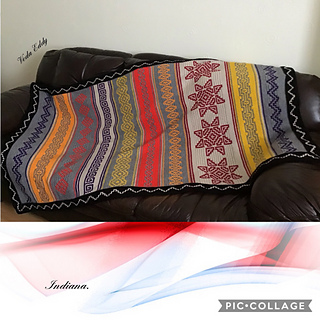
My Indiana Afghan is a bedspread that fits a single bed. Once the blanket is blocked it measures 2,10 m (83”) long and 1,30 m (51”) wide, including the border. You can easily make an Indiana bedspread for a queen size bed by doubling the cast on stitches and the repetitions.
The afghan is composed of 8 patterns, and patterns 1-7 all work with a repetition of 24 stitches. If you would like to make a blanket with a different gauge or size, you can cast on multiples of 24 + 4 chain stitches and work the first 7 patterns according to the charts. The eighth pattern, the big stars, does not work with this multiplication unless making more modifications.
I’d also like to point out that you can use this pattern for multiple projects, working only one or more of the eight patterns. For example, many of my students have made cushion covers with the Indiana patterns, which is a great way to practice the technique with a smaller piece to begin with and for measuring the gauge if you want to try it with another type of yarn. If you want to work the pattern into rounds, you can also use all the Indiana patterns and combine them with my Mosaic Purse pattern or my Deep Sea Handbag pattern, both available in my Ravelry Store.
If you want to change the length of the blanket you can of course do that too. In my afghan I work all the eight patterns and then repeat the first two. I also work 14 SC rows between each pattern. This is of course optional, and you can choose to work more, or less single crochet rows between your patterns than I did. Or even skip these rows and/or some of the patterns. But, bear in mind that the magic number for the starting stitch count for the border must be a multiplication of 12 + 5 and that you will have to take that into consideration if you plan on mixing it up a bit! You will want to have a final row count that matches that number, or close to that, so you can then easily adjust your stitch count in the first rounds of the border.
General Instructions
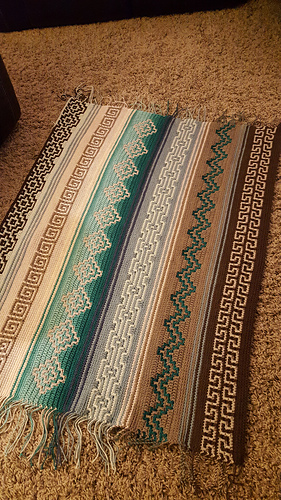
The blanket is all worked from the front side, from right to left, so at the end of each row you break off the yarn. Therefore, there are lots of ends. You can either choose to work on your Zen and weave them all in like I did, do the twisted fringe or you can work the double border and hide the ends inside the border.
This pattern consists of 8 mosaic patterns. I personally much prefer working with charts; and in the Indiana Afghan pattern I opted to use charts instead of written instructions. The first pattern and the border come with written instructions, but pattern 2-8 are shown in charts. To help you along, if you are not used to working with charts, I always write up the second row of each chart. You will find this under each chart.
also, see my YouTube tutorial on how to work with my charts here:
https://www.youtube.com/watch?v=XHdgBFQ0BRg&t=564s
Border, Tails & Fringe
Since the whole blanket is worked from right to left and you always break off the yarn at the end of each row, there are seemingly endless ends to deal with! Now, to every problem there is a solution.
First of all, there is always the option to just make a fringe with them, then I especially recommend using the twisted fringe method, that gives a great finishing look. If you choose to make a fringe, then decide how long you want it to be and always leave a tail at the beginning and the end of each row according to this. I recommend leaving approximately 20 cm (8”) tails for the fringe if you’re making a big blanket. Also take into consideration that the fringe ends up shorter then the tails, after twisting them together.
I designed my blanket with a double border to get rid of all the ends, that way all the ends get sandwiched inside the border. If working the double border, it’s enough to leave a tail of 10 cm (4”) at the beginning and end of each row. In the double border included in this pattern; the backside is worked with DC’s and the front side with SC’s and the mosaic technique. The double border really gives a beautiful finish and my recommendation is to either work the double border or the twisted fringe.
Another option is to either just work on your Zen and weave in your ends as you go (in the end this probably doesn’t take any longer to do then to work the back side of the double border!), or always crochet over your tails, both at the beginning and end of each row. This later method does give a slightly thicker texture on the edges where you do this. And you could experience some stretching in the pattern themselves near the edges as well. I personally found this stretching unacceptable, but that may be a matter of opinion and obviously this saves you a lot of work later. If you go for either one of these options, you can still work the mosaic border and just work the front side of it. Saving both the time and yarn it takes to work the backside.
For visual aide on how to work the border, and maybe decide which way you want to go with for the border before you start, check out my YouTube tutorial: Havana CAL –Double border and tails.
https://www.youtube.com/watch?v=QUYGnsrgK0Q&t=41s
If you need any help with the pattern, please join us in my Facebook group, where me and my wonderful admin team will be happy to help you!:
19593 projects
stashed 15470 times
10742 projects
stashed 5092 times


