

 YarnZooCrochet


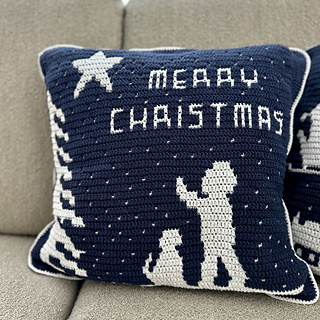


Overlay Mosaic Christmas
MERRY CHRISTMAS PILLOWS
Overlay Mosaic Crochet
In addition to all other Christmas decorations, the Christmas pillow is a perfect addition to your sofa. It adds that extra festive touch, while also being comfortable to lean on and durable enough to handle some wear and tear.
Materials for All 4 Sides:
- Scheepjes Softfun 2401 Prussian, 600 grams
- Scheepjes Twinkle 901 White, 300 grams
- Crochet hook: 4 mm and 3.5 mm (for the border)
- 2 inner pillows: 40x40 cm
- Tapestry needle
Pattern Explanation:
- Border stitch with Prussian: This symbol appears at the start of the row and indicates which color to use. It is very important.
- Border stitch with White: This symbol appears at the start of the row and indicates which color to use. It is very important.
- Double crochet in the front loop of the previous row with Prussian: These only appear in a square with the color of the row you’re currently working on.
- Double crochet in the front loop of the previous row with White: These only appear in a square with the color of your current row.
- Single crochet in the back loop with Prussian: The color of the square doesn’t matter. You work one color per row, so you can work a single crochet in a square of the other color.
- Single crochet in the back loop with White: The square’s color doesn’t matter. You work one color per row, so you can work a single crochet in a square of the other color.
You alternate the color of each row based on the edge stitches. You crochet from right to left and fasten off the yarn at the end of each row. There’s no need to weave in the ends, as a border will be added later to cover them. The two sides of the pillow will be joined together, and the yarn ends will be hidden inside. The border is crocheted with the 3.5 mm hook.
Envelope Border
Preparation (with Prussian):
Start by tying together the two threads next to each other. Then, cut all ends so that they are only a few centimeters long.
Crochet slip stitches along all the sides of the pillow cover. Work the slip stitch into the edge stitch along the sides. Pull the yarn towards you through the edge stitch so that the yarn you are working with is at the bottom. You will see a slip stitch on the right side and a loop on the back. The double crochets will be worked into this slip stitch later. Be careful not to crochet too tightly.
If you’re looking for videos on the envelope border, there are tutorials on YouTube. We will only do a half envelope border for each pillow cover, as the two pillow covers will be crocheted together.
We can begin crocheting the border once this preparation is done (with Prussian). We will do this with double crochets, closing it off with single crochets. The double crochets will be made using a smaller hook to avoid the border becoming too bulky. Start with T1 at the front of the pillow cover, crocheting through the loop of the slip stitch. For a neater finish, begin 6 stitches away from the corner. Finish the round with a slip stitch, and begin the next round with 2 chains to count as the first double crochet.
Border (with Prussian):
- T1: Crochet a double crochet into each slip stitch. The first double crochet consists of 2 chains. Insert the hook under the slip stitch towards the outside. Crochet a double crochet into each slip stitch, but in the last slip stitch of each corner, work 2 double crochets, and also 2 double crochets into the first slip stitch of the next side. This helps create a smooth corner. Finish with a slip stitch.
- T2: Crochet 2 chains to count as the first double crochet, then crochet a double crochet into each double crochet. To create a smooth corner, work 2 double crochets into the last 2 stitches of the corner, and also 2 into the first 2 stitches of the next side. This means you’ll have 8 stitches in the corner. Finish with a slip stitch.
- T3: Crochet 2 chains to count as the first double crochet, then 1 double crochet into each stitch. In the corners, repeat what you did in T2. Work 2 double crochets into the last 2 stitches of the corner and 2 into the first 2 stitches of the next side. Finish with a slip stitch. Fasten off.
Joining the Edges (with White):
Crochet the edges of the two pillow covers together with white.
There are two versions of the patterns: a chart and written instructions. In the written pattern, the following abbreviations are used:
- SC: single crochet in the back loop
- DC: double crochet in the front loop of the previous row
- BS: border stitch, start the row with a standing single crochet through both loops of the first single crochet of the previous row (also a border stitch). End the row with an edge stitch by making a single crochet through both loops of the last stitch of the previous row. Then chain one, pull the yarn through the loop, and cut it (leave about a 2 cm tail).
3320 projects
stashed 2823 times
272 projects
stashed 287 times


