

 Girly Knits: Knits for Hip Chicks


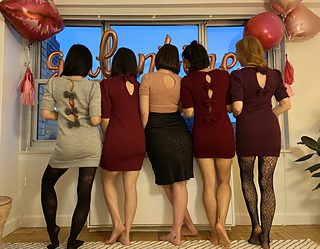

"Put a Bow on It" Dress
Written for a mid-gauge knitting machine (I used my LK150). For the hand knitting version of this design go here. For the sweater version of this design go here. To see all of my machine knitting patterns go here!
1020 (1070, 1120, 1170, 1220, 1270) (1320, 1370, 1420, 1470) yards / 935 (980, 1025, 1070, 1115, 1160) (1205, 1250, 1300, 1345) meters of Worsted Weight Yarn to fit a 32 (34, 36, 38, 40, 42) (44, 46, 48, 50) in Bust / 34 (36, 38, 40, 42, 44) (46, 48, 50, 52) in Hips.
Give them a peek of just how cute you are in this adorable bow back dress! Featuring delectable puff sleeves and darling keyholes and bows to adorn your back side, you are sure to turn heads in this eye catching ensemble. Putting a bow on it just makes everything better, and with this dress you will have the chance to!
This dress was designed to be totally customizable to suit your unique preferences and make it your own. The scoop neckline can be made higher for more modesty, the sleeves can be made as long as you like, and the dress length is knitted custom to you. There are also 3 keyhole options - 3 keyholes/3 bows, 1 keyhole, or no keyhole. The middle bow is designed to cover your bra closure, with markers placed as you go to make finishing this dress as easy as can be.
The sleeve is magical in that it is super easy to seam on! I designed it so that it fits perfectly into the shoulder and you can just seam it on without any special placement, and I even have a video showing you how I do it.
This pattern is designed for the beginner machine knitter, and is filled with up close photos and explanations of all techniques used. I’ve also got a video series walking you through the neckline and shoulder shaping, neckband, and sleeves so you can make it alongside me here! A video is also included for exactly how I make the keyhole back and attach the bows here.
Enjoy!
39657 projects
stashed 29219 times


