patterns >  Megsy Stylish's Ravelry Store
> The Ava Rainbow Tuck Blanket


The Ava Rainbow Tuck Blanket
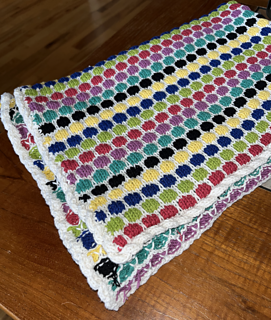
The classic multicolor and white tuck baby blanket. Made using Bernat Cotton-ish, now discontinued, sadly. Why do the best yarns go away? There are some decent substitutions available: https://yarnsub.com/yarns/bernat/vickie_howell_cotton_ish
KX-350 XXL (extra needle bed section added) or any mid-gauge machine. I used T5 with my yarn. Make a swatch and wash and dry it, especially if you are using a cotton yarn that blooms - the Cotton-ish I used did.
A regular KX-350 or LK 150 is probably wide enough, as we know tuck s-t-r-e-t-c-h-e-s widthwise - a lot!
Size is also up to you, mine blocked out at 36”w x 42” long.
Here is a good size reference from the esteemed Cheryl Brunette of Bond Knitting Machine fame: https://www.cherylbrunette.com/wp-content/uploads/2016/03...
A total of seven colors used, plus white. Happens to have been the stash I had on hand. Well less than half of each of the seven color skeins used; a tiny bit more than one skein of the white used; both for the body and two rows of single crochet around the edge.
The third iteration of this blanket was edged with the famous “Worm” or “Piecrust” edging - super easy, took less than an hour to do the whole blanket, and used about half a skein of the white. Changed the tension to T4 for the edging - looked better that way.
From http://machineknittingismylife.blogspot.com/2015/02/the-p...
“To make this you are going to take your project off the machine. Then (with the wrong side facing) rehang 3 complete stitches from the edge of the project that you want to edge. Knit 6 rows. Then, rehang the next 3 stitches on top of the 3 stitches on the machine. Knit another 6 rows. Continue in that fashion all the way around the edge. When you are finished you will have an edging that looks similar to a pie crust.” To go around the corners of the blanket, I knitted eight rows in one or two of the loops to help it wrap around the corner.
Cast on your stitches with your “background” color - I use e-wrap and then two rows of stockinette. You want a stretchy cast-on, to accommodate the tuck stitch stretch. Since it is a tuck pattern, you will want to hang lots of weight, with extra claw weights in each end.
Easy tuck pattern, using the provided 3 x 1 selection tool that comes with the KX-350. Alternate each set of tucks. Like this:
----.---.---.---.----
--.---.---.---.---.--
Select each fourth needle (dot) and push all the way out to hold.
I marked my needle bed in the center and the ends with two different colors of washable markers. Set up your needle count so that there are two un-tucked needles at each end of one set of selections, and four un-tucked needles at the end of the other set. No tucked stitches on the ends!
Set your carriage to Hold in both directions. Knit one row; on the way back to the end of the second row, stop, pull all needles out to hold, and weave your end into the first twelve of so needles. DO NOT FORGET to push the non-tucking needles back into working position - you still want those last three tucks to form.
Knit two more rows, for a total of four rows of color. Cut a long enough tail of your color to weave in later.
Switch your carriage back to Normal in both directions. Two rows of background color in between each set of four tucks.
Careful!! First row of background color - knit slowly, and pull lots of slack in the yarn. Frequently, the stitches on either side of the four row tuck will not knit correctly - look down the row carefully and reform these stitches as needed. After the first row is knitted, pull out a dozen or so needles on the end where the color tail is and weave the tail in. If you take the time to do the starting and ending tail with each color, you will have much less work to do to when finishing.
Since there are a lot of stops and starts of color, you might wish to alternate the side that the colors start on. Otherwise, all the tails end up sewn in on one side of the blanket.
Since there will be a lot of background color loops on one side, I did one row of single crochet around the entire blanket. Definitely helps stabilize the shape before you start the piecrust edging.
Washed at medium temperature and dried until still a bit damp. Gently ironed with my iron set on Cotton - don’t squash the tuck bubbles! - and barely killed the piecrust edging - didn’t need much, as the piecrust edging seems to kill most of the edge roll.
Infinite variations on this theme are possible! Next time I want to try a black background.
2657 projects
stashed
1628 times
- First published: March 2022
- Page created: March 7, 2022
- visits in the last 24 hours
- visitors right now

