

 Esti Juango's Ravelry Store


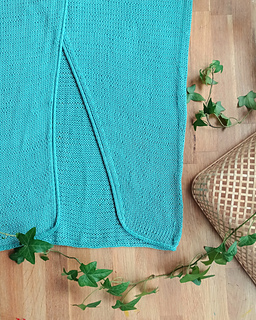


Ura skirt
Knitting goes beyond winter sweaters, how about knitting something for a special occasion? This skirt is designed to combine with a special top. You can wear them both to a special event, as well as in your day to day life. Knitwear is so comfortable, it caresses your skin and you won’t want to take it off.
Difficulty Level
Beginner – adventurous beginner
Pattern has been tech edited and tested
Perfect for a special occasion. Combine it with Aire tee
What do you need to know?
To knit, purl, make increases and decreases. Skirt is worked flat. Only waistband is worked in the round, but can be easily adapted to work flat.
Materials
- Yarn: Katia Tencel-Cotton: 50gr, 120m (131 yds). 67% Lyocell - 33% Cotton
- Amount: 6 (7, 9, 10, 11) skeins of 50gr Total in meters: 720 (840, 1.080, 1.200, 1.320) m Total in yds: 786 (917, 1.179, 1.310, 1.441) yds
- 4 mm (US 6 ) needles
- 5 Markers
- Stitch holder or waste yarn
- Tapestry needle
Gauge
In a 10 x 10 cm(4 in x 4 in) square you should have 19 sts and 25 rows. Knit the swatch with stockinette stitch and block it.
Construction notes
Skirt is worked top down. Start at the waist and work your way down to the hip. From here, decrease the sts to shape the sides and the front crossover. To form the waistband, position the front crossover well and pick up the sts. Work the waistband to be able to insert an elastic band to hold the skirt in place.
There are 3 sections in the pattern:
- Section 1 - Waist-hip: Make increases until reaching hip circumference.
- Section 2 - Hip-final length: We continue with the decreases until the end.
- Section 3 - Closing and finishing.
-----Español/Spanish-----
Inspiración
El punto va más allá de los jerseys de invierno. ¿Te parece si tejes algo para una ocasión especial? Esta falda está pensada para combinarla con un top especial y poder lucirlos tanto en un evento especial, como en tu día a día. Las prendas de punto son tan cómodas, acarician tu piel y no querrás quitártelas.
Perfecta para una ocasión especial. Combínala con Aire tee
Nivel de Dificultad
Fácil – Intermedio
El patrón ha sido editado técnicamente y testeado.
Requisitos previos
Saber tejer derecho, revés, hacer aumentos y disminuciones. La falda se teje en plano. Solo una parte de la cintura se teje en circular, pero puede adaptarse fácilmente a tejer en plano.
Tallas
Disponible cinco tallas 1 (2, 3, 4, 5) con contorno de cintura de 66 (72, 78, 88, 98) cm y contorno de cadera de 88 (98, 114, 126, 140) cm.
Materiales
- Hilo: Katia Tencel-Cotton: 50gr, 120m (131 yds). 67% Lyocell - 33% Algodón
- Cantidad: 6 (7, 9, 10, 11) ovillos de 50 gr Total en metros: 720 (840, 1.080, 1.200, 1.320) m
- Agujas de 4 mm
- 5 Marcadores
- Imperdible o hilo adicional para dejar p en espera
- Aguja lanera
Tejido de Muestra
En un cuadrado tejido de 10 x 10 cm obtendrás 19p por 25 pas con una aguja de 4 mm.
Notas de construcción
La falda esta tejida de arriba abajo. Se inicia por la cintura y se va aumentando hasta llegar al contorno de la cadera. Desde aquí se irán disminuyendo los p para dar la forma a los costados y al cruce delantero.
Para formar la cintura, se posiciona bien el cruce delantero y se recogen los p. Se trabaja la cintura para poder insertar una goma que dé sujeción a la falda.
En el patrón encuentras 3 secciones
-
Sección 1: Cintura-cadera. Inicio hasta llegar a la altura de la cadera
-
Sección 2: Cadera-longitud final. Continuamos con las disminuciones hasta el final.
-
Sección 3: Cierre y acabados.
555 projects
stashed 412 times


