

 DorothyF's Ravelry Store
Wingfeather Saga Sea Dragon
Wingfeather Saga Sea Dragon
This pattern makes a soft toy dragon modeled after the dragons found in the Wingfeather Saga book series, although this pattern would also work for a generic sea dragon. An optional wire addition makes the dragon posable and wearable.
The finished project is approximately 28 inches long.
Supplies:
• Whatever yarn you’d like in two colors, one for the body (C1) and one for fins and accents (C2). The amount varies based on how long you want your dragon to be, but the amount you’d need for one and a half socks or mittens should be about right.
• 4 double pointed needles, size 4 (or whatever size best fits your chosen yarn)
• Yarn needle
• Stuffing
• Pieces of white and black yarn or embroidery thread for the eyes; alternatively, plastic toy eyes
• A piece of flexible wire just shorter than your finished dragon (optional)
Skills needed:
• casting on and off on
• knitting in the round
• ichord knitting
• Kitchner stitch
Notes:
• This pattern is knit in the round, tail to nose.
• Don’t worry about gauge, just use the right size needles for your yarn so no stuffing shows through the stitches. Smaller yarn and needles will make a smaller dragon, and larger will make a larger product.
• When knitting in the round I use the M1L and M1R increase method. You can just kfb, but I find it leaves an unsightly lump in the finished work.
• There are many options for back decorations for your dragon. If you want it to look more Wingfeather Saga-ish then try the ichord or plain method.
• If you’re not familiar with the Kitchner stitch or French knots, there are lots of good YouTube videos and blog posts that explain them. That’s how I learned.
Tail:
You can knit this part of the tail in either C1 so it matches the body, or C2 as an accent piece.
Cast on 2 stitches. Knit flat.
1) Knit across.
2) K1, kfb (3)
3) Knit across
4) K2, kfb (4)
5) Knit across
6) K3, kfb (5)
7) Knit across
8) K4, kfb (6)
9) knit across
10) knit across
11) cast off until you have two stitches left, knit to the end (2)
12) knit across
13) knit across
14) K1, kfb (3)
15) knit across
16) K2, kfb (4)
17) knit across
18) K3, kfb (5)
19) knit across
20) K4, kfb (6)
21) knit across
22) K5, kfb (7)
23) knit across
24) K6, kfb (8)
25) knit across
26) K7, kfb (9)
27) knit across
28) knit across
29) Cast off until 2 stitches remain, k to the end (2). At this point, if you’ve been using C2, switch to C1.
30-32) ichord for three rows
33) K1, M1L, K1 (3)
34-36) ichord 3 rows
37) K1, M1L, K2 (4)
38-40) join in the round and mark the beginning with a stich marker. Knit three rounds.
41) K1, M1L, K3 (5)
Continue in this way, knitting three rounds and making one stitch on the 4th round, stuffing as you go, until you have 15 stitches evenly divided between three needles.
Continue knitting until your dragon measures 12 inches from the tip of the tail, stuffing as you go.
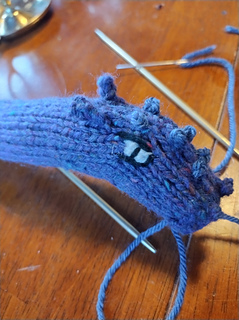
Back fins:
1) K5, CO4, turn knitting and knit the 4 cast on stitches, yf, transfer the 4 stitches on the right needle (the ones you just knit) to the left, turn and continue knitting in the round on the next needle: K10, CO4, turn knitting and knit the 4 cast on stitches, yf, transfer stitches from right needle to left, turn knitting. (23)
2) K9, turn knitting and working back down the same needle: k2tog, K2, yf, transfer the 3 stitches from right needle to left, turn and continue knitting in the round on the next needle: K14, turn knitting and k2tog, K2, yf, move stitches from right needle to left, turn knitting. (21)
3) K8, turn knitting and working back down the same needle: k2tog, K1, yf, transfer the 2 stitches from right needle to left, turn and continue knitting in the round on the next needle: K13, turn knitting and k2tog, K1, yf, move stitches from right needle to left, turn knitting. (19)
4) K7, turn knitting and working back down the same needle: k2tog, yf, transfer the stitch from right needle to left, turn and continue knitting in the round on the next needle: K12, turn knitting and k2tog, yf, move stitches from right needle to left, turn knitting.(17)
5) K4, k2tog, K9, k2tog. (15)
Continue knitting in the round until your entire work measures about 24 inches, or until the body of the dragon is about 6 inches shorter than you want your finished project to be. Stuff the dragon’s body as you knit.
Throat and horns:
With your 15 stitches divided evenly among three needles, beginning the round by knitting across the dragon’s belly and then up and over its back:
1) K1, P1, K1, P1, K11
Repeat row 1 and knit this way for three (3) inches.
2) K1, P1, K1, P1, K1, M1R, K10, M1L (17)
3) K1, P1, K1, P1, K5, cast on 3, turn knitting and knit the three cast on stitches, yf, transfer the three stitches from the right needle to the left, turn and continue knitting in the round on the next needle; K2, cast on 3, turn knitting and knit the three cast on stitches, yf, transfer the three stitches from the right needle to the left, turn and continue knitting in the round on the left needle, K5. (23)
4) K1, P1, K1, P1, K9, turn knitting and K2tog, K1, yf, transfer the two stitches from the right needle to the left, continue knitting in the round on the next needle; K5, turn knitting and K2tog, K1, yf, transfer the two stitches from the right needle to the left, turn knitting and continue knitting in the round on the left needle, K5. (21)
5) K1, P1, K1, P1, K8, turn knitting and K2tog, yf, transfer the stitch from the right needle to the left, turn and continue knitting in the round on the next needle; K4, turn knitting and K2tog, yf, transfer the stitch from the right needle to the left, turn and continue knitting in the round on the left needle, K5. (19)
6) K1, P1, K1, P1, K5, k2tog, K2, k2tog, K4. (17)
Head: continuing on -
7) K1, P1, K1, P1, K13. (17)
8) M1R, K1, P1, K1, P1, K1, M1L, k2tog, K8, w/t, P7, w/t, K6, w/t, P5, w/t, K4, w/t, P3, w/t, K2, w/t, P1, w/t, K4, k2tog. (17)
9) K2, P1, K1, P1, K12.
10-16) Repeat row 9
17) Knit 3, k2tog, K9, off 3 (along the side of the dragon’s snout), K4 (leaving 5 stitches on the needle), cast off 3, K4 (leaving 5 stitches on the needle).
20) Working only the 5 stitches on the top needle, purl back across
21) knit across
22) purl across
23) knit across
24) purl across
25) knit across
{If you want to have a posable dragon, now is the time to add your wire. Insert your wire near the spot in the tail where you started working in the round and work it all the way up the body until it comes out the mouth. Bend the tail end of the wire into a circle, work it into your stuffing until it disappears, then stitch it in place. Snip off the mouth end of the wire so it’s just shorter than your dragon, then bend the mouth end into a circle so nobody gets poked.}
Cut a very long tail and Kitchner stitch the remaining 12 stitches together (if Kitchner stitch is too intimidating, just cast off all ten stitches and sew them together). Using your long tail, sew up the holes in the sides of the dragon’s snout, and embroider two French knots on the top of the snout for nostrils.
Fins (make 2):
CO 12 in n C2
Switch to C1 and knit 11, w/t;
K 10, w/t;
K 9, w/t;
K 8, w/t;
K 7, w/t;
K 6, w/t;
K 5, w/t;
K 4, w/t;
K 3, w/t;
K 2, w/t;
K 1, w/t;
Knit to the end.
Cast off all stitches.
Options for back crest:
• Option 1) Plain, do nothing and go for the streamlined look.
• Option 2) ichord:
CO three stitches in C2. ichord for 6-9 inches (however long you want it), then cast off and sew to the dragon’s back starting just below the horns.
• Option 3) Big crest:
CO 60 stitches in C2, leaving a very long tail. You can use straight or circular needles, but it will be too many stitches for double pointed needles.
1) K1, P1, repeat all the way down the row
2) Repeat row 1
3) Cast off 40, then proceed to purl and knit until there are three left, w/t, (P1, K1) x7, w/t, (P1, K1) x6, w/t, (K1, P1) x5, w/t, (K1, P1) x4, w/t, (P1, K1) to the end.
4) Cast off all stitches.
Finishing up:
• embroider eyes on the sides of the dragon’s head
• sew the two front fins on just below the start of the ribbing on the dragon’s neck.
• if desired, embroider a row of French knots in C2 down the top of the dragon’s nose.
• sew on whichever option you choose for a back crest.
Abbreviations:
(CO) Cast on. Use any method you’d like.
(k2tog) Knit two together. Knit two stitches together.
(Kfb) Knit front and back, knit into the front and back of one stitch, making one new stitch.
(W/t) wrap and turn. Move one stitch from the left needle to the right, wrap the yarn around the stitch, and replace the stitch on the left needle.
(M1L) Make one left. Pick up one stitch from the left side of the stitch you’ve just knit.
(M1R) Make one right. Pick up one stitch from the right side of the stitch you’re about to knit off the left needle.
(YF) Yarn front. Bring yarn to the front of your knitting as if to purl.
Skills needed:
• casting on and off on
• knitting in the round
• ichord knitting
• Kitchner stitch
Notes:
• This pattern is knit in the round, tail to nose.
• Don’t worry about gauge, just use the right size needles for your yarn so no stuffing shows through the stitches. Smaller yarn and needles will make a smaller dragon, and larger will make a larger product.
• When knitting in the round I use the M1L and M1R increase method. You can just kfb, but I find it leaves an unsightly lump in the finished work.
• There are many options for back decorations for your dragon. If you want it to look more Wingfeather Saga-ish then try the ichord or plain method.
• If you’re not familiar with the Kitchner stitch or French knots, there are lots of good YouTube videos and blog posts that explain them. That’s how I learned.