Gather ‘round boys and girls, it’s story time:
Once upon a time, I encountered this pattern and knew it was perfect to make for my hubby! So I started off by using yarn I had on hand - which happened to be worsted. No big deal, I thought, and got to work.
Meanwhile, I located on Etsy, a really cool looking pre-made Nail that I decided to purchase and use rather than crocheting one. It was actually a necklace, but I knew it would be perfect. The problem was that it was much smaller than would work in scale with this pattern. So…
I stopped working on the worsted weight version, and tried a sock version. I had to order yarn for this (Premier Minikins using 3.5 hook), but that was okay. The yarn was kind of annoying. It kept splitting. Like a lot. But I was dedicated.
Then the Nail arrived and it was smaller than I was envisioning. I’ve never been good at visualizing sizes and measurements. And I thought, okay… I should find some lace weight yarn to do this in. That was virtually impossible. It was literally impossible to find, purchase, and have it sent to me in time for me to complete a third iteration of the Knight.
The next best thing I had was crochet thread. I just didn’t have any in grey. But I got started on the white and black parts, and then one day when I happened to be near a Michael’s, I dropped in and found a grey. It was lighter than I wanted, but beggers can’t be choosers when you’re this close to a self-imposed deadline (Christmas).
Thus, I worked quickly to complete the Knight in thread. I don’t care for the stiffness of the Red Heart thread, but it probably wasn’t intended for amigurumi. The Aunt Lydia’s was noticably softer, which was appropriate for the cape.
Rather than felt eyes, I decided I wanted safety eyes. They look cooler to me, and honestly, the Knight’s eyes were only slightly oval in most images I’ve seen, so it worked fine. I always oversize my safety eyes, intentionally, but here’s something to consider: holes in crochet thread items are reeeally small. I had to spend some time stretching the hole for the back of the safety eyes to fit through. I did this by inserting my crochet hook and working it around a little to stretch the fiber around the hole. Then, I would do it again with a slightly larger hook. I kept increasing the hook size until I could fit the backing of the safety eyes through the hole without overstretching.
I knew I didn’t want to fool with wire in the horns. I’ve done wire in projects before and wasn’t a fan. Besides, the bend didn’t need to be drastic, and the wire wouldn’t be supporting weight really. I’ve been crocheting and making amigurumi long enough to have logged some info away in my brain. I’m not smart enough to create my own patterns, but I’ve learned enough to manipulate existing ones a bit. For each horn, after the first complete round of connecting the two nubs, I began shaping them with stitches. It wasn’t an exact science, and I eyeballed some things, but it was roughly like this:
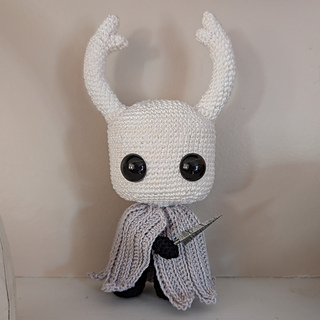
I alternated actions on each row. One row would have 2 increases and decreases, one row would have 1 increase and decrease, and the next row would have no increases or decreases. Determining what point would be on the inside, I sort of figured out a center line on either side of the horn. On the “inside” of the horn (the part that would curve inward), I would add increases straddling the center line, and decreases straddling the opposite side center line, making sure I always ended with the correct number of stitches. As the beginning/ending of each row gradually moves due to the nature of crochet stitches, I would have to ad-lib on occasion, so I had to pay a little more attention during this process. But the result was what you see in the photos. Curved horns that didn’t need wire. I believe if I wanted a stronger curve as opposed to this gradual one, I could have just added more increases/decreases to achieve it, but I didn’t want to spend any extra time figuring this out. (You know… Christmas… deadline… Why do I do these things to myself?)
Oh… rice in the feet? Absolutely no. Rice would have done nothing for my poor little Knight. I used BBs. Maybe if he’d been bigger, but honestly, I think BBs are the way to go for weighing down any amigurumi that isn’t really meant to be played with. Even with the BBs, poor Lil Bit struggles to stay upright. How can you blame him? He’s kinda top-heavy, after all. BBs have a nice heaft to them for their tiny size. BBs all the way.
Here, I got a little nerdy: The Knight is most likely right-handed. I researched it.  There’s some argument, but by and large, the concensus is that he’s a righty. Therefore, I wanted the Nail in his right hand. The “hilt” of my Nail wasn’t very long - just enough for a jump ring, since it was meant to be a necklace. But it was long enough to insert through a stitch gap and the Knight looks like he’s holding it.
Because of this, I had to make a change to the cape. It was meant to overlap in such a way that he wouldn’t have easily gotten his right arm through. And I wanted the Nail to be visible. It’s a pretty major part of this project by now. So I overlapped the cape in the opposite direction, which made the sewing a little annoying, but I felt like the right side of the cape looked nicer than the left anyway, so I love how it looks now.
Let’s see… what else do I need to remember?  OH! Who the heck knows why I haven’t, in the entire 13-year span of crocheting, purchased a darning needle?
  Sewing the head on my Knight was super annoying, mainly because all I had were straight needles. A darning needle is probably way more helpful for this process. I ordered some immediately after completing.
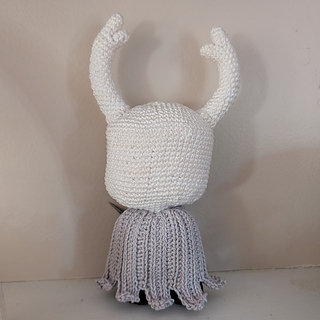
It turns out, the thread I used probably isn’t much thinner than the sock yarn I had before, but the thread was MUCH easier to work with. And the Nail was still a bit small in scale, but it works and adds a little something to the overall appearance, I think. Somehow he looks a bit wonky from the back, but pretty freaking awesome from the front. Super happy with this guy, and I think Joey was too. 


 DecemberButterfly notebook


 projects
 handspun
 stash
stash queue
queue favorites
 friends
 groups & events
 needles & hooks
 library
 blog posts
 Project

 stashed