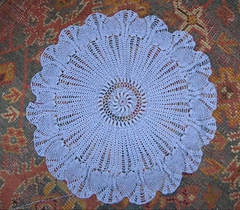
2 Apr 2018: Discovered when blocking the edges that I’d been omitting the round picots between the beads from about halfway round. The first section with round picots looks much better - normally I’d rip back the second half with much cursing, but I simply don’t have the time left. The shawl has to be delivered in three days…
13 Feb 2018: Fortunately a 1.25mm hook goes through the middle of a 4mm bead - just - so no complicated threading devices are required…!
Rnd 64 (picot edging)
{ Work 4chain, then 2ch, 1ch through bead, 3ch, sl.st. back into approx 3rd chain before bead, 4ch } (bead picot)
{ 2dc into shell in row below, 2ch, 2dc back into same shell } (round picot)
Repeat (bead picot, round picot) four more times.
Bead picot, dc into shell at base of pineapple.
//3dc into outer treble/ch loop of next ‘shell’ up side of pineapple.
{ 2ch, ch through bead, 3ch } (3ch bead loop)
3dc into outer edge of next ‘shell’.
Repeat from // two more times up side of pineapple. 3dc, 4ch bead loop (3ch, bead, 4ch) across 3ch-space at top of pineapple, 3dc into outer loop of first shell on other side.
Repeat (3dc, 3ch bead loop, 3dc) down other side of pineapple, dc into shell at end.
Continue, repeating this entire segment 17 more times.
1 Feb 2018: Final row complete. Now I just need to work out a beaded edging using 700-odd beads over 18 repeats!
6 Jan 2018: Doing final round and adding ‘points’ to finish pineapples as I go, as suggested by SaltysHook.
Rnd 63: Shell, ch4, (sh, ch5)x4, sh, tr in each dtr of prev. rnd (i.e. 12 tr), sh, (ch5, sh)x4, ch4.
To work POINT of pineapple:
sh, ch3, dc in ch3 of prev. rnd, ch3x7 for 6 loops
**Work a ‘far turn’: 2tr into shell on prev.rnd, 2ch, 1tr (incomplete shell), turn, 5ch, 2tr into centre of incomplete shell just worked, creating another incomplete shell on top of it
ch3, repeat dc in ch3 of prev. rnd, ch3 to end of pineapple.
Work a ‘near turn’: shell, turn, ss in top of tr, ss in ch2, ch2, 2tr (i.e. turning shell as used at start of round)
Repeat from **, working back and forth across pineapple, until you reach the end of the last row, i.e. ch3, dc in single loop of previous round, ch3.
Work a far turn. Work shell into turning shell of prev. rnd to join top of pineapple. Turn, ch3 and sl.st. into top of incomplete shell.
Now repeat ch4, sl.st. into centre of incomplete shell in prev. rnd 7 times down the side of the point to fill in the missing trebles of the incomplete shells. Work 1tr into shell in Rnd 62 to complete last shell of round.
Now continue with Rnd 63: ch4, (sh, c5)x4, sh, 12tr into dtr of prev.rnd, sh (ch5, sh)x4, POINT. Repeat to end of round.
4 Oct 2017: Now doing (sh ch5) in place of (sh ch6) everywhere, i.e. over top of small pineapple as well.
- Rnd 61: Sh, ch4, sh, ch4, shell, {ch5, sh, ch5, sh}, ch5, sh, ch5, tr between the 2tr combo on prev rnd, ch5, sh, ch5, {sh, ch5, sh, ch5}, sh, ch4, sh, ch4, sh, pineapple (ch3, dc)x8, ch3
- Rnd 62: Sh, ch4, sh, ch5, sh, {ch5, sh, ch5, sh}, ch5, sh, 6dtr in ch5 space, 6dtr in second ch5 space, shell, ch5, sh, ch5, {sh, ch5, sh, ch5}, sh, ch4, sh, pineapple (ch3,dc)x7, ch3
12 Sep 2017: So much for ‘back to the pattern as printed’ - I seem to be deviating more and more. This is what I’ve got for Week 5 so far:
- Rnd 57: Sh, ch4 (to stretch medium pineapple), sh, sh, {ch6, sh, ch6, sh} (extra columns), ch6, {2tr, ch2, 2tr, ch2, 2tr} (triple shell) in shell of prev.rnd, ch3, dc in ch3, ch3, dc in ch3 (top of small pineapple), triple shell, ch6, {sh, ch6, sh, ch6}, sh, sh, ch4, sh, ch3, pineapple (ch3, dc)x12, ch3
- Rnd 58: Sh, ch4, sh, {ch6, sh, ch6, sh}, ch6, sh, sh, ch3, ss, ch3 (top of small pineapple), sh, sh, ch6, {sh, ch6, sh, ch6}, sh, sh, ch4, sh, pineapple (ch3, dc)x11, ch3
- Rnd 59: Sh, ch4, sh, ch1, sh, {ch5, sh, ch5, sh}, ch6, sh, ch3, sh, sh (top of small pineapple), ch3, sh, ch6, {sh, ch5, sh, ch5}, sh, ch1, sh, ch4, sh, pineapple (ch3, dc)x10, ch3
- Rnd 60: Sh, ch4, sh, ch3, {ch5, sh, ch5, sh}, ch6, sh, ch4, 2tr in shell of previous rnd, 2tr in next shell of prev. rnd, ch4, sh, ch6, {sh, ch5, sh, ch5}, sh, ch3, sh, ch4, sh, pineapple (ch3, dc)x9, ch3
9 Sep 2017: I got to the end of Rnd 59, then realised I’d forgotten to add the extra 1ch between the sh sh on either side of the medium pineapple (not vital) and the extra 3ch between the sh sh sh sh above the small pineapple, which really is significant for the next row! This represents an extra 8ch for every pattern repeat on a shawl that’s already too frilly.
So as I had to undo the entire row anyway, I decided to change all the ‘extra’ ch6, sh, ch6, sh columns to ch5 instead, which means the net gain is only 4ch… and the only surviving ch6 columns are those on either side of the small pineapple section.
27 Aug 2017: Decided not to split blank columns in Row 59 after all, as the shawl is already extremely ‘frilly’ (I suspect I overcompensated when adding extra columns to accommodate extra diameter). Also decided not to split the columns on either side of the medium pineapple as written in the pattern, and to continue working 4 ch on either side instead of gradually increasing back to six. I really do have an awful lot of extra width here.
20 Aug 2017: Rnd 57 - used 4ch instead of 6ch between the sh sh and the medium pineapple, ‘to stretch pineapple’ as I did in ‘my’ Rnd 57.
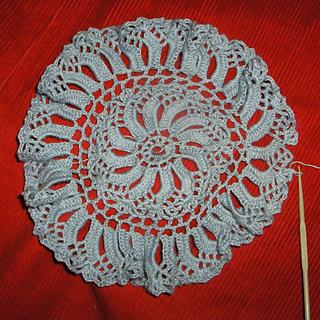
7 Aug 2017: Finally finishing Week 4. Referring back to the computer I find that the photo I made my guidance sketch from is actually that of Lisbeil's modified shawl, which explains why I can’t relate the instructions for the ‘points’ to my picture!
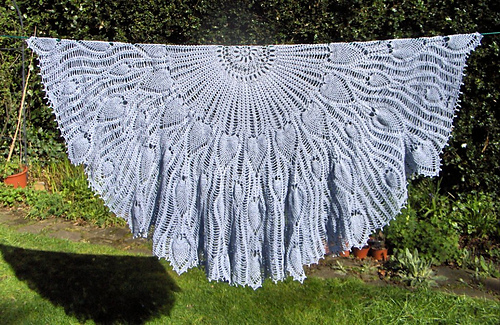
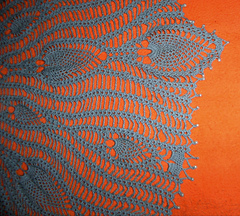
Looking at other people’s shawls (difficult since it’s apparently almost impossible to get the edge to lie flat enough to be photographed), I don’t think I want to do the enormous dagged points along the edge - they look too heavy for the design and just hang down in lumps. These are created as the (8dtr in 6ch space) in Rnd 62 which makes the edge too wide. So I need to imitate Lisbeil or SaltysHook and find a way to leave out the start of the ‘large pineapple’ at this point.
Meanwhile I still need to do something with the ends of the two extra columns between pineapples created by repeating rows 30-55 twice… Lisbeil’s fancy edging turns out to be simply the 14 dtr which would otherwise have formed the base of the large pineapple. Salty filled his in with extra shells.
The triple shell followed a round later by by sh sh (eventually followed by sh ch2 sh etc.) that I’ve just done towards the start of Rnds 55 and 56 is the start of a long split column that becomes sh ch4 sh by Rnd 61. The triple shell at the beginning of Rnd 59 is the start of a split column to either side of the ‘medium-size’ (i.e. 14dtr versus 16dtr) pineapple I’m working at the moment and that forms Lisbeil’s edge points. The triple shells in the middle of Rnd 57 are the ones that form the topping to the small pineapple, and eventually the set-up for the ch6 tr ch6 that would be the base for the ‘large pineapple’. So what I’ve got is an extra two ‘blank columns’ between the long split column and the small pineapple and associated decorations.
I suppose the simplest thing to do would be to split those columns at the edge - maybe in Rnd 59 where the final column split takes place at the edge of the medium pineapple? I’d probably need to reduce the 6ch spacing between them at the same time…
Jul 28 2017: Now back on Row 52 for the second time, and soon to enter into terra incognita when I reach a part of the pattern I haven’t actually worked before!
Remaining rows of modification recorded as follows:
- Rnd 62: shell (as above), ch6, sh, ch6, sh, ch3, 2tr in shell of prev.rnd, 2tr in shell of prev.rnd (joining columns), ch3, sh, ch6, sh, ch6, sh, pineapple (ch3,dc)x11, ch3
- Rnd 63: sh, ch6, sh, ch6, sh, ch3, shell between sets of 2tr in prev. rnd, ch3, sh, ch6, sh, ch6, sh, pineapple x10, ch3
- Rnd 64: As Rnd 63 but pineapple x9
- Rnd 65: sh, ch6, sh, ch6, sh, ch3, (2tr, 2ch, 2tr, 2ch, 2tr) in shell of prev.rnd, ch3, sh, ch6, sh, ch6, sh, pineapple x8, ch3
- Rnd 66: sh, ch6, sh, ch6, sh, ch3, sh, sh, ch3, sh, ch6, sh, ch6, pineapple x7, ch3
- Rnd 67: as Rnd 66 with ch3 added between sh sh over small pineapple and (ch3, dc)x6 over large pineapple
- Rnd 68: as Rnd 67 with ch4 over tip of small pineapple and (ch3,dc)x5 over large pineapple
- Rnd 69: as Rnd 67 with ch5 and pineapple x4
- Rnd 70: sh, ch6, sh, ch6, sh, ch4, sh, ch6, sh, ch4, sh, ch6, sh, ch6, sh, (ch3,dc)x3, ch3
- Rnd 71: triple shell (2tr, 2ch, 2tr, 2ch, 2tr), ch6, sh, ch6, sh, ch4, sh, ch6, sh, ch4, sh, ch6, sh, ch6, triple shell, (ch3,dc)x2, ch3
- Rnd 72: As Rnd 47, except that we now have extra (ch6, sh, ch6, sh) columns in between the triple shell areas, and ch4 in place of ch3 on either side of the ‘small pineapple’ area.
22 April 2017: Back on the original pattern at Row 47, plus or minus two extra shell/six chain columns acquired between the pineapples!
4 Feb 2017
Almost a year since I split the column over the top of the small pineapple - since then, I’ve rejoined and am now splitting it again! (I’m going to need an even number of shells to make the base for the next small pineapple (three columns doesn’t work) and now that the large pineapple is beginning to draw in at the point I’m actually going to need the extra frilliness/circumference that I was getting rid of earlier.
2 May 2016: List of modifications (or rather, complete new section inserted into the pattern)
- Rnd 54: as written, but omit ch10 and repeat shell, shell, shell, shell over corresponding shells on row below.
- Rnd 55: as written, but over sh sh sh sh from Rnd 54 work sh, ch6, tr between shells of row below, ch6, sh (to create base of large pineapple as in Rnd 30 setup)
- Rnd 56: shell or false start-up shell at beginning of round, ch6, sh, ch6, sh - top of small pineapple (ch3,dc)x3 - sh, ch6, sh, ch6, sh - large pineapple base (ch3, 8dtr in ch-6 space, 8dtr, ch3) as in Rnd 31
- Rnd 57: shell (as above), ch4 (to stretch base of large pineapple), sh, ch6, sh - small pineapple (ch3,dc)x2 - sh, ch6, ch, ch4 (to stretch pineapple), sh - pineapple base as in Rnd 32 (ch3, (tr in dtr,ch1)x15, tr in dtr, ch3)
- Rnd 58: shell (as above), ch4, ch, ch6, double shell (2tr,2ch,2tr,2ch,2tr), ch3, dc in top of small pineapple, ch3, double shell, ch6, sh, ch4, ch - pineapple base (ch3,dc in chain of row below)x15, ch3
- Rnd 59: shell (as above), ch5, sh, ch6, sh,sh (in double shell of previous rnd), sh,sh ditto (on other side of small pineapple), ch6, sh, ch5, sh - pineapple (ch3,dc)x14, ch3
- Rnd 60: shell (as above), ch5, sh, ch6, sh, ch2, sh,sh (over point of small pineapple), ch2, sh, ch6, sh, c5, sh - pineapple (ch3,dc)x13, ch3
- Rnd 61: shell (as above), ch6, sh, ch6, sh, ch3, sh,sh, ch3, sh, ch6, sh, ch6, sh - pineapple (ch3,dc)x12, ch3
28 Apr 2016: Finished Rnd 60. I’ve worked two rows with 4ch on either side of the large pineapple (in order to help extend the wide base) and two more with 5ch, so presumably I now revert to the standard sh/6ch interval all round. I’ve split the column over the top of the small pineapple as was done over the top of the large pineapple and can/should presumably add in extra chain between these shells, otherwise it’s going to be a very thick column of four shells - the edge of the shawl is actually looking fairly frilly already at this point, so I’m not sure if I did the right thing.
Maybe I should be using extra spacing between these ‘new’ columns instead of the scheduled split halfway up the side of the large pineapple?
27 Feb 2016: Working Rnd 59 (details to follow) and wondering how best to enlarge the outer edge to fit the existing pattern, given that the circumference will inherently need to be greater after the extra repeat. Probably the easiest thing to do is to split the column of shells on either side of the point of the large pineapple (not the double column immediately over the point, which will form the base for the long pointed leaf at the edge). I can then reduplicate the little block decorations which already appear around the edge over the small pineapple points.
11 Jan 2016: Realised that I’d left out all the double-shells in Rnd 55 except for the very first repeat, and decided to make this ‘official’! After all, I’ll probably be getting more than enough extra width for the top of my small pineapples out of the bulgy bases of my large pineapples at this point… Worked 16dtr into the ch6 loops above the 4-shell section, with a shell and 3ch on either side.
3 Jan 2016: Started Rnd 55 and realised that I’d missed the instruction to work ch10 over the 4-shell section in Rnd 54!
Since it’s clear that the shawl is going to be too small and this appears to be the set-up for the final row of ornament, I decided to use the error as a sign that it was time to start altering the pattern as written in order to include some extra rows into it. I’d originally intended to work another ‘plain’ section with just radiating shells, but now thought that I could work an extra set of large pineapples at this point (just before peak of current smaller pinapples).
I worked shell, ch6, (tr between two centre shells of the four), ch6, shell over the 4-shell section as in the Rnd 30 set-up, with the idea of working dtr into the ch6 loops as in Rnd 31. I think I should possibly have done double crochet or even slipstitch for the stitch between the 6ch…
I probably need to fork the remaining column of shells using a double shell followed by two more in the next row, and to decrease the size of the chain-loops to either side of the new pineapples in order to pull the sides out. Fortunately the result can be distinctly bulgy as a result of experimenting as I go along - since the rest of the shawl already is!
30 Dec 2015: Working Rnd 54.
28 Dec 2015: A bit confused at Rnd 52 - the pattern shifts to the left at this point, so the last shell of the three at the end of the line is actually worked into the first double-shell of the next repeat on the previous row.
I managed to change my dc/3ch loop technique halfway round and started working into the tops of the trebles instead of into the 1ch spaces between them, thus ending up with seven loops instead of six on half the repeats! Had to undo it and start again.
11 Dec 2015: Finished Rnd 48. The instructions for this seem a bit arbitrary - all the shells on this row are worked into the top of the next shell on the row below, but for some reason it only specifies “shell in ch2 on previous round” for one of them, and that one randomly placed in the middle of the instructions!
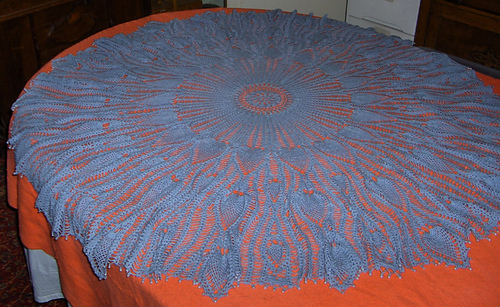
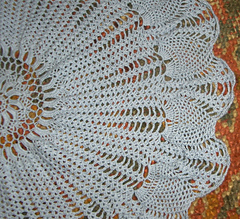
1 Dec 2015: Finally completed Week 3! Shawl is now 24” in diameter.
22 Nov 2015: Discovered that I had missed out a 3ch, dc repeat about three rows back, which became obvious only when I ended up with two loops remaining at the top of the pineapple when it should have been three…. Managed to fake an extra row of loops down the side of the pineapple by working back down using slipstitch.
(And apparently I managed to miss another loop while working that row… almost tempted to go back and undo it, but that would mean undoing past the ‘faked’ stitch all over again. Instead I just worked two loops on top of two loops and hoped no one would notice.)
22 Nov 2015: Apparently the pattern was only available to download during the five weeks of the crochet-along event - so all those of us who fell behind no longer have the final weeks accessible via our Ravelry libraries. Need to e-mail the designer directly to get the missing files… which presumably can’t then be filed together with the rest of the pattern in Ravelry. Assuming that we ever wanted to work the shawl again.
I suppose I need to request both US and UK versions, as there was apparently an error in Week 5 that was only corrected in the US copy….
20 Nov 2015: Further errata: when repeating Rnd 41, work 2tr instead of 3ch, 1tr for second and subsequent repeats.
11 Nov 2015: Had to rework Rnd 34 twice, after failing to notice first of all that there were now 3ch between the stitches worked into the trebles, and secondly that the stitches in question were now dc and not trebles any longer!
8 Nov 2015: Further errata to the pattern - Rnd 30 should end “ss in top of 3rd ch” like all the others (i.e. attach back to first ‘treble’ in first shell of the round), rather than telling you to work back ino the ch2 you just made. Also, every time it refers to ‘ch 2 from previous rnd’, it means specifically and only the centres of the shells from the previous round and not all the other 2ch spaces!
Rnd 32 should read ‘across next 15 dtrs’ at the start of the row, not 14 - likewise there is a missing instruction to ‘tr in last dtr’ at the end of the repeated section. In other words, each row of the ‘pineapple’ in Rnd 32 has fifteen ‘loops’ into which 15 stitches are subsequently worked in Rnd 33.
The shawl still doesn’t lie flat, and I do have a creeping suspicion that this was not so much intentional on the designer’s part but more the outcome of a desire to have a nice round number of pattern repeats…
4 Nov 2015: Reworking the centre makes no difference to the tension, it seems. Finally completed ‘week 2’ - on the Wednesday of Week 3! The shawl now measures 14.5” in diameter and is still ruffled round the outside edge.
23 Oct 2015: The first twelve rounds come out very ruffled. Decided to rip the whole thing back to the end of Row 4 and try again, working the 3-chain spaces in Row 5 more loosely and the 13-tr petals in Row 10 more tightly. Unfortunately I managed to work 38 petals instead of 36 by accidentally working into the same 3-ch space twice, thus making the ruffling problem worse instead of better… since I had also failed to leave 3 chains unworked at the start of my first petal, I decided I really had to rip the whole thing back once more!
There are definitely errors in this pattern, at least in the UK version. Row 6 should have an extra “ch3, skip next two ch1 spaces, ss in peak of next petal, ch3” before the final slipstitch back to the first shell.
The end of Row 7 ought to specify “3rd ch of 6”, since the row starts with 6ch and we need to join halfway along this.
As for Row 6, Rnd 12 should have an extra “ch 3, dc in 1st ch1 space, ch3” before the final slipsitch back to the first shell.
18 Oct 2015: Not the easiest pattern to understand, but then that’s always the problem with crochet lace: how do you describe where to attach the hook next?
Having difficulties with the ends of Row 6 and Row 12 in the pattern: can’t work out how to finish the ‘shells’ round. Also, I think the reference to ‘Row 1’ must mean ‘Row 2’, since the first row is simply the little wheel of stitches at the centre of the design.


 HarrietBazley notebook
  handspun
 queue
queue favorites
 friends
 needles & hooks
 library