I originally started making the size Medium (38”). My gauge was tight (even with a needle 3 sizes larger), so I sized up, but as I progressed, I realized that I was actually making gauge and that it was going to be too big, so I ripped back and restarted, this time for the size Small (34”). I think that it will block out quite a bit too, if I need it to.
Needles:
US 7/4.5 mm (ribbing)
US 8/5.0 mm (main body & sleeves, and bind off ribbing)
US 9/5.5 mm (sleeve lace, incl bind off, and bind off sleeves main)
US 10/6.0 mm (body lace, incl bind off)
Hook 7/4.5 mm (cast on)
I started out using size 10.5/6.5 mm for the body lace bind off, but ripped that out and did not end up using those needles.
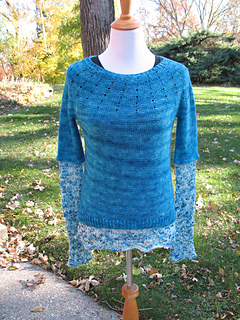
Yoke:
Crochet cast on to 16” size 7 needle with size 7 hook.
For the first start, I worked the ribbing purls by wrapping the yarn the opposite way, as this normally helps to make my ribbing neater, a tip I learned from Lucy Neatby (see this video). But for some reason, it didn’t work this time, so I did a twisted rib instead, and turned it the other way when I got past the ribbing (because this piece is worked from the wrong side). I can sew up the resulting hole with the tail.
4 rounds ribbing (to .5” from CO).
Switched to 16” size 8 needle.
Knit 2 rounds even (to .75” from CO) before first increase round.
Increase every 6 rounds (.75”).
Worked 13 rounds past the last increase to 6.5” (my gauge is loosening up).
Total rounds from ribbing: 46
Split for Sleeves:
Cable cast on for underarm, purlwise, with no twist when placing new stitch on the needle.
Body:
First incr on round 28 (should have been approx. 32 rows to 4” before first incr, but my gauge has loosened up). I seem to be getting more like 7 rounds/inch now instead of the 8 that I was getting before.
Next increase, at 7”, should be at about round 49 if this holds true, but I did it at round 47. It was already over 7”, so I’m loosening up even more! Now I seem to be getting closer to 6.5 rounds to the inch.
Worked thru round 71 to 11” before beginning short rows.
Short Rows:
Began short rows at round 72.
Worked as wrap & turns.
Note that the designer says she worked German short rows, but she describes wrap & turn.
I did some swatching for this, as the traditional “wrong” side of the fabric is the right side for this pattern, and most methods try to get the wrap to fall to the back. The opposite is what I was after. I didn’t care what it looked like on the stockinette side.
I found that I liked the purl side better when I wrapped the stitch by bringing the yarn forward (or back) first before slipping the stitch (this seemed to make a shorter float), and not resolving the wrap at all (this eliminated the big loose loop).
Attached the second skein of the main color on the first w&t row.
Bottom Ribbing:
Switched back to size 7 Needles
Turned the work, to be able to work the twisted rib from the right side (I don’t know how to do it from the wrong side in the round). Did not wrap the turning stitch, as I can use the tail to close the hole.
Began with a knit row, instead of a purl row, and proceeded with 10 rounds of twisted rib. This wasn’t quite an inch & a half, but almost. My gauge has definitely loosened up.
K2tog tbl BO with size 8 needle. This was borderline too tight, but I left it. If I made this again, I would redo this bind off to be looser.
Body Lace:
On chart row 10, the beginning of round is moved one stitch to the right, not to the left as the pattern says.
K2tog tbl BO with size 10.5 needle, but this was actually a bit too tight, so I picked that out and re-bound off, this time with the “elastic” bind off, which is a little bit stretchier variation. It puts an extra knit stich between the k2togs, like this: Knit 2, slip them both back to the left needle and knit them together tbl. Then knit the next stitch, slip these 2 back and knit them together tbl. Repeat from.
This one was actually too loose, so I backed that out too, and re-did it with the size 10 needles that the lace was knit with. This one was kind of too loose too, but not as bad as before, and better than too tight, so I decided to go with it. I think the whole thing might be too long, and the lace too loose, but it’s too late now, ‘cause I’m not going back! We’ll see how it blocks out in the end, and how it looks when I get the sleeves on.
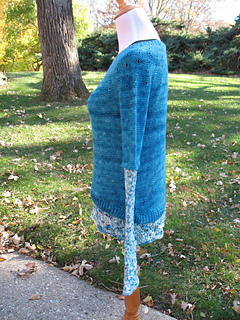
Sleeves:
Worked 2 sleeves at a time, concurrently, with each sleeve on its own needle, moving back and forth between them.
Used 12” fixed size 8 needles for the pick up & main color.
Did not work any decreases before the lace (I very much dislike tight sleeves).
Worked 40 rounds (approx. 5.5”) main color.
Then purl 1 row, knit 1 row, as per pattern, but:
Instead of switching to the lace here, work an additional purl row, knit row, purl row, then bind off (k2tog tbl w/size 9’s) and pick up for the lace in the purl bumps, as for the body, with size 9 needles, and decreasing 4 sts immediately on the first row in order to have the proper number of stitches for the lace repeat (work 1 knit row before beginning the lace, decreasing 4 sts by k2tog evenly around).
Used 12” Clover bamboo’s, size 9, for the lace.
I started out using 12” Chiaogoo shorties for this. I had 2 cables, but only 1 set of shorty tips, so I was moving the tips back and forth in order to work the sleeves concurrently, but the tips felt too long for the cables, and it was a struggle, so I switched to the bamboo. That was my only other 12” option in my size 9 needle inventory, and I didn’t want to do magic loop.
I wanted to use the size 9 needles instead of the 10’s that I had used for the body lace, because I thought the lace fabric was too loose & sloppy with the 10’s.
Stopped at 8 reps of the sleeve lace chart, as it seemed already to be about 19”
Bind off as per body lace, without changing needles.
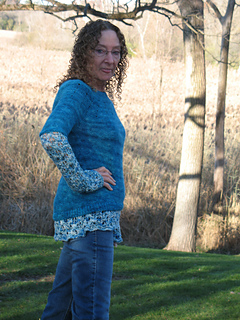
Approximate Finished Measurements (Before & After Blocking):
Chest circumference: Before: 34”, After: 36”
Top of shoulder to bottom of ribbing: Before: 20”, After: 21”
Top of shoulder to bottom of front lace: Before: 22.5”, After: 25”
Top of shoulder to bottom of back lace: Before: 24”, After: 26”
Width of sleeve at underarm: Before: 4.5”-4.75”, After: 5”
Length of sleeve from underarm: Before: 17.5”, After: 21”
Length of sleeve to end of main color: Before: 5”, After: 6”
Depth of yoke at center: Before: 6”, After: 7”
I really had to struggle to get these finished measurements. The yarn stretched out so much when soaked, it was ridiculous!! I ended up tumbling it in a dryer bag in the dryer about 10 minutes at a time until almost dry to get it to be a reasonable size. I started out on low heat, and gradually increased that until I ended up on high heat in order for it to shrink back in at all. The sleeves are actually still a bit too long, but I had them folded in order to fit on the blocking board I was using, so I couldn’t really tell how long they were. I could have gotten them to be shorter I think, had I realized that I needed to.
I also had been concerned that the dark teal would bleed onto the light colored lace. And rightly so! I only soaked it for about 3 minutes instead of the usual 15 before I had to pull it out, as the water was already turning blue. I had thrown a couple of dye catchers into the bath, and they already turned blue by then as well. Drying the sweater most of the way in the dryer also helped to keep the dye transfer in check, as it avoided having the dark color lying on top of the light color while soaking wet. I think that’s the way to go in the future!


 KnitSister1 notebook
  handspun
 queue
queue favorites
 friends
 needles & hooks
 library