After making James’ vest and some lovely ladies offered some advice on finding a pattern that uses Steeking….something I have wanted to do for a long time but absolutely terrified of making something so intricate only to destroy it! However, after watching a lot of newbies attempt it and say that actually, it isn’t that bad…well, here we are! A relatively small project that will be my first steek.
I am incredibly apprehensive, but, excited at the same time. Wish me luck.
7.5.2020
So far so good. Instructions easy to follow so far and the colour chart is beautifully simple. No long floats to contend with. I love working in the round.
8.5.20 done my first round of the pattern chart, I unfortunately made one wrong colour use on the last 5 rows, was meant to be my light blue, but through black of concentration I used white. But, still looking good. Working up fast and really enjoying the progress. I hate weaving in ends, however, this morning I will weave them as it’s better than doing the whole Vest at the end…there us already 34 threads.
11.5.20 been slow progress for the last few days as my carpal tunnel has flared up. But I have reached the point for getting arm holes and V neck centre onto stitch holders and to start the steeking. That is me done for today as the next step might need more concentration than I have in me right now. So far the pattern has been an easy repeat and very enjoyable.
13.5.20 So finished setting up for Steek cutting today. A little disappointed in the pattern as there was no explanation on how to steek. I chose this pattern as the description said ideal for beginners at steeking. There is a lot of useful tips, but no clear instruction, I was a little daunted. However, thank goodness for the power of YouTube videos. I found a good video on how to set up and cut steeks. I finished the day with cutting the steeks and joining the shoulders with 3 needle bind off. Lovely finish to the shoulders and my first time using this technique, again used YouTube. TIP: do this method with your work inside out, so RS facing RS.
15.5.20 My sewing machine is out on loan and since lock down, have not been able to retrieve it back and my advice is use a sewing machine to lock stitches before cutting your steek. a new day has allowed me to see that my hand sewn efforts were far from perfect and troublesome in patches. so i spent a few hours trying to ensure that when I tacked the steek flaps down, they were as secure as I could manage. I did a blanket stitch style tack, saw the example on YouTube and seems to remain flexible. As this is my first attempt, I cannot confirm if this is a good or the best method, however, it has work for me.
I spent 8.5 hours today, tacking down, picking up the armholes and neckline and completing the rib. took copious amounts of cups of tea and the patience of my husband to allow me to complete this instead of homeschooling. It was very time consuming and i did have a few melt downs as my steeks were causing me some headaches. But this was my error, nothing wrong with the pattern.
And finished. All on a blocking board and ready to dry overnight.
16.5.20
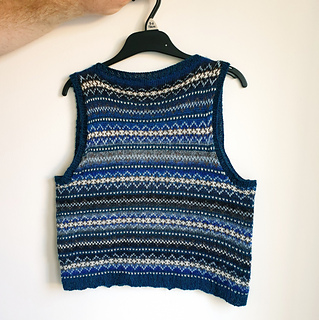
FINISHED.
All blocked and completed. I am very disappointed in the length. ADVISE YOU TO EXTEND THE LENGTH BEFORE ARMHOLES BY ANOTHER 1.5 INCHES. It fits my son, but is on the cusp. not much growth room.
ADVICE:
a few points that i think would be beneficial to those wanting to do this project.
If a beginner at steeking, this is an ideal project as it is small and yet shows you enough to understand. But be prepared to do some research yourself to help you along. YouTube was my friend as well as a few friends on some knitting pages I follow on FB.
Use a sewing machine if you have the option, otherwise do a far better job than i did on the hand sewn technique. Or try the crochet, I have no experience of this so I cannot advise. Some of my hand stitching worked, so it is possible.
PLEASE TAKE NOTE OF THE PATTERN WHEN DECREASING FOR ARMHOLES AND NECKLINE. As you can see in my photos, I lost the rhythm of the pattern and only noticed a little late on. Take your time and plan ahead. Once I realised, it was easy enough to adjust.


 Knittingmadkelly notebook
  handspun
 queue
queue favorites
 friends
 needles & hooks
 library