-
The pattern is formatted for ease of use and neatly, though unusually set up, IMO. I mean, it’s 19 pages long, which is long for a top down, largely-stockinette knit) but there’s lots of space on every page, photography pages and some pages are only applicable per size. The increases are worked and the stitch markers are positioned in a fashion that isn’t standard in my experience (how one would see it worked in many other patterns) which makes it a bit tricky to begin (see more below).
-
Note that, while knitting the yoke, you have to look at 2 sections simultaneously to ensure that you will correctly work the “at the same time” instructions. What’s referred to as Yoke 1, 2, 3, 4 is not fully reproduced in Steps 1-4 on the Increase page (at least for size small). For ex: Step 1 is rows 1-20 on the Increases page but that is not entirely relevant to Yoke - 1 (which only refers to the first 2 rows as “examples”. Yoke - 2 refers to row 5 but is not referenced on the Increase page. This makes things challenging IMO. In trying to make this pattern extremely clear - and it is set up very neatly - something is lost.
-
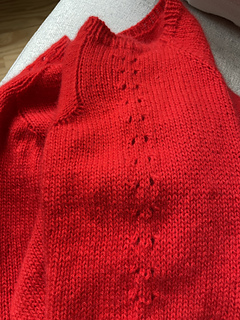
Mid-project Update: This sweater is constructed in such a way that the fabric lies oddly in the armscye and upper arm. The front of the upper sleeve folds on itself and pushes forward because, I assume, the bicep circ is proportionately large in that area and the front shoulder seam is more vertical than a standard, diagonal raglan seam. Moreover, the front and back sleeve aren’t related to each other in the way they would be if the same construction were being worked on both the front and back. Def review armscye depth and upper sleeve circumference, before knitting, in the event that the sleeves require fewer stitches.
-
I had to decrease from the recommended 85st to 71st (these are the totals before casting on at the underarm) to achieve the desired upper sleeve circ - see more below.
-
Used 3.5mm needle for the body and a 3mm for the edging.
-
About Step 1 (rows 1-20): RS rows have 8 increases and WS rows have 2 increases. Yes, the increases (worked as YOs) are a PITA to work through the back loop on the opposite side - something I generally enjoy - because of the positioning of the markers. I’m sure I’ll improve as I work them dozens of times 
-
As indicated in R1 of the pattern (RS:) The second st (and the st just before working the very last stitch of the row) represent the neck increases. The increase stitches before the first marker and after the last marker represent the saddle shoulder increases. It is indicated that, on the WS, the increases are made immediately before the first marker and after the last marker.
-
While this instruction is clear, it’s a bit unusual that there’s only one increase on each sleeve (on the RS), right next to the second and 5th markers - essentially just before you slip the 2nd marker to knit the raglan stitch and just after you slip the 5th marker after having knitted the 2nd raglan st. The saddle makes up for the “missing” increase and saddle shoulder increases occur on the front body and on the back body (the 2 WS increases).
-
IMPORTANT: The sleeve lace starts on R5. Alas, having started this project once, and made a mistake in the increases, I ripped back and then reknitted rows 1-20 yet again. But I forgot about the lace-work on the sleeves. So this was a 3x start. Again, this pattern is presented in a streamlined fashion but it’s also confusing because everything is so segmented that it’s hard to get a feel for the “at the same time” information.
-
If I’ve counted correctly, when working the yoke, at one point there are 17 markers being used. Definitely one must be careful to achieve the instructed stitch counts. I charted the number of stitches per row (till split for sleeves) so that I could confirm that I was on track not only in terms of st count but also re: “at the same time” instructions.
-
As of the instructed end of yoke section, I put on holders and tried on. Also remeasured gauge of the fabric. Gauge has remained reasonably consistent with pre-blocked swatch (except the stitch gauge has got slightly snugger).
-
Each round of body (at 220st and preblocked gauge of 6st/1”) takes 0.833 g of yarn. Note that I am working with one strand of very light-weight cashmere that’s akin to a light sport-weight yarn in gauge.
-
To work 127R of body, that would utilize ~106g of yarn or practically half of the yarn I’ve got avail for this project. I estimate that the yoke used ~65g. 106g + 65g = 171g. I have 221g in total which would leave 50g for the sleeves and neck edging. I’m going to finish one sleeve and the neck edging to get a better sense of how long I can actually make the body. Not that it will save me much yarn, but I may opt to do 4-6st decreases below the bust / “waist shaping” to get back to or slightly below the instructed stitch count.
-
Neckband: This took 5g of yarn with my light-weight cashmere. It would probably take about 10g if knitted with a “standard” yarn that meets gauge i.e., one that isn’t finely spun.
-
I feel that instructions for this section are not optimally specific. The pattern assumes that you know what you’re doing. It does indicate picking up every stitch but that’s not optimally clear given that, on the front body edging (the diagonal v), you actually want to pick up into the knit stitches and the stitches between those (the inverted v). To clarify - as I worked the edging both ways: In size 2, along each diagonal edge (which ends at the centre V stitch), if I knit into each stitch, I pick up 21 st. If I knit into each stitch and also into the “in between” area, I pick up 36st.
-
When I followed the instructions, at first, the V neck was practically a round neck in terms of shaping and depth because it’s not drafted deeply to begin with AND because the shortage of stitches, when one knits into each diagonal front stitch only, pulls the neck up that much more. In terms of project pages, I can see that some FOs sport a neckline that’s more crew than V. I suspect that these people followed the instructions.
-
I also worked the centre stitch CDD every other row because I don’t like how prominent it looks when worked every row. Moreover, the more decreases worked, the more the centre v will be inclined to pull up because the band is made smaller with each decrease.
-
For reference, when I worked the neck edge the first time, following instructions, I had 120st on the needles. When I worked it the second time, I had 152st on the needles.
-
Sleeve Take 1: While a schematic is provided, there’s no indication of the circ of the upper arm before decreases. Size 2 has 89st on the needles at the start of working the arm. That’s 15.5” for size 2 - proportionately large sleeves. Though I added 4 extra st on the body, I will not do so on the sleeves and I may opt to decrease more quickly at the underarm.
-
My upper arm circ is 11.5, I don’t want a circ greater than 13.5” or 2” of positive ease. This means that I need to decrease quickly at the start. To do this, work the 2st decrease rounds starting on the second round of knitting. Then work a decrease round every other round till 77 st on the needle (starting point is 89st).
-
Size 2 arms are worked after split for sleeves for 90R. Thereafter, I’ve opted to work a decrease on every 8th round. (Note: I switched this to a dec every 6th row about half way through.)This gives me another inch to work additional decreases if desired, before starting the cuff ribbing. I also decreased to 57 st before working the cuff decreases because it’s too large as instructed at circ.
-
I can’t explain why the sleeves are drafted so large in the bicep area - maybe it’s necessary to create the saddle shoulder meets raglan shaping? Maybe it’s a design feature - though the sleeves don’t look overly large in the marketing photos. Of course, if this were an area wherein I wanted additional circ, I’d be glad. Others have also noted the proportional largeness. I decreased 2” of arm circumference in 1.5” vertical span.
-
Sleeve Take 2: Having knitted most of the first sleeve, I opted to block the in-progress garment. If blocking reveals no change (and I’m blocking cuz I have a feeling that it won’t), I’ll have to decide whether to reknit the sleeve or just frog the garment and use the yarn for something else. My current concern is also that there are too many stitches on the front body at the vertical line of the shoulder seam which is contributing to the problem.
-
Having blocked the garment, mid-project, I can confirm my gauge is at 23.5st and 35R. I can also confirm that the sleeve does not work, for me, as drafted. On closer review, it does seem like the problem is in the sleeve itself and not the fit of the front body.
-
First try, I decreased 2st every other round, 6x, to get from 89st to 77st quickly. That yielded 13” of circ in approx 1.3” (12R) of length.
-
In Take 2, to get to ~10.25” of length in the sleeve, I worked the instructed 90R. I decreased every round to get down to 12” of circ (~73st) before I began decreasing more slowly. I wanted 9.5” of circumference before starting the cuff. Based on gauge, that means I had to work decreases every round for the first 8 rounds or for almost 1” of vertical length. Between rounds 9 and 90, I decreased every 10R to get to the desired length at the desired pre-cuff circumference, i.e., 9.5” of circ and 10.25” of length.
-
Update: This didn’t work. The front of the upper sleeve still folds on itself and pushes forward because the bicep circ is proportionately large in that area and the front shoulder seam is more vertical than the standard, diagonal raglan seam. It is irritating that this is the one dimension NOT provided in the schematic.
-
Sleeve Take 3: So I ripped the project back to R51 of the yoke. Between reading the work, figuring out where all of the markers needed to be re-placed and unkinking the (mid-blocked) yarn by steaming it over the stove, this process took more than 5 hours.
-
I opted to continue with this project, largely because I have only a certain amount of this yarn and I cannot for the life of me find another project, that I haven’t already made, that will use the amount of cashmere that I have at hand. I can always frog if/when I find the optimal project for this yarn.
-
For ref: I started with 71 sleeve st which became 75 when I cast on the 4 underneath the arm. I then decreased on the 3rd and 5th rounds so that I had 71st. Then I worked 10R between each decrease round until I got to 61st. I worked the final 36R before the ribbing without decreases. Then followed the decrease instructions prior to switching to smaller needle at 54st. However, having done this, I realized that 54st is too many for the circ of my forearm so I actually decreased from 61 to 50 st. I used a knitting calculator and purled (or p2tog) as necessary, to create the ribbing in this decrease round.
-
About the Yarn: It’s my first time working with Sandnes Garn Cashmere, which is a dupe for Cardiff Cashmere Classic. Given that I hated the CC, I’m surprised I opted to try this having only seen and touched it briefly in a yarn store a few months ago. I prefer the colours in the Sandes Garn palette and the balls, while underweight, weren’t as badly underweight as the CC. It’s soft (and lovely to look at) but it is, as with most cashmere, excessively delicate. It splits when working the yarn overs through the back loop on the next row, which is fussy. Actually, it just splits whenever it feels like it because it’s not tightly spun. Each ply is weak on its own so it’s optimal to avoid the splitting. It’s rare for me to suggest this, but it’s less splitty (due to spin direction) if you work from the outside of the ball vs centre pull.
-
According to my swatch, this yarn doesn’t grow or shrink excessively on blocking. I’ll likely need to knit a few more rows (length) to counterbalance my slightly smaller gauge. I’m hoping that the finished object is tough enough to manage light wear and tear.
-
Yarn Cost: I got this on sale so what would have cost $254 for 9 skeins (25g each) cost $203 - 20% discount.
-
A lot of thought has gone into this pattern and its presentation. Based on my experience and other project pages, it either clicks easily for you brain or it’s a slog to connect the dots. In some areas it does provide a lot of useful information, but elsewhere it assumes that you know what you’re doing - for ex. bare bones info re: neckband.
-
If you opt to make this, definitely work at least one sleeve before knitting the majority the body, to ensure that it fits as anticipated.
-
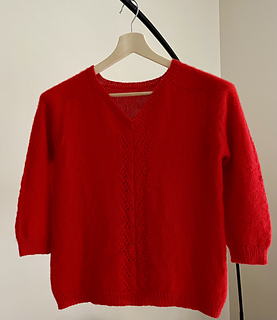
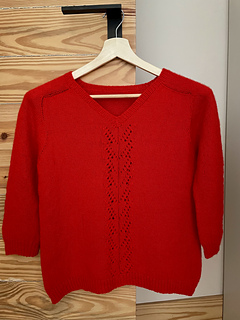
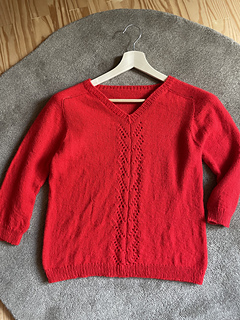
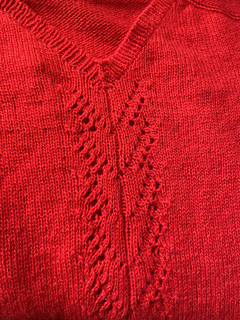
Sleeve fit aside, it’s a lovely design, quite feminine, with an unusual feature (saddle shoulder that’s only on the front body). The yarn over increases create an effect that is visible (one sees a tiny eyelet because, yarn overs do produce eyelets). If that’s not appealing, the increases can easily be worked with M1R / M1L instead. I followed the pattern as written because I was intrigued to see how I’d like the final look.
-
Given the saddle-shoulder-meets-raglan construction, the neckline, pre-neckband, looks a bit unusual when it’s not on the body. The back neckband/neck sits quite low and wide by comparison with the front. The number of neckband stitches cast on is critical to how the v will wear. When not on the body, the front neckband looks very slightly floppy. This is not the case when its being worn. One has the option to cast on fewer stitches on the front neckband but that approach makes the neckline shallow and more round than v.
-
Via this construction, the sleeve top at the shoulder is 1.25” taller than the back neckband. Effectively the back neck is lower than the tops of the shoulders. So while the v neck is reasonably shallow, it’s also proportionately wide from shoulder to shoulder. What’s interesting is that, despite this, the sweater stays in place.
-
I removed one front lace pattern repeat (14R repeat) and I would prob remove one more (2 in total) were I to make this again.
-
I would likely not have had enough yarn if I’d completed the final, instructed front lace panel repeat and made the sleeves as instructed. It indicates that size 2 requires 1040 yards and I used 1000 yards having made my version smaller.
-
I would use this yarn again if I wanted to work with a pure, new/not recycled cashmere. It was splitty and it didn’t thrill so it won’t be a go to unless it wears better than expected. I think this yarn would best suit a light-use accessory. I much prefer to work with Woolfolk Tynd, for ex., which is just as soft and much more pleasant to knit with (and is as expensive as pure cashmere, though it’s “miraculously-spun” merino). I found the tension-ing challenging (not usual for me) and, given that I had to rip back and reuse (unkinked) yarn, I do see a slight difference in the sections that were knitted more than once.
Forgot to take these before wet blocking.
(Initially, after swatching, I got 23st and 36R but when I blocked the garment part way through, the numbers changed…)


 KristinM100 notebook


 projects
 handspun
 stash
stash queue
queue favorites
 friends
 groups & events
 needles & hooks
 library
 blog posts
 Project

 stashed