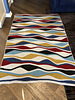
When I first saw the Miss Grace Shawl on VeryPinkKnits video I fell in love with the design. I’m not a shawl person, but I thought it would make a beautiful blanket for a cottage that my Husband’s family is in the process of building.
I found one other Ravelry user who had done that. Thank you JMillerDrist for being my inspiration that it could be done.
Just in the early planning stages because the colours have not been chosen yet for the interior. Did a test swatch just to see how the short row shapes work. This was using acrylic yarn and wasn’t blocked… but I’m happy with the overall look. My plan is to finish with an i-cord to hide the yarns that are carried up the side.
December 13, 2020
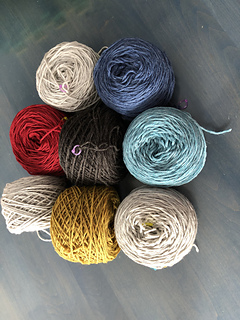
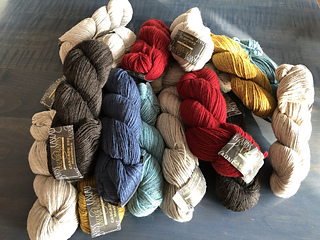
Spring has come and gone. I’ve finished my daughter’s afghan and a bunch of other smaller projects. Time to revive this one, but with a different scope. Instead of for the cottage, I’m going to be selfish and make it for me. Using lots of the leftover Cascade 220 Aspen Heather yarn from the other blanket (over 10 skeins) I bought 10 more in various colours, inspired by the painting we have in our living room. (Not so much on the green, more on the blues.) Will do a variation of the Northern Lights, but need to swatch to see how I want to layout the colours first.
This will be a great project for what I expect to be the long winter of 2020/2021.
January 6, 2021 - Detail Design Finalized!
After a lot of swatching and redesigning and frogging I finally cast on today.
The plan, which is a combination of the Miss Grace Wrap, Miss Grace Shawl, Northern Lights Scrapgan, Suzanne Byran’s Undulance Socks, and some of my own ideas.
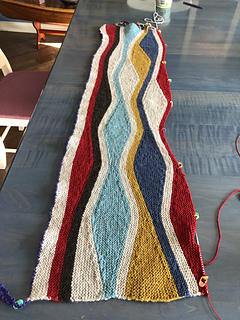
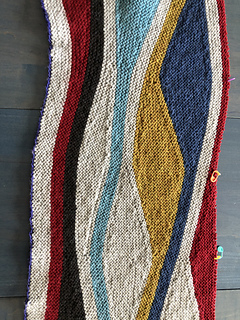
The “shapes” will be symmetrical, as in the MG Shawl and Undulance socks, increasing by 4 sts on each side to 28 stitches, and then back down again. I’m planning on having 1, 2, or maybe even 3 shapes in one colour band across the blanket. The blanket will be 8 shapes across (8 x 28) plus 5 neutral stitches on each edge, for a total of 234 stitches. (Go big or go home!) (Actually, 2 half-shapes and 7 full shapes.) I’m adding in extra rows before, between, and after the shaping rows for a total of 8 rows per band, which is about 1”.
The first of shapes will only use the 2nd half of the shaping, and only for the even numbered shapes. This will keep a flat edge across the bottom. Similarly, I will end with the 1st half of the shapes in the top set.
Planning on doing a 4-stitch I-cord around the blanket at the end, with a larger (6mm) needle. I am using a crochet cast on to start to keep those stitches live, so I won’t have to pick them up later.
Current plan is to do 2 grey sets for every 5 sets, so it’ll go colour, colour, grey, colour, grey.
January 25, 2021
I’m really happy with how it is progressing. Have decided to just cycle the colours in the order that I started, I don’t want the dark blue & black to end up beside each other.
February 26, 2021
Just about half way through the stripes. Using a spreadsheet to keep track of my yarn usage. It will definitely be a case of yarn chicken for the coloured stripes… my estimates come very close to 200 gm for each colour, which is about the 2 hanks that I have bought.
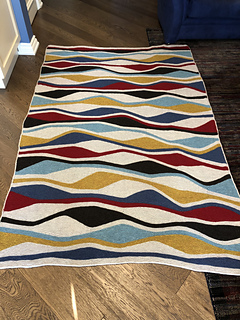
Here is the pattern that I made up, based on the Miss Grace and Northern Lights afghans.
I had 5 colours Red, Black, Turquoise, Gold & Navy which I cycled through, interspersed with the Grey. I cycled through colour/colour/grey/colour/grey, using the colours in the order listed.
Each coloured band had 8 base garter stitch rows, plus added short rows on rows 3 & 6 for the shapes. There were 7 positions across that I would have a full shape, plus half shapes on the ends, and additional 5 stitches on each end beyond the half shapes. I used each of the 7+2 positions over the course of 4 or 5 coloured bands. Each band would have anywhere from 1 to 2 1/2 shapes.
Place a marker every 28 stitches, with 5 extra on each end. Each full “shape” will be 56 stitches wide, starting at one marker, passing through another one at the centre, and ending at the third marker. When I was about to start a band I would place a green clip marker at the centre of the shape, and orange ones at the ends to help me remember where to start and stop the shapes.
Row 1 - K (RS)
Row 2 - K (WS)
Row 3 - (RS) K to 4 stitches past the first green marker, turn, K to 4 stitches past the green marker, turn, K to 8 stitches past the marker, turn, K to 8 stitches past the marker, turn… continue adding 4 stitches on each side for the row until you have made turns at each of the orange markers, 28 stitches. Continue to the end or until the next shape’s green marker. (I used wrap & turn, and did not pick up the wraps.)
Row 4 - K (WS)
Row 5 - K (RS)
Row 6 - (WS). K to the first green marker. Continue for 28 more stitches to the orange marker, turn. K to 28 stitches past the green marker, which takes you to the other orange marker, turn. K to 24 stitches past the green marker, turn. K to 24 stitches past the marker, turn.
Continue decreasing 4 stitches on each side of the marker until you have done turns 4 stitches on each side of the green marker. Continue K across the row or until the next shape.
Row 7 - K (RS)
Row 8 - K (WS)
Note…for the 1/2 shapes at the ends, just continue past the last marker and don’t do any turns in the 5 stitches on the edge.
Another Note… I did a wrap and turn for the short rows, but didn’t pick up the wraps afterwards. I saw a comparison video once by Suzanne Bryan, and this was recommended for short rows in garter stitch.
My plan is to use a 3 stitch i-cord in the grey to finish.
This is only a template, and can easily be adapted to suite whatever size object you want and what yarns you have on hand. Have more or fewer shapes. Make the shapes steeper by having fewer stitches between each turn, or make them flatter.
April 29, 2021
Bummer! I’m down to the last set of stripes, one for each of the colours. The red worked, but I didn’t have enough for the black. Ordering more…
October 22, 2021
Not all the colours I needed were in stock at my favourite LYS and by the time they came in it was too bloody warm to work on a full size worsted weight blanket. So I put it aside to work on other projects.
Finally picked it up again and blitzed the final 8 colour bands while at the cottage for a week.
Next… test and finalize the i-cord border. What size needle? How many stitches, etc.
October 30, 2021
Decided on a 3 stitch i-cord using a 6mm needle. I have live stitches across the top and I did a provisional cast on at the bottom, so those stitches will be live too. Will pick up 1 stitch on each garter ridge.
December 14, 2021
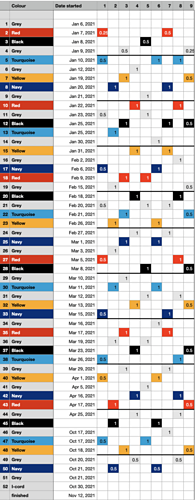
I just added a screen shot of the spreadsheet I used to plan the layout of the Shapes. In each group of 4 or 5 rows (not counting the ends) I made one shape in each of the positions.
In the first and last sections I only did the shaping on either row 6 or row 3. I hoped that would keep the beginning and end edge from getting too wavy, but in retrospect, if I followed the above rule I think I would have been OK.
I had a few instances where I had more than 2 shapes in a coloured band, but mostly kept to 1 or 2.
In row 5 I had two Turquoise shapes separated by one space. That actually means that the last short row of one was adjacent to the first short row of the next one, making a slightly larger hole. After seeing that I avoided placing the shapes that close together.
The value in each box was used to help me calculate yarn utilization.


 Machomamma notebook
  handspun
 queue
queue favorites
 friends
 needles & hooks
 library