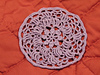
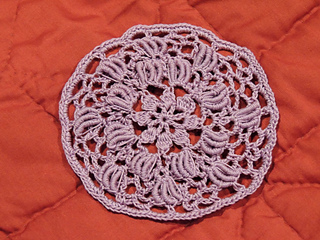
Since I used size 10 thread, this turned out to be a pretty good size motif. So I changed the last rows a little to accommodate a flat motif, instead of the button it was suppose to be. Here’s how I interpreted the pattern with some recommended changes using US terms:
Figure 80-A. 2nd photo. No changes.
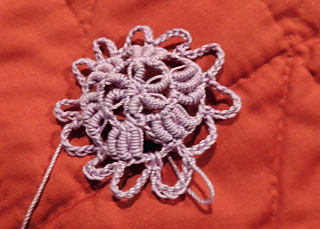
Figure 80-B. Pattern states rows, but your are working in the round. It has you ch 7 then work in the 1st st. I did the following:
- Using an adjustable slipknot, ch 7 and 1 dc in center. (ch 2, 1 dc in the same space), 6 times, ch 2, join in the 4th ch of starting ch.
- sl st in 1st ch 2 space, ch 3, 4 dc, holding back the last loops on the hook, yo and draw through all loops. (ch 7, 5 dc puff st as last one) 7 times, ch 7 join to the the 1st loop.
- 2 sl st in next ch space. ch 4, 1 sc in loop, (ch 4 1 sc in next loop, ch 1 sc in same loop); repeat around.
- Repeat row 3.
- sl st to center of (ch 4, 1 sc in next loop) 2 times. NOTE: original pattern has 3 times. 3 20 wrap bullion sts, on the center of the ch 7 loop of round 2. Skip 1 loop at back of bullions, sc in next loop. {1 sc in the next loop. (ch 4, 1sc in the next loop) twice), 3 20 wrap bullions in the next ch 7 sp in 2nd row) } repeat { to } around
- (ch 4, 1 sc in the next loop and one in the center of the bullion cluster) repeat around. Note: I did a 2nd rd of row 6.
- Repeat round 5, only place you bullion sts inbetween the other bullion cluster on row 5.
- Pattern has you doing a round of 15 ch loops. I did row 6, then I did 5 sc in each lopp. Finish off.
Don’t forget that these buttons were originally made with size 80 to 100 threads.


 Melbav notebook
  handspun
 queue
queue favorites
 friends
 needles & hooks
 library