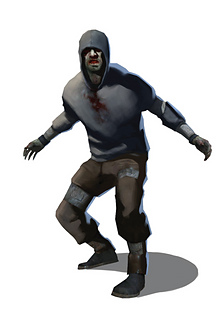
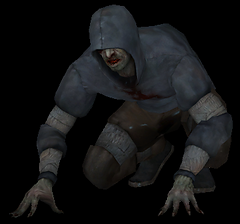
I made a Winter Hayley doll from this pattern and my fan-girl daughter asked if I could use the same body shape to make one of her favorite characters from the Left 4 Dead 2 video game, a type of super-zombie called a Hunter. Mods will include:
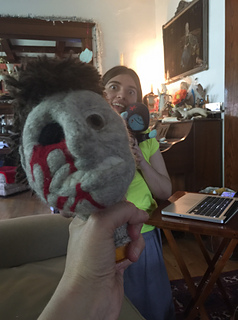
- a needlefelted face (my daughter is going to do that so it’s exactly as she wants it)
- fingers (like I made for Winter Hayley, but a bit longer) with the addition of claws made from black press-on nails (I can buy a box of 100 for something like $4, so there will be lots of raw materials to mess with until I get the shaping process down)
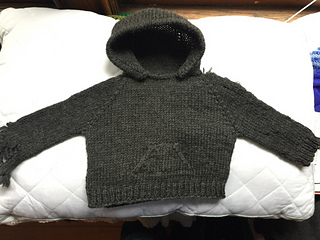
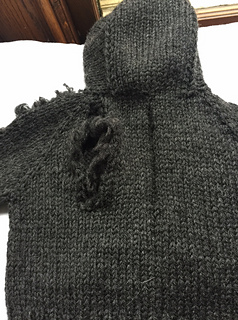
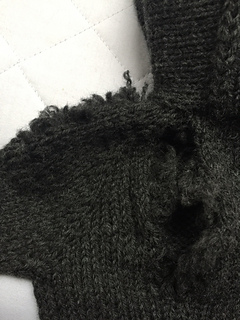
- a hoodie and dark jeans with strips of duct tape added around the arms and legs; hoodie will be a pullover, rather than a zip-up like the last one I made.
- gnarly scraggly hair
- removable black boots, made in a similar fashion to the ones I made for Winter Hayley
She wanted toenails, too, but i said that, given the construction of the foot, making toes was more work than I was willing to do.
Knitted hands tutorial by Joeknittedit, with mods:
- casting on 10 extra stitches; place first 5 stitches on holder for thumb, pick up 1
- knitting 6 rows before starting fingers
- knitting from wrist down to fingers then picking up at the wrist to knit arm; will knit arm thicker than in the original pattern (not sure how much more, yet) and include a bent shoulder at the top, using the leg/knee bend from a dragon I made years ago
- looks like I’ll probably be making a foot this way, too, winging it as I go, but based on the feet in the original pattern
- 10 rows each for index and middle fingers, 8 rows for ring finger, 7 each for pinkie, 8 for thumb
- stuff each finger fairly tightly, pushing small amounts of stuffing in with a knitting needle, rolling and pulling fingers into their full length
- Pick up 28 stitches around wrist
- Knit 4 rows
- Decrease 4 stitches, 2 either side of outer edges of hand (24 stitches)
- Knit 1 row
- Decrease at beginning and at end of next row (22 st)
- Repeat last 2 rows (20 stitches)
- Begin 50 arm rows
Started second hand, got all fingers knit, started to stuff it and weave in ends, and GODDAMMIT I MADE A SECOND RIGHT HAND.
Got pissed off at project and haven’t touched it for about a week.
Feet:
- CO 28. Join. Knit 4 rows. Begin heel shaping.
- I’m not a sock knitter (hate it), so I’m using a sock pattern for the shaping, rather than winging it.
- K14; put these on waste yarn and work on remaining 14.
- Knit 12 rows for heel flap (instead of 10 in pattern), slipping the first stitch of every row.
- K9, SSK. Turn, slip decreased stitch; P4, P2tog. Turn, slip decreased stitch, K4, K2tog. Repeat until all stitches are decreased to edge on both sides. 6 remain.
- Knit 1 row
- Pick up 8 stitches down side of instep; knit stitches on holder, pick up 8 stitches on other side of instep, place marker for beginning of round.
- Knit 1 round.
- Right-hand side of instep is beginning of round. Mark other side ; directions in the sock pattern seem really dumb; they say to knit to the end, decrease, and then begin the next round and do the matching decrease at the BEGINNING of the SECOND round (???). Why not just to a paired decrease in the same row??
- Double decrease: Knit instep, K1, SSK; knit to 3 stitches before end of round, K2tog, K1.
- Knit 1 round.
- Repeat last 2 rows until there are 28 stitches.
- K2tog, K2, SSK, knit to end of round (2 decreased in instep to give a suggestion of an arch). 26 stitches.
- Knit 4 rows. Begin increases for ball of foot.
- Increase 1 at either end of instep: Knit instep, K1, M1L, knit to 1 stitch before end of row, M1R, K1.
- Knit 1 row.
- Repeat last 2 rows. 30 stitches.
- Increase 2 stitches for big toe. For left foot: knit instep, K1, M1L, knit 1 row; repeat. For right foot: knit to 1 stitch before end of row, M1R, K1, knit 1 row; repeat. 32 stitches when finished. 6 for each of 4 toes (24 stitches) + 8 stitches for big toe.
- Begin toes (left foot). Knit instep and next 5 stitches. Divide toes as in fingers for knitted hands by putting stitches on waste yarn. Bottom yarn: last 2 stitches of round, instep, 5 stitches of next part of foot. Top yarn: knit around rest of foot and place remaining stitches on second piece of waste yarn. (right foot: last 5 stitches of round, instep, next 2 stitches).
- start with pinkie toe: 3 stitches from top & 3 from bottom. Do the same for all 4 toes.
- “pick-up row” + 4 rows for pinkie toe. pick-up + 5 rows for next two toes. 6 for next toe.
- 8 stitches for big toe. Pick-up row + 5 rows. Sew each pair of toes together.
Reverse shaping for right foot. Increases go on left outer edge; begin toes with pinkie toe on far right.
Pick up all 28 stitches and knit 65 rows for the leg, including the pick-up row. Stuff very firmly.
Pants: similar to Keito pants, but with all stitch numbers doubled. Do 2 sets of increases for inseam; only cast on 6 stitches total for inside of leg. On Row 25, do double decrease at inside of leg. Double decrease on Row 50. 15 more rows; work decrease row on 16th. Knit 1 row. Bind off.
05-26-2016
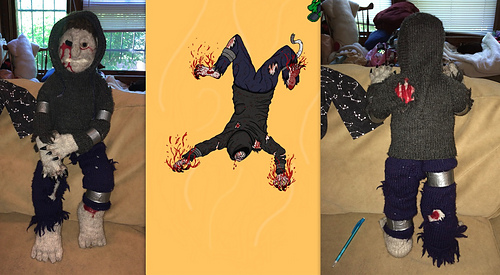
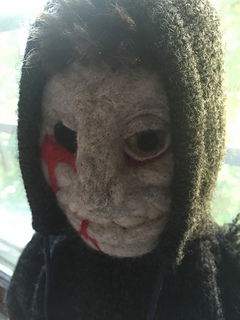
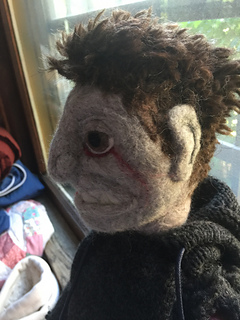
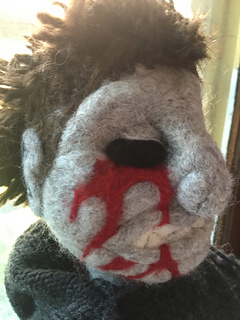
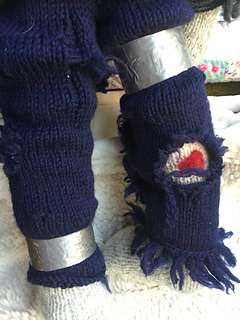
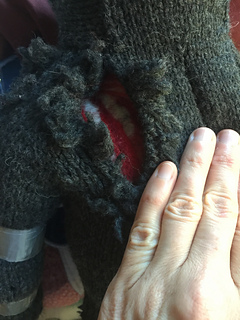
Have been slowly working on this thing. Stuffies get a bit tedious for me so I tend to do them in fits & starts. Getting close. Pants are knit but still need to be slightly shredded. Sweatshirt has long been done. Body parts are all done. Hair is on and hacked apart (he’s a zombie, after all). Face is nearly done (my daughter is doing that part). He has wounds and scratches and damage on various parts of his body, all needlefelted, including massive damage to his left shoulder and upper back, his gouged and bleeding right eye, and various discolorations and blood on his arms and legs. The neck support is an old prescription bottle; I cut it down with a hacksaw, drilled 12 holes in it (3 rows of 4 holes each, with 1 hole every 90 degrees around the circle), filled it with strips of cotton/wool quilt batting rolled into, um, a roll, then crazy-glued the lid on. the lid will be glued up against the stuffing of his head, then after it dries, will be put down into his body, and the whole mess sewed into place at three different levels from front to back and side to side. I’m planning on sewing it on with some crazy-strong nylon sewing thread, then running stitching yarn through the holes to make sure there’s no wiggle room. After that, he’ll get a piece of needlefelted wool (I felted a rectangular strip I can cut into pieces) applied to the top, and bob’s your uncle: zombie.
Sweatshirt has to go on and all this business done around that, since it won’t fit over the head (the hood fits the head, but the neck opening won’t. The pants have to go on the legs before the legs are sewn to the body for the same reason. His arms have been on for awhile, since all kinds of shaping had to happen to the shoulder joints.
Very fun making this with my daughter, despite my semi-reluctance to dive into stuffed creatures. (I’m never reluctant to START - just to keep going through to the end.)(I guess I get bored easily and there’s so much more tedious work than on a sweater.)


 Palacsinta notebook
  handspun
 queue
queue favorites
 friends
 needles & hooks
 library