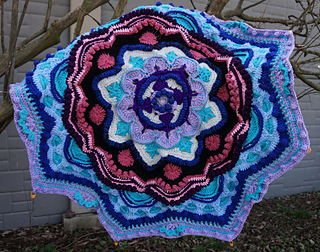
This was going to be a rug but I liked it so much that I just kept going. The more I liked it the less I could bear the thought of dogs walking on it. So … it’s going to be a bedspread for my queen size bed.
The yardage counts are not accurate. I entered number of skeins when I used 2 for a color or 1 of each skein if I blended them. No, I did not use up all my skeins. Yes, I am using up a lot of partial skeins and old stash.
In particular, I love the boucle matched with a worsted acrylic of almost the same color. i can see the stitch! Love this look and shall have to see about doing it on future projects as i love boucle and this makes it so much easier to work with.
Okay, my second try at this pattern. I intend to see if I can make the points lay up straight in the first few parts.
I pledge to make more of an attempt at color coordination.
This is 2 strands held together.
Part 1 - Row 14: I substituted hdc for the dc. this reduces the bulkiness and the ‘petals’ lay a lot flatter.
Part 2 - Row 19: I put a stitch marker in each ch-1 sp to mark the point. It makes it easy to find them.
Part 2 - points: instead of squishing everything to the right to work into the first stitch after the ch-1 sp, i am placing 2 stitches on the left side of the ch-1 sp. i will do this throughout the pattern where there are points so that there won’t be any leaning points.
Part 3 - points continue trying to keep them straight. i believe that just because we are working circular and stitches will shift constantly to the right that this is also contributing to the off center points.
when possible, i have reversed my row and worked in the other direction. you do have to be careful of the stitch count and that there are no post stitches on a row when you do this.
Part 5 - Row 39: the stitch count is rather odd. Unless i did Row 38 completely wrong but I don’t think i did.
Row 39 …. skip next 2 stitches and ch-1 space
odd thing is that in Row 38 you did a sc, ch 1, sk sc and repeat. so i can’t figure out where the 2 stitches are that you are skipping.
i think she means “skip sc, ch-1, sc”. so that’s how i am going to work it.
Part 6, 7 - I have kept these points nice and tidy straight. It’s because she is turning on the bobble rows. Plus, I didn’t squish my first stitch into the first stitch beside the ch-1 point. i added that sc randomly to the downside of the point each time.
At the end of Part 7, it measures 57 inches wide.
Part 8 - Row 53: I had trouble getting my stitches spaced correctly on this row until i figured out that i wasn’t counting the first stitch after each set of tr clusters. it was buried under the tr’s. then it all worked out great.
Part 8, Row 57.
i don’t think i have done anything wrong but i can’t make the stitch count work when she says
hdc in next 12 sts taking care not to miss the 1st st behind fpdc just made,
If i start my series of 12 hdc starting in the missed stitch behind the fpdc then i am exactly 1 stitch behind in where my next stitches should be placed.
fortunately, this is the type of thing that can be corrected easily without there being any obvious change to the pattern that i can tell. when i zoom into the pictures in the photo tutorial, it sure doesn’t look like she followed her own instructions. so i am starting my 12 hdc in the first stitch after the long (4 yoc) stitch. it just works out better and looks like the pictures.
another tip, the fpdc goes around the top of the 3 ‘long’ stitches but it works best if you do this around the “tops” and not the “top of the posts”. so it’s a sort of post stitch but really it’s more of a gathering together of the top of the stitches. this will make more sense when you work the actual stitch.
Part 9, Row 59 - What she means is look for the 3 hdc in one stitch on Row 57. This is in the center of the 3 ‘petals’ with all the long stitches. In Row 58, you will have a ch-1 centered over those 3 hdc - that’s where you are starting your new point space.
Her Photo Tutorials are almost useless. They just don’t show enough detail and her written instructions have BIG gaps sometimes. I couldn’t figure out where the heck she meant me to put the tr and so I finally watched the video tutorial. Yep, that was really useful. I highly recommend the video tutorials. Just skim to the parts that you need.
Part 10, Row 65 - She doesn’t say if you should do the sc in the 10th stitch in “front” or in “back” of the ch 6 of the previous row. so i am taking a wild guess and doing it in “front” of the ch 6.
Part 10, Row 66 - Start in the first sc of Row 65.
Part 10 - i was trying NOT to carry my ‘color 2’ very tightly across the ch stitches. that was a mistake. you pull that color 2 just as tight as you want because in Row 67, she brings it down to working in the 3 sc across the back of those points. if you haven’t pulled that color 1 really tight then it shows.
Part 10, Row 67 - what is the point of carrying color 2 around to the first stitch on Row 67? i don’t see it at all. i just cut it off at the end of Row 66. that’s a weird thing to have you do.
whew - there are going to be a LOT of ends for Part 10. i have to say that of all the parts i have worked up until now, i have not liked this part. I don’t think it is very pretty either. Hard to work and definitely not for the faint of heart.
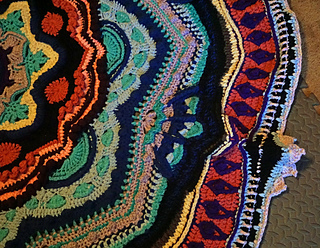
Part 12 - next set of pictures (outside and inside). it has grown so large that i can’t really see the full extent of it unless i stand back. so i decided it was time for pictures. to my dismay, it’s not laying flat. oooh but i hate that. it has become overly full.
i shall finish this section and see if it lays flat. if not then i shall look to ending it. i don’t want a mess of something that doesn’t lay correctly.
I have gone down a hook size to an L (8.0 mm) to see if this will help take up the fullness.
Part 13 - This section is going great but I have figured out that it’s Part 10 which causes the ruffling. I pulled my carried yarn - snug. but i didn’t pull it TIGHT. that is what you should do to avoid ruffling. it quite ruins it if you don’t.
The smaller hook is helping to take up some of the extra fullness but it is definitely NOT flat in Part 10. It’s quite ruined for ever being a rug.
UGh …
I really don’t like it and am glad i stopped at Part 13. The ruffling in Part 10 ruined it. This is something I will definitely be gifting to someone else.
Dimensions
96 inches in diameter
Good News - my son loved this and has taken it home. i love finding a good home for something i made (whether i liked it or not! lol).
8/1/2021 - When I was visiting my son, I discovered that he had given this to his dog as a bed blanket. Such an expensive dog blanket! I am never making one of these types of mandala blankets again. So ugly!


 PiggyWiggy96 notebook
  handspun
 queue
queue favorites
 friends
 needles & hooks
 library