I am making this for me. It will have 2 girls for my granddaughters and 1 boy for my grandson. Well, a combination of boys and girls …
I chose light purple as the solid color just because I think it will match my living room colors better. I wanted a gender neutral color but it had to be something I already had in my stash.
The variegated yarn is left over from a baby blanket I made as a commission for my stepmother. And then I purchases a few more just because I knew I was going to make one of these for me.
It shouldn’t be as hard as the first one since I spent so much time learning how to read the first pattern, the Baby Boy one.
The H hook, 5 mm, is for the foundation chain only.
Step 1 - Review the Double Border. Easy Start. Three Magic Steps video to remember how to make what she calls an Icord (but it isn’t) and what she calls center sc stitches ( but are not). She is re-using names for other stitches. So, it is best to see how SHE wants you to make the stitch. It’s confusing until you figure out what she is doing.
Her stitches work, you just have to figure them out.
Step 2 - Work the pattern AFTER you have your stitch key. Don’t use hers, it will just confuse you. Use the stitches from her accessory PDF.
My foundation cord was 131 stitches. I worked into the bottom of the foundation cord as per the video instructions. Leaving the top of the foundation cord for the double border.
Stitch Definitions - Not found in the stitch definition section of the pattern
First stitch of all rows is a modified standing center sc. See video for how to make.
Last stitch of all rows is a modified center sc. See video for how to make.
blosc is used for all rows EXCEPT Row 1 and the Last Row. This does not include the 1st/last sc of every row.
Row 1 and Last Row are: 1st st - modified standing center sc, normal sc across, last st - modified center sc. Except that it doesn’t make any sense on Row 1. You are working into a foundation chain (or what she calls an Icord) - there are no stitches to work the modified standing center sc into. It makes sense on the Last Row, but not Row 1.
All other rows are: 1st st - modified standing center sc, blosc or flodc across, last st - modified center sc.
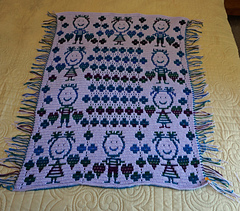
Body of blanket
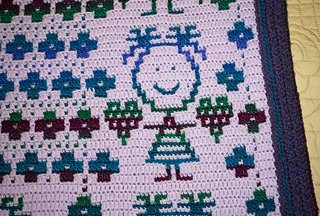
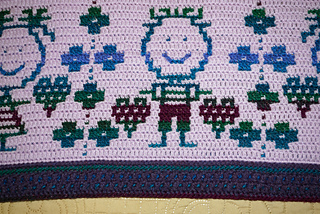
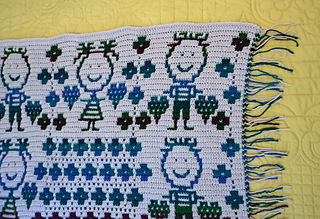
1st row of children - Start changing instructions on Row 5. Repeat from Girl pattern, then repeat from Boy pattern, then repeat from Girl pattern. Each repeat is 40 stitches and so this works just fine. The 1st section is rows 2-41.
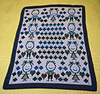
There is one project that is 3 sections tall and wide and about 30 in by 30 in. That seems a bit small for what I want, which is a couch lap afghan. I am going to do 4 sections tall.
I did a favorite on this project but it doesn’t show up here like it should. Here is a link to it, very nice project.
Me-jel’s My precious baby girl/boy blanket
Size
I am on Row 38. It feels a bit small to me so I stopped to measure and compare. This time I am using all DK weight yarn with a size G (4.25 mm) hook. My blanket is only 28 inches wide. This is with no border.
The 1st one I made is 34.5 in wide (after the border). But I used a worsted weight yarn for the solid color. And the same G hook.
The pattern target is 36 x 42 inches. The border is about 2 inches wide. So, 28 + 4 = 32 inches wide. Which is still smaller than what I want. I liked the width of my first blanket. I will have to see if I can make the border slightly wider to make up for it. If it’s too small, then it doesn’t work as an adult lapghan for on the couch.
2nd row of children
I worked girl, center, boy. Since you always start from the right, the only tricky part here was making sure that you started the last repeat in the right place since the spacing can be slightly different. I used stitch markers for between each repeat.
3rd row of children
I worked boy, center, girl.
4th row of children
I worked boy, girl, boy. I did this by having the printed patterns in front of me with a post it note on each to show me the correct row. And a small ruler to keep me on the correct line and pattern. I moved the ruler back and forth for the repeat from the correct pattern.
This was a lot easier than I thought it was going to be. I have been sailing right along.
Ends
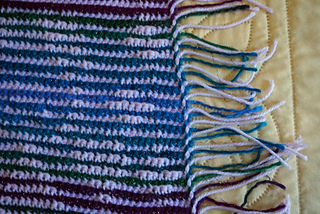
If you choose to use her double border (which I highly recommend), then don’t leave long ends. I left all my ends about 3 inches long. I am leaving knotting them until the very end. Because, yes, I have had to take out a row or 2 when I made a mistake.
She has you knot and trim the ends before you start the border. I found with my first blanket that if you trim the ends before the first half of your border, it’s a bit hard to keep them out of the way. I am going to try trimming them after I have the first half of the border worked.
I did learn from my first blanket that using her beginning and ending modified sc stitches really helps for making a nice border. They might be a bit fussy but well worth the effort.
Last 2 rows before border
Oddly, I didn’t make a comment about this in my boy blanket project. The pattern says the last section is Rows 2-41 and then finish with a row of sc in Color A.
What I did:
Row 42 - Color B, followed directions.
Row 43 - Color A, followed directions with no sc. Hindsight - should have kept the sc to keep consistent look.
Row 44 - Color A - As instructed for last row of sc.
Last step before border - knot every 2 strands together. Yes, this will help keep the ends from unraveling.
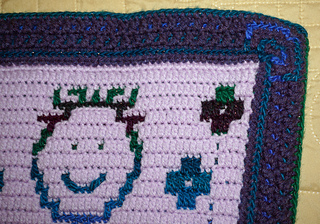
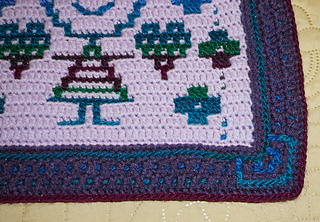
Border
When starting, she means the top right corner of the backside facing you. Start with wrong side first.
When skipping stitches, do NOT skip any stitches on the left and right, vertical sides. Skip the 1st and last stitches on the top and bottom, horizontal rows. Only the first time around the border.
I made the 2nd border on page 11 of the supplemental PDF “Double Border. Easy Start. Three Magic Steps”. I don’t know why she says it’s supplemental when it’s absolutely necessary to have this PDF so you know how to work the pattern and the border.
A total of 8 rounds for the border that I made, which includes the joining round. I changed colors in the corner so that it was invisible.
Color A - Soft Lilac, used for body of blanket and the back of the border. There was some yarn left over but not enough for the front of the border.
Color B - Sirius (the multicolored yarn), used for the body and the front of the border.
Color C - Dusky Purple, used for the front of the border. It was a worsted weight yarn instead of a DK, but it was the color I wanted. Used most of the skein.
Dimensions
width - 32 inches
length - 42 inches


 PiggyWiggy96 notebook
  handspun
 queue
queue favorites
 friends
 needles & hooks
 library