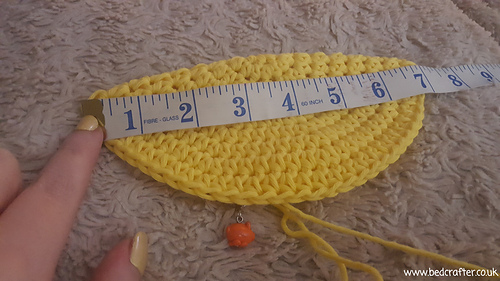
This is my second attempt, using the same pattern but the next size up. I am hoping this will give me the right size hat for the child I am making for, I have his measurements and I’m glad I did as I could of made a hat too small (shows the importance of having their measurements if you can).
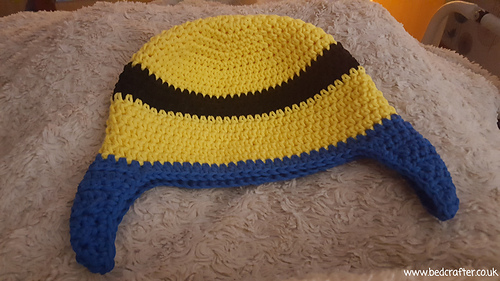
I am making this hat for my friend’s son Aaron who I think is around 4 years old. His mum showed me a photo of a minion hat they saw and liked so I am basing mine on this. I am using the Zabrina the Zebra pattern to get the basic ear flap hat and using yarn colours in the order needed to get the look I am after. I am basically following the pattern but not needing to follow the colour changes, apart from when I need too to get the look I am after.
Aaron’s Measurements
19 inches circumference
7 inches length approx
Pattern Notes
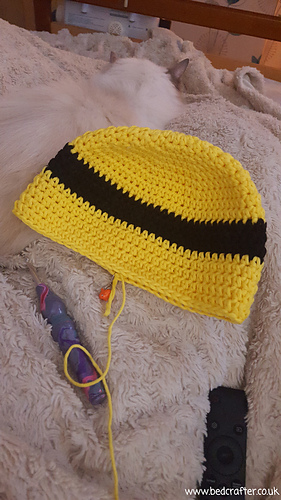
For the actual hat I followed the instructions for size teen and just changed when I change the yarn colour. Below is the details on change of yarn colour.
Round 1-10: In yellow yarn
Round 11-13: In black yarn
Round 14-19: In yellow yarn
Round 20: In blue yarn
Another sc round of blue is added after ears are made.
Pattern states Round 10 to desired length and for the boy I am making for I have a total length of 7.5 inches approx which includes the sc round at the end. In the pattern instructions it gives a hat length guide and I followed this, I choose 7.5” as the boy is age between 3-10 years and this is what the pattern suggests. I know I followed the teen size to get the right width of hat but I still kept to the guide of length based on his age, I also knew from measurements his mum gave me his was roughly 7” so 7.5” felt like the right size to me (I think mum may of measures his length slightly wrong so I wasn’t worried about the extra half inch!).
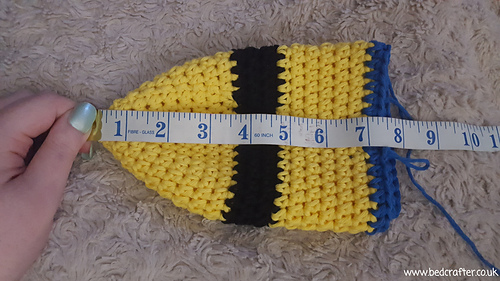
When following the instructions for the ears it ends at round 6 which leaves a row of 5 stitches, and I wasn’t happy with this look as when I make ear flap hats they continue for a few rows until they have more of a point end. I decided to continue in the same method and add another two rows, which leaves 3 stitches. I am much happier with this look and once braids are added you won’t even notice as it will look like it goes to a point if that makes sense.
I will now repeat the same for the other ear, so I’ll do row 1 to 6 and then add another 2 rows in the same manner, which is starting with a chain 1 and hdc2tog and then hdc stitches until the end. Repeat this one more time and you’ll end with one hdc2tog and two hdc stitches (3 stitches in total).
I am now adding the features to the hat to make it look like a minion and I’ve been given a photo reference to work from. I am starting on the eyes which is what the black stripe on the hat is about, as these are the goggle’s the minion is wearing (or whatever you refer to them as). To make the eyes I’ve done the following;
In black yarn using 5.5mm hook used to make hat
R1- Make a magic ring and do 8 sc into the ring. Slip stitch into first stitch.
In brown yarn
R2- chain 1 and sc in same stitch (chain 1 counts as first stitch) and then 2sc into each stitch (16). Join with a slip stitch to the first sc you made, not the chain stitch.
In white yarn
R3- chain 3 and dc in the same stitch (chain 3 counts as first dc), 2dc into each stitch all around and then slip stitch into first dc. (30)
In dark grey yarn
R4- chain 1 (count as a stitch), sc in same stitch and then sc in each stitch. Slip stitch to first sc to join. (30)
R5- reverse crochet (crab stitch) in each stitch, when you do the last stitch I then cut my yarn leaving a long tail for sewing to hat. I then took my cut yarn strand and went underneath my first reserse single crochet and secured it as the back. I did this method rather than slip stitch as it’s a mpre hidden join. You should then have plenty of yarn left to see eye down.
Note: on round 3 I realised I missed a stitch as I should of had 32 stitches so I missed one stitch that would of had 2dc. Luckily you cannot notice so I’ve decided not to undo my work and re-do it. If you want to follow my instructions to make these eyes too you can either work with my mistake given you can’t tell or include the stitch I missed and carry on with the other rounds, just remember the stitch count will be out by 2.
The eye is now finished and I did it twice so I had two of them.
As you can see I did use several colour yarns so I did need to do colour changes for different rounds. I did this by using the technique of changing yarn on the last stitch of the round, to do this you start the last stitch in current yarn and when you finish of the last part of the stitch you change over to the new yarn colour (this means the top loop of the stitch is now the new yarn colour) and of course use that new yarn to join with a slip stitch as per my instructions.
Sew down the eyes, take time to get the placement correct. I pinned them down to start with but as it meant the eyes weren’t flat the placement was off so I tacked them down with yarn instead. This worked much better and I got the right placement. In terms of sewing down the eyes I sewed down where the sc round of the dark grey was and not the last row of reverse single crochet (crab stitch) as I wanted to make sure this round was left to get a 3D shape.
After the eyes I did the smile, this was pretty much by eye and feel so I can’t give instructions for this.
I then went onto the hair and I found 4 inch lengths of black yarn was right for me/this hat. At first I just started in the middle and worked my way out, doing it till I had the look I wanted. I realised I had gone to thick and needed to spread the hairs out so I tried again, this time though I put the hat on a mannequin and it made it a lot easier to add the hair strands as I could see better how it would look on the head rather than flat. I made sure to spread out the strands of yarn better and this gave a much better look (looking at graphics of Minion’s helped). To add the hair I used a crochet hook, I folded over my strand of yarn and used the loop of the yarn to pull the strand threw parts of the hat. I can’t really explain it but this is a known method for doing this kind of thing (pull loop through stitch on hat and then use crochet hook to pull the two end yarn strand through to secure).
Now the only part left to do is the braids that you attach to the ear flaps that I’ll do in blue yarn. I cut 38” strands and I did a total of 6 sets of 4. Using 3 sets per braid so that’s 12 strands per braid and as strand is folded in half that then gives you twice the amount. I followed the length of braids as given in the hat pattern I followed for size and then I can adjust the braid to the size I’d like, longer is always better as it gives you options and the size does decrease as soon as you start braiding too.
Mum wants short decorative braids so I’ve done them at 4 1/2 inches long, taken from below the start knot and the end knot (not including cut yarn strands at the end). Total length from start knot to end of braid (including yarn strands at the end) is 6 1/2 inches approx.
Finished crocheting the hat now :-) just need to add fleece lining that mum asked for to add extra warmth.
Lining the hat with fleece
I have got some lovely pale yellow fleece to line this hat with from a local fabric shop. I followed this guide for lining the hat, it was really easy and quick to follow. I followed the instructions and all I did was include the ear flaps too, which I’m pleased I did as the results look great.
I didn’t take many photos during the process of lining the hat as the guide shows it so well. All I did differently was draw around the ear flaps and I still made sure to allow the access at the bottom of the hat, so they could be folded over and lined (I refer to the bottom line of the hat, just like in her guide as her hat doesn’t have ear flaps). One thing to remember is when including the ear flaps to allow extra fabric, because like the bottom edge of the hat they need to be folded over to see down. What I did was still draw around the hat shape like she did, I just came out a little more when it came to drawing around the ear flaps. I had no problems following her guide and including the ear flaps as well so I’m sure you won’t either.
In terms of sewing the two pieces of fabric cut, I started at the point of one of the ear flaps and kept working up and around all of the hat to the other end point of the other ear flap. I then put the fabric piece into the hat and made sure I was happy with the placement. I did add it whilst the hat was lying flat to start with and then I picked it up and worked around the hat as a more circular shape. Doing this meant I got a good placement with the ear flaps too, it was still in a very similar placement to when I was adding the fabric inside with the hat laying flat. Luckily I had quite a bit of excess fabric around the ears and bottom edge of the hat so I cut the fabric down as I pinned the fabric in place. The excess was good as it meant I could get the placement right for the ear flaps. Just be careful you don’t cut to far when your cutting to the edge between the bottom line of the hat and the corner of the ear flap.
All of this might sound complex but following her guide really was very simple. Yes including the ear flaps was a bit more fiddly but not much. Over all it still went quickly and was easy to do  I’ll definately be using this guide again when I line more hats (I even have another planned soon where I’ll take more photos showing what I mean with the ear flaps).
Love the end result a lot  I can’t believe how good it looks and I’m so pleased I finally lined a hat because the finished results really are amazing!


 bedcrafter notebook
  handspun
 queue
queue favorites
 friends
 needles & hooks
 library