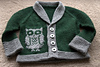
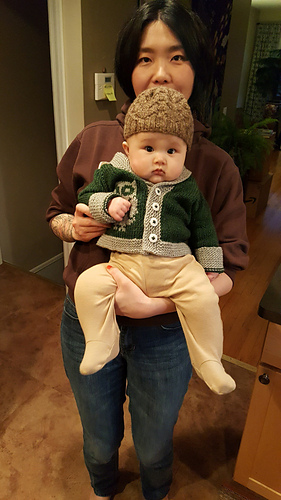
This is cozy looking. The grey garter cuff on the arms look like little muffs because I knit it longer. This is going to start out big on Kai, but hopefully he can get a good year of wear out of it before he outgrows it.
I did one row buttonholes instead of a YO. They were 2 stitch buttonholes, which stretches to fit a 3/4 in button, but a 5/8 in button might have been better. For the shawl, I knit 3 garter ridges before starting the short rows. I knit until 24 stitches from the end and then w&t. I spaced the w&t 2 stitches apart (not intentionally, I just misunderstood the directions). I had 4 w&t stitches on each side, created button holes, and then knit 5 more rows and bound off.
If I were to knit this again, I’d ignore the selvedge and not bother slipping at the beginning of the row. It created wider stitches at the edges of my knitting, which made it look weird, and didn’t necessarily help with picking up stitches for the band and collar. I’d rather I knit regularly and then picked up every other row. To try and hide the extra wide edge stitches, I actually picked up a column in, so there’s a little more fabric than usual behind the button band.
I did the sleeves one at a time, but I think if I were to knit this again, I’d do it two at a time - mostly so that I can decrease whenever I feel like it, without having to mirror on the other side. A lot of my decisions were on the fly.
All stitches were bound off by k2, put both back on left needle, k2tog through back loop. So far I’m liking this as a way to bind off garter stitch.
March 14, 2018
Cast on 40.
m1R before stitch marker, m1L after stitch marker instead of a backwards loop increase.
I’m loving the quick baby sweater knits. Great way to learn about sweater and garment construction.
March 16, 2018
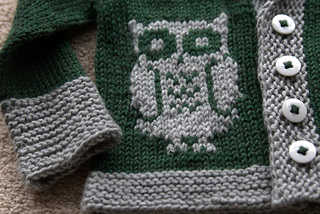
This is my first item that involved a bit of stranded knitting. And it’s fiddly. Practice might make it less fiddly, and I think my next goal in knitting is to get comfortable with English style so I can hold a yarn in each hand.
March 20, 2018
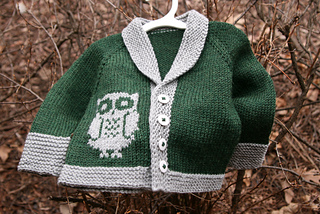
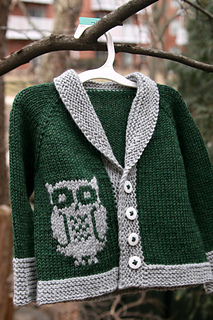
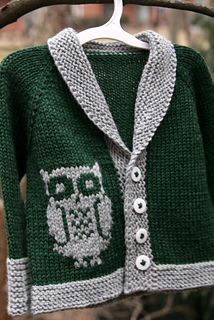
I cast on 40, and divided as front:5, sleeve: 7, back: 16, 7, 5 (per shredbetty’s notes.)
Knitted Rows 1-13 once and then rows 2 and 13 until I had 33 stitches for each sleeve. I knitted a few more rows only increasing for front(s) and back, aiming for 100 stitches for the body. I knitted straight for a couple more rows until it measured ~5 inches from cast on edge. Separated for sleeves and cast on 3 stitches at each underarm for a total of 106 stitches for the body, then followed pattern for owl on right front.
Sleeves: picked up ~4, 5 stitches at the underarms to close holes and then decreased immediately in following round to achieve 36 stitches. Decreased 2 stitches 2 inches later, then 1 inch, 1 inch, for a total of 4 sets of decreases before starting on the cuff. Knitted the cuff a little long (10 garter ridges) because I was running out of the green yarn.
The measurements on this garment are all over the place, mostly because it’s really hard to knit for someone else’s baby when you don’t have one of your own. Kai is 4 months old, but he’s fitting into 12 month old onesies. What does that mean, exactly? Does he need the same length sleeves as a 12 month old? Or he just needs the extra length in his torso? I have no idea. I knitted it larger, figuring that worse case scenario, he can grow into it. Also, this baby size chart was helpful.
March 21, 2018
Off the needles! Needs to be blocked and buttons. I used up all the green. When I go to the sleeves, I weighed the yarn and divided the remaining yarn for each sleeve, and knitted to length by knitting a longer garter cuff section using the grey yarn.
April 25, 2019
Baby Kai is 18 months now. And the torso is now short for him. Next time I’ll add some length to the torso so he can get more mileage.


 christinelien notebook
  handspun
 queue
queue favorites
 friends
 needles & hooks
 library