While working on the CSM blanket project http://ravel.me/karenramel/b2btc
by creating first the fabric on the csm machine then assembling, I worked up a cone of unmarked Birkeland wool that seemed too stiff a fabric to be comfortable double layer (original plan was to make knitted tubes then join). Once I mostly finished the cone it occurred to me that it would be better if used as a ball chair cover.
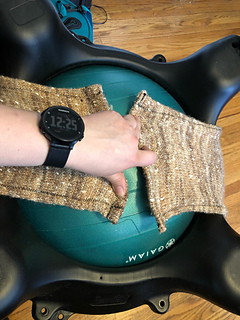
What I started with:
With this wool in the machine I really didn’t have a choice on tension as only on the 54 cylinder using the loosest tension could I grudgingly produce a knitted fabric (worked in round with two needles removed - one at each side of the halfway or midpoint marks). This fabric fought the machine continually with the different textures and varied thickness. So I worked 888grams of wool in the form of a 52 stitch in the round tube with a left and right line of unworked stitches.
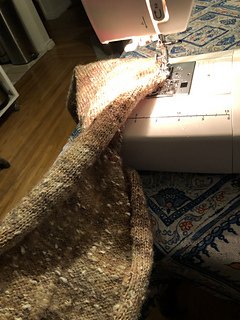
I cut the horizontal bars of one of this rows then ran both edges through the sewing machine to trap the rows.
Silent video: https://www.instagram.com/p/BxuiCUOhQKP/?igshid=owuwxg4kik8f
This wool is very sticky so I had no problems with anything unraveling while manipulating fabric.
I now had a flat bit of fabric where the original and second row of unworked stitches is now the vertical middle of the piece.
I determined how long it should be to cover the chair and then zigzag stitched two prepped pieces in parallel. I then ran a straight stitch parallel row.
I laid the double wide fabric on the ball chair and approximated the curved edges on the front and back sides of the chair. Determined how much was left of the fabric then prepped and cut it into two equal parts.
Basically the fabric was laid out on the ball in the shape of a plus with the horizontal lengths extra long to later have Velcro to secure cover to chair and wheel base. As more fabric was needed in four small separate segments between the “plus shape” on the diagonals - I used some leftover fabric from the recent flat worked fabric I made a pair of lounging pants.
Reference: http://ravel.me/karenramel/p1c9fwc
At the time of writing this the final seam securing needs to be done, two of the shorter edges need a final hem and the longer two “wrap edges” need Velcro application and slight beautification later tonight after work.
Am very pleased with this project as it uses the heavy fabric, protects the ball and makes using it safer for me.
I finished the edges with heavy nylon strapping and designed a parallel adjustable strap closure with Velcro closing the bottom of the chair cover and securing the cover to the chair. Air valve access.
I love how this turned out. Yay.


 csmlove notebook
  handspun
 queue
queue favorites
 friends
 needles & hooks
 library