02-16-2017
Amazing pattern. I strongly suggest to watch the whole series of three videos explaining the execution step by step.
HEAD
I started from the head, I made myself sure to keep an extra tight gauge in order to have a tightly knit texture in order for the stuffing not to show.
No hair as I didn’t like it.
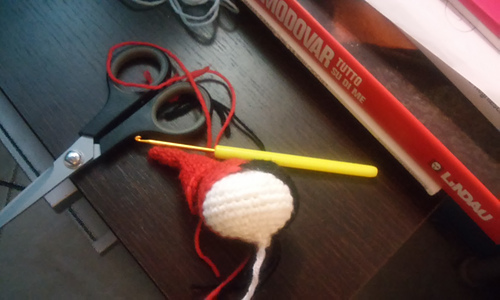
CAP BODY
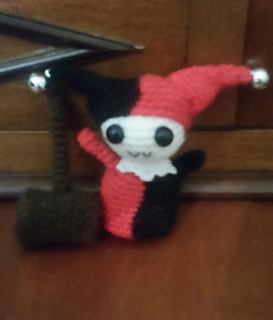
The cap is really fun to crochet, I had some troubles starting the bicolor magic ring and making the bicolor DCs at the end of a section. In the end, the cap was a bit too tight because of all the floats in the middle, so I resorted to cutting those in half. I need to secure all the annoying ends in the back but at least the cap fits well now!
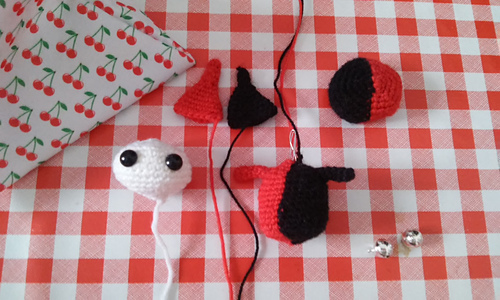
HORNS
probably the fiddliest bit. starting off with three stitches is PAINFUL. the piece just reverses itself showing the wrong side on the exterior. I was able to put it back to the normal position just at round three, when you start increasing and have 6 stitches. From that row, things go back to normal. I don’t know if I’ll be able to find the sleigh bells, but I want to put those because the tip is not really clean looking :D
02-17-2017
BODY
In order to have better stability, I decided to do a round more than adviced and to have a 30 sts base instead of the adviced 24. Instead of just doing 4 rounds after the initial one in the back loops, I’ve decided to make 9, resulting in 10 rounds forming the torso.
Halfway, the floats in the interior were so tight that all the piece was distorted. I stupidly decided to cut all the threads in half but this caused some central stitches to come undone. I unraveled everything and start it off again, cutting the unused yarn everytime and knotting it again when needed. This was more time consuming but I was soo happy of the final result!
Once I’ve finished the 10 rounds and thus before starting the decreased section, I’ve inserted the metal wire and the stuffing. The first round of decreases was 4 dcs, 1 dec, because I was starting with 30 sts. Rest of the decrease section as from the pattern.
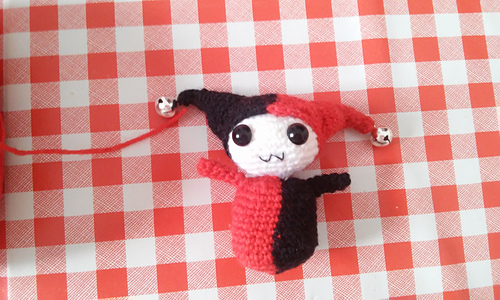
ARMS
damn, it was so difficult working on just 4 sts! I had troubles always around the second round, some sts just looked distorted and wonky, so I capitulated and worked on 5 sts instead of four.
after finishing, I bent both arms in order to make them look more natural.
02-18-2017
Finishing time!
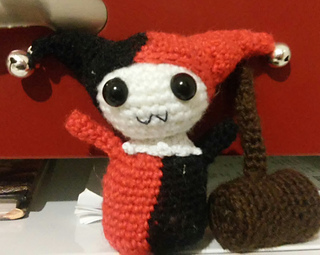
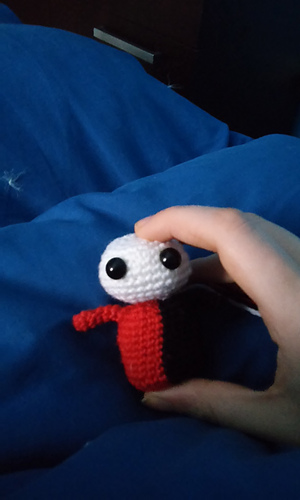
Head: Attach two plastic eyes using textile glue. This is meant for an adult so I’m pretty sure he won’t stuff it in his mouth :P, but if it was for a toddler I’d use thread for the eyes.
Using doubled sewing thread, I’ve sewn a cute chibi mouth (not quite sure if I’m satisfied with it)
Cap: the floats in the interior are making it difficult to properly fit it on the head, so I’ve cut those in half. Were I to do it again, I’d use the method I’ve used for the body; in this case I’ve secured the floats using textile glue and pressing them onto the fabric.
Horns: I’ve managed to add two sleigh bells, maybe too big for this project. In order to attach the horns to the cap, I’ve put the sl st at the bottom, and I’ve tried to keep the base as open and stretched as possible. Once sewn, I’ve drawn the thread inside the horns and cut it.
Arms: Keep the sl st on top, this will look roughly like a shoulder and help the arms to bend down. I’ve attached the arms roughly at the first decrease round, matching the color of the body.
Body: Very hard to attach this part to the head even though the metal wire surely helps to make things stay put. I’ve kept the head slightly tilted forward for a more natural look.
Fit the cap on the head aaand… you’re done!
ADDITIONAL MODS
I did some research and I feel the characteristic mask is missing so I’m pondering to add that even though that would be hard to fit in that limited space.
What I’m adding for sure is the typical lace collar because I feel that it will help concealing the neck seam .
What about the hammer? I’m thinking about it as well, the problem is to find a wooden stick that fits my needs
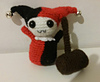
02-20-2017
Chibi harley is finally completed!
I gave up about the mask, since it would have been virtually impossible to make it work with such big eyes, but in the end I’ve added the neck frills and her typical hammer!


 ddrdevotchka notebook
  handspun
 queue
queue favorites
 friends
 needles & hooks
 library