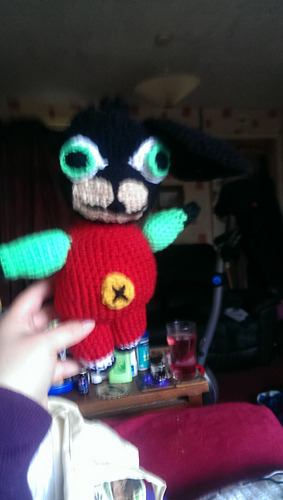
This is only the second pattern I’ve designed and typed up, feel free to adjust. I think the head should have been a little wider, or perhaps I should have just sewn the eyes on a little closer together. No special stitches, BLO back loops only, is just for a bit of definition between ‘limb’ and ‘clothing’. I use magic rings to start and usually wait a few rounds before fully tightening as it’s easier to work with. I find small stitch markers are most helpful. I didn’t count every repetition so ‘around’ simply means repeat the stitch to the end. The number at the end is the number of stitches you should have, although if you’re 1 out I wouldn’t worry, especially towards the end of the body (see note where you sew on button)
Legs (make 2)
MR6 black 6
Inc around 12
SC BLO 12
Change to white SC 12
SC 12
INC, SC around 18
Change to red SC 18
SC 18, 6 times
SS to ‘flatten’ and fasten off leaving thread for sewing to body
(Obviously) stuff before attaching
Button
MR6 yellow
Inc around 12
SC FLO 12
SS fasten off
The front loop only round provides a bit of definition, like a button edge, choose the side you prefer and embroider a cross, I went over it twice to stand out more.
Mouth
Mine wasn’t perfect so feel free to adjust. This is worked by crocheting around the chain,alongside and then along the other.
CH11 beige
SC10, inc(at the end), SC10(along other side) inc
CH1, SC9, INC, SS, CH1, Turn
SC11,SS, CH1 Turn into
SC4, SS, SS, SC4, SS
Fasten off
Embroider ‘lips and mouth’
Outer eye (make two)
MR6 White
Inc around 12
SC12
SC12
SC2, INC, SS (This make the teardrop point)
Inner eye
MR5 black
SC, INC, SC, INC, SC
Change to green SC7
SS to complete green circle
Fasten off and sew to outer eye
Arms (make two)
MR7 black, don’t pull ring tight, CH2 and SS to the ring
Skip the CH2 and SC around, this makes the ‘thumb’, pull magic ring closed
SC, INC around 10
SC 10
SC 10
Change to green BLO SC 10
Stuff lightly then keep stuffing as you go
SC10
SC,INC, around 15
SC15, 3 times
(Following decreases are meant to be opposite the thumb, so adjust if they don’t fall in the right place)
SC7, DEC, DEC, DEC, SC, SC 12
SC7, DEC, DEC, SC 10
SS fasten off leaving tail for sewing to body. When attaching, have thumbs pointing up
Ears (make two)
You may want to make an inner ear as well to make them more robust)
CH5
SC in 2nd chain and across, CH1 turn 4
INC, SC,SC,INC, CH1 Turn 6
SC6, CH1 turn 6
INC, SC, SC, SC, SC ,INC, CH1 turn, 8
SC8, CH1 turn,6 times
DEC, SC, SC, SC, SC, DEC, CH1 turn 6
SC6, CH1 turn 6
DEC, SC,SC, DEC CH1 turn 4
SC4 CH1 turn 4
DEC, DEC, CH1 turn 2
DEC, CH1, SC around edge to give a nicer finish, SS to join
Fasten off leaving tail for joining to head
Body (Whilst typing this up I can see I’ve missed writing down something, however if you work evenly around, increasing at the ends for the first 4 rounds you should be OK) stuff as you go along, however is comfortable for you.
CH13 red
SC11, INC,SC10 around other side, INC
SC11, INC, SC11, INC
SC1, INC, SC10, INC, SC, INC, SC11, INC
BLO this round. SC,INC, SC12, INC,SC2, INC, SC11, INC
SC35
SC6, INC around
SC40, 4 times
SC6, DEC around
SC35
SC5, DEC around
SC30
SC4 DEC, around
SC3, DEC around
SC2, DEC around
Sew on button to middle of body (technically there should be 15, but I had 16)
Stuff
SC16
INC around 32
SC, INC 40
SC40
SC7, INC around 45
SC45, 4 times
SC7, DEC around 40
SC6, DEC around 35
SC35
SC5, DEC around
SC4, DEC around
SC25
SC25
Sew on mouth
Sew on eyes
Stuff
SC25
SC3, DEC around
DEC repeat until closed
CH5, SS into head, 3 times
Fasten off and sew in ends


 handspun
 queue
queue favorites
 friends
 needles & hooks
 library