(Started during the Geogradient MKAL 2023 as something to do in between clues, but I’m not sure of the exact date)
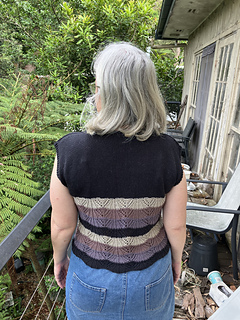
This is the second of the tops out of the Moda Vera bamboo/cotton packs from which Thea wanted a top. This colourway pack is actually labelled “Tonal Delights”. It is greys and black.
… sort of greys and black. This yarn is really interesting in that it often appears to be a completely different colour when squished in the packet next to the other colours compared to when you get the ball out of the packet by itself, and then, again, when knitted up. My theory is that its beautiful lustre actually reflects the light coming off nearby objects, making it appear a different colour depending on what is nearby. Once the balls were removed, they appeared to be a beautiful black, a cool mid-dark grey, a cool mid-dark chocolate and a distinctly greenish mid-light grey. They do look lovely together, though …
I am anticipating some interesting gauge issues. It will be easy to get the stitch gauge of 20 sts/10cm, but the row gauge is likely going to be a bit of a sticking point. I need to do a good swatch …
To my surprise, the suggested 3.5mm needle was not as far off as I thought it might be for unblocked row gauge, with one vertical pattern rpt being 4cm ie, ~32.5rounds per 10cm. (Pattern gauge for lace is 40rounds per 10cm.). Unblocked, one chart rpt took around 8cm in width, so that works out to around 22.5sts for 10cm (pattern gauge is 20sts per 10cm). This means that with this needle size, an unblocked chart motif is too tall and not quite wide enough. From recent experience, this yarn has a marked propensity to grow width wise on wet blocking, and, in addition, is actually quite well behaved in that it stays how you want it to after removing the pins, even if what you wanted it to do is squish back together a bit
… I discussed the issue with Thea and suggested that I might need to miss out a vertical stripe. She said that is fine. …I will deal with the stockinette when I get to it.
…so, I stopped and measured my gauge after doing about 3 of the “stripes” (with the 3.5mm needle). The result is very interesting! I am just about spot on the pattern for row gauge, which is 40 rounds per 10cm, but my stitch gauge is way more condensed at around 27st per 10cm. After thinking for a bit, I am not too worried. This yarn REALLY wants to stretch when wet. When I block, I will need to be careful not to let the garment stretch vertically (although, I am still considering leaving out a stripe) and also be careful to pin it to the needed width so that it dries to an appropriate size …
I am considering somehow incorporating some similar stabilisation modifications for the shoulder as those I incorporated into the daisy check top ie, some twisted stitches and slipped stitches near the shoulder line, in order to keep the shoulders from stretching out of shape in this slinky yarn.
Stockinette section
I have been trying to figure out the best thing to do for the Stockinette section. Thea really likes the fit of the Daisy Checks top I just knitted for her and it is in the same yarn and is a very similar shape, so I’ve been thinking that I might be able to use info that I gleaned making that project to inform what I do on this one.
I was so pleased (and surprised) when the stitch count for that one turned out to be exactly the same as for this one - YAY!!! This means that I should be able to use the same size needle and get a similar size. I should also be able to use the same armhole measurement (which was 21cm). I think that means that there will need be very few plain rounds prior to splitting for the armhole in order to prevent the top from being too long … but I should probably actually do some torso length measurements on Thea to see exactly how the armhole will be best placed vertically. I need to remember to take into account where the bottom of the yoke will sit in relation to the bust, too…. I probably should have sorted all of this out before doing the lace, but I’m still only halfway through the lace, so there is still time.
I am planning on doing the armhole length as per the size 5 or 6 (whatever is closest to the wanted 21cm) but everything else as per the size 2 that I am knitting. I need to remember that if I am going to add some slip stitches and/or twisted stitches at the top in order to prevent the shoulders and neckline stretching out of shape, it needs to start a couple of rows before the neckline bind off. I will probably need to do some extra rows above this point b/c the slip stitch or twisted stitch pattern is very likely to be vertically compressed.
…if I am going to do slip/twisted stitch modification, I wonder whether I need to do the front first so that I can match the number of modified rows on the front with the number of modified rows on the back … or maybe I can just do it based on the measurement needed for the front neckline, and keep track of numbers of rows etc … I need to remember to take into account that the back armhole length is a little bit different to the front armhole …
So, I did some measuring and discussing with Thea. The appropriateness of the 21cm armhole depth was confirmed as was the fact that if I do 5cm of plain stockinette in the round b/w finishing the lace and separating at the armholes the top will be too long. I have measured the length of the lace halfway through and it was 13cm, so double this should be around the length of the lace section when it is complete. When I measured 26cm down from the appropriate armhole depth the length would be pretty much perfect for the top. This would require the lace to come right up to the armhole, though, which made me worry about where the transition would lie across the bust. After discussion, though, Thea didn’t have a problem with where the transition will sit if the lace comes right up to the armhole and the armhole is 21cm. So, my plan is to finish the lace section exactly as written, probably do just one or two plain stst rounds so that any distortion caused by the armhole doesn’t affect the lace directly, divide for the armholes and knit as for a 21cm armhole depth.
I am so pleased with the pairing of this yarn with this pattern! I just hope that everything works out when I have finished, washed and blocked …
Yoke
Changed to a 4mm needle for the stockinette (yoke). There is a chance that I will later regret not sizing up more. The Daisy checks T was done on 4.5mm, but I had to really squish it quite a bit to get it to the wanted measurements in blocking. The lace part of this project will need tensioning (ie the opposite of squishing) for the lace to get to the desired measurements, so I figure that somewhere in between the size of the lace needle I used and the size of the needle I used for the other project should be ok … in theory …
…there is a good chance that I might have to do this part more than once in order to have something that I think works …
So, I decided that I actually like the look of the tiny detail that is added in the lace by changing colours during mixed knit/purl rounds, so my first yoke round (black) was an exact copy of the first round of the lace chart, with the lace needle size. The next round I switched to the 4mm needle and stocking stitch. I completed two full rounds in stocking stitch - my thinking is that might stop the lace being distorted too much at the bottom of the armhole.
One of the conclusions I have come to is that I will probably be better off completing the front yoke before the back yoke b/c I am planning to make some (hopefully subtle) modifications in order to help prevent the neckline and shoulders from stretching out of shape. These modifications will need to start lower on the front b/c of the neckline, so if I do the front first, I can then just try to match whenever the mods need to start when I knit the back. So, the sts for the back were put on hold so I could knit the front yoke first.
As an aside, the first ball of black ran out right at the division into front and back.
I am knitting the front until the armhole length is 13.5-14cm. After that, I will do just a few rows with every 2nd st worked through the back loop, alternating which column of sts is twisted, until the neckline is reached. I am toying with the idea of not actually binding off the central stitches for the neckline, but, rather, putting them on hold to use when the ribbing is done, rather than picking up stitches. I know that binding off these stitches can provide better stability, but I actually prefer the smooth look that is created when the stitches are held across the centre rather than bound off when something like ribbing is to be added (like here). In any case, I have added stabilisation plans for the ribbing, so not binding off those central sts shouldn’t be a big problem.
I thought about knitting the front to the length of starting the twisted stitches and then doing the back to the same length before doing the rest of the front, but I don’t really think there would be much gained by doing that as long as I know at what length the change to using twisted sts was done. For the back, I’m not sure whether I want to match the change over as measured from the bottom of the armhole or count rows down from the shoulder “seam” , or something else. I am hoping that I will have a better idea once I have seen how the front turns out …
Neckline
On the third row of working alternate sts tbl I was supposed to divide for the neckline by working across the 36sts for the right shoulder, placing those on hold, binding off the next 36sts, and then working the last 36sts. What I did was work across the first 36sts as established, pm, work another 6sts as established, work 24sts as ptbl, slip 1 (rpt), go back to ptbl, p1 for 6sts, then place all of the sts for this row so far on hold, then continue on to work the last 36sts as established. I could now work the left shoulder and neckline as follows:
The first st of every row was slipped with yarn to the back of the fabric.
The established pattern of alternating plain sts and twisted stitches, with the columns changed for each row was continued.
Left shoulder
Decrease rows as per pattern
6 rows in off set half twisted stockinette as established (work measures 19-20cm at armscye)
Start adding slip stitches to further stabilise shoulder area - 1 row of work 1st alt with slip 1st, then purl back across as per previous, then 1 row of slip 1st alt with work 1st, purl back again …
Rpt the last four rows
Armscye now 20.5cm, so left shoulder stitches put on hold to work right shoulder
Right shoulder
Slip right shoulder sts back onto working needle in order to be able start with a RS row as per pattern.
I swapped the k2tog for a ssk b/c I like mirrored shaping in my knitting. ( I know that these edge sts will kind of be hidden in the pu for the neck band, but the fabric drapes slightly differently, so I just know that I will be happier if I mirror the shaping.)
Basically followed the same procedure and row counts as for the left shoulder, but with mirrored shaping.
Back Yoke
Plan to knit armhole to the same length as the front when twisted stitch pattern was commenced, then start twisted stitch pattern for the back.
I ended up starting out by having 12sts on each side involved in the twisted st pattern, then slowly added more and more sts to try to make a curved shape where the stst changes to the off-set half twisted stockinette. It worked well - but I would have liked the curve to be steeper. I also added a couple of rows of k1 tbl, s1 or k1,s1 high on the back - just for the stitches that will become the neckline plus a few ea side of that…then I did a few more rows and ran out of yarn ~4 rows short of the shoulder! I so hope that we can get some more of the yarn!!!
Local Spotlight had the yarn - YAYYY!!!
Did another couple of rows with slipped stitches close to the shoulder joins. Didn’t bind off the stitches that were meant to be bound off - put them on hold instead.
Modified 3needle bind off (knitwise for front needle and purlwise for back needle) for the shoulder joins. Gives a lovely flat seem. I did it from the right side so that there is a wonderful, subtly decorative, flat chain sitting along the seam lines. From the front for one shoulder and from the back for the other shoulder.
Neckline
Not quite sure what needle size to use for the ribbing. Not sure whether I need to do the picking up in a tiny needle like I usually would, either …
I ended up going back to the 3.5mm needle, like I used for the lace. Thea’s head is slightly larger than normal size for a woman, so I didn’t want to make the neckline too small… I can always go down another needle size a few rounds in if needed …
NB: remember I had the stitches across the centre front and back on hold rather than bound off.
So, with the 3.5mm needle, starting at the right back, I did k1 tbl, p1 across the stitches for the back neck. Then I picked up 8sts down the left neck and k1 tbl, p1 across the front neck . Finally, I picked up 8sts along the right neck to complete the round.
Second round was k1 tbl, p1 the whole way.
I made the third round fully twisted rather than half twisted rib by twisting the purls as well as the knits. I am hoping that this will increase the recoil of the neckband and help it to keep its shape without completely cutting the ability to stretch a bit.
After that round I went down to a 3.25mm needle and did another round of half twisted rib.
The following round has the knit sts across the back neck only slipped. The purls were worked as normal. The rest of the round was half twisted rib.
I did a sewn bind off after that round.
Armhole finishing
I needed to improvise the number of stitches to be picked up because not only was the armhole a lot deeper than called for in the size I knitted, but I think the gauge probably changed a bit towards the shoulders where I had switched to offset half twisted stockinette and a few rows with slipped stitches.
I used a 2.25mm needle to pick up the sts b/c I find that my pick ups look much neater when I use a very small needle. I then swapped to the 3.5mm needle to do the actual knitting.
When I counted the picked up stitches for the first sleeve, it was 103. I picked up 3sts for 4rows for most of the way around the armhole. This should be ok. I will get that down to 102 by working the first and last sts together to join in the round. I plan to do half twisted rib with maybe a round or two of full twisted rib to help prevent stretching out of shape and aid in achieving some recoil in the fabric. It is possible that I will want to reduce the number of stitches in the last round or two before binding off.
1 round half twisted rib
1 round full twisted rib
1 round half twisted rib
Switch to 3mm needle
1 round half twisted rib
1 round full twisted rib
Bind Off
Now it just needs to be blocked. It will be interesting to see if I can get it to the wanted dimensions and then whether it will hold said dimensions once dry …
Blocked to:
21cm deep at armholes
49cm long from shoulder to hem
45cm across top of shoulders
46cm across at bottom of armholes
54cm across bottom
(NB: I measured Thea from shoulder tip to shoulder tip across the back of the neck and that measurement was ~42cm)


 felicitymcrowe notebook
  handspun
 queue
queue favorites
 friends
 needles & hooks
 library