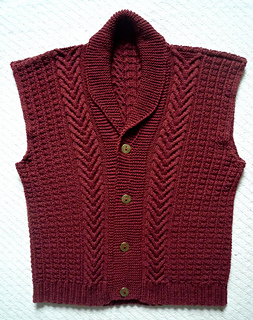
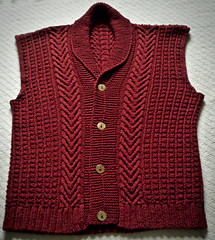
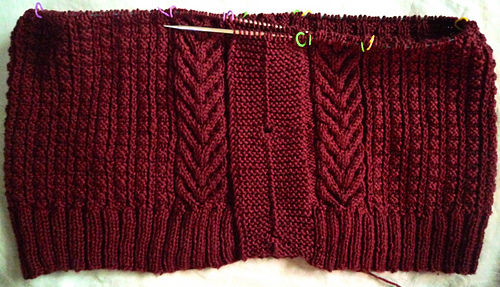
this is a one-piece botom-up vest that i’m designing using elizabeth zimmermann’s percentages method & her “phoney seams” (i didn’t end up using them because the sailor’s rib st gave it plenty of structural support). i’m incorporating a variation on a vintage men’s shawl collar sweater (link below) but i’m knitting the 16 st border in garter st instead of stockinette st - i really like the RS slip st in the middle; it really adds a nice detail.
What I Did
starting at the bottom edge
CO method:
https://www.youtube.com/watch?v=wf8cY_djTRI
i CO ~90% of total number of stitches needed to fit my dad, with a gauge of 5 st/inch = 250 st
PM: placed markers
1st set - 16 st from each edge
2nd set: 50 st farther in (i.e. 66 st from each edge)
the 1st set mark the button /shawl collar border & the 2nd set (66 st in) mark the center of each side.
after increase/set-up row i redid the makers (see below)
began by knitting 18 row ~2 ½“ of 2x2 rib st (i believe EZ recommends 30 row but that seemed too much not sure my dad would like that large of a rib band so i “eyeballed it”) along with the 2x2 rib i knit a 16st garter st border on each side using a variation of the border from the shaker sweater pattern: http://www.ravelry.com/patterns/library/shaker-sweater
http://freevintageknitting.com/sweater-patterns/star141/s...
shawl collar buttonhole border: 16 sts on either side
RS: Sl1 K6, Slip (sl) 1 as if to P, K7, P1 - knit pattern to last 16 st - P1, K7, Slip (sl) 1 as if to P, K7
WS: Sl 1, K 15 - knit pattern to last 16 st - K16
- planning to knit this for ~15 ½“ after which i’ll increase for the shawl collar.
with buttonholes on the lefthand side
https://www.youtube.com/watch?v=IIDFeEY8tE0
placed the 1st buttonhole ~¾“ from the bottom will add 4 more each buttonhole ~4 ½” apart i.e. 5 buttons in total.
after 18 rows of 2x2 rib and 1 buttonhole:
set-up & increase row:
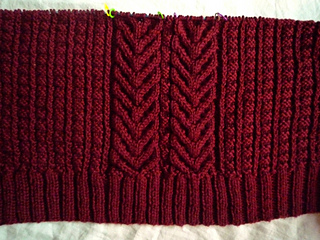
i added 24 st while setting-up for the sailor’s rib st pattern; this will bring the st count to 274 - making approx 52” vest (this includes ~2” overlap for the buttons)
- on the WS i did the set-up for the sailor’s rib stitch:
- p1 then repeat k4,p1 until the end of the row
- adding 6 st to each side (between the outer & inner PM) and 12 along the back (between the 2 inner PM).
PM: adding placed markers
after increase/set-up row i redid the makers - i think at least 8 PM will be very helpful, but you could add a few more for the cable background st - placing markers 16 st apart (i.e 8st to each side of cable center) for each cable:
- 16st in from the edge - should already be in place (1st set) for the border
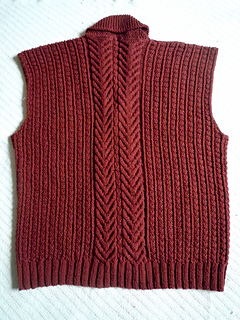
- then another 20st in - this is for the staghorn cable pattern - front
- then another 36st in for the 7 repeats of the sailor rib (7x5)+1 - side/armhole
- then another 45st in for the 9 more repeats of the sailor rib (9x5)+1 - back
- then another 40 st for the 2 repeats of the staghorn cable pattern - back
- then another 45st in for the 9 repeats of the sailor rib (16x5)+1 - back
- then another 36st in for the 7 more repeats of the sailor rib (7x5)+1 - side/armhole
- then another 20st in - this is for the staghorn cable pattern - this last marker should be 16st from the other edge and should already be in place from the 1st set marking the border. - front
the body:
- 16st (PM) - continuing with the 16st garter st border (see above)
- 20st (PM) - 20 st staghorn cable pattern (see below)
- 36st (PM) - marks the center of the side (used later for armhole) - (7x5)+1
- 45st (PM) - (16) repeats of the 5 st sailor’s rib st (see below) - (9x5)
- 40st (PM) - (2) repeats of the staghorn cable pattern (note this will yield 4st of reverse stockinette in between the 2 cables, which i didn’t really like, - i could have reduced the st ct by 2 but i didn’t want to rib back so instead i alternated the center 2 sts in groups of 3: the end result was a stack of 2x3p followed by 2x3k, keeping the outer 2 st in reverse stockinette - i’ll try and write this up to be clearer but from the RS this echoes the sailor’s rib but is 3 rows high instead of 2 rows (i thought it made it look a little less static). - 20x2
- 45st (PM) - (16) repeats of the 5 st sailor’s rib st - (9x5)
-
- 36st (PM) - marks the center of the side (used later for armhole) - (7x5)+1
- 20st (PM) - 20 st staghorn cable pattern
- 16st - 16 st garter st border
Stitch Patterns:
border: 16 sts on either side
RS: Sl1 K6, Slip (sl) 1 as if to P, K7, P1 - knit pattern to last 16 st - P1, K7, Slip (sl) 1 as if to P, K7
WS: Sl 1, K 15 - knit pattern to last 16 st - K16
sailor’s rib stitch:
Sailor Rib Stitch
multiple 5 + 1
set-up - (WS): p1, k4, p1
row1: (RS) k1-b, p1, k2, p1, k1-b
row2: (WS) p1, k1, p2, k1, p1
row3: (RS) k1-b, p4, k1-b
row4: (WS) p1, k4, p1
http://www.knittingfool.com/StitchIndex/StitchDetail.aspx...
https://www.youtube.com/watch?v=VEtPHNFM2fE
this is a 5+1 st pattern
note: i noticed when working this stitch pattern on the WS (even rows) simply: “knit” stitches as they present - meaning knit the knit stitches and purl the purls. this way you only have to remember (2) 5 st pattern which are alternated on the RS - i often forget what i’m doing and this makes it easy: on the RS i can look at the 5 st pattern presented and then knit the other one, and on the WS i just follow as presented - hth
with staghorn cable:
STAGHORN CABLE
(Worked over 16 sts)
Row 1 (WS) and every WS row: Purl
Row 2: K4, C4B, C4F, k4
Row 4: K2, C4B, k4, C4F, k2
Row 6: C4B, k8, C4F
These 6 rows form the Staghorn Cable.
http://texturedknits.blogspot.com/2015/05/staghorn-cable....
http://newstitchaday.com/knit-staghorn-cable-stitch/
i’m knitting it as a 20st pattern - 16 st for the cable and 2 reverse stockinette sts on either side as background. i’ve place 1 column on either side of the front 16 st border and 2 running up the center of the back


 handspun
 queue
queue favorites
 friends
 needles & hooks
 library