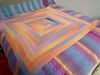
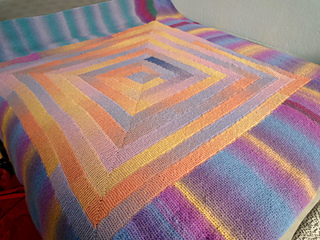
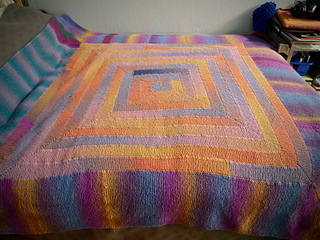
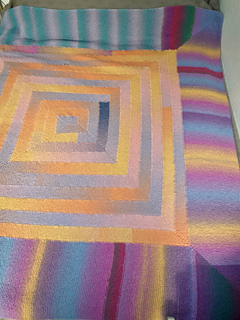
photos:
from the top down
1st to 3rd - pre-washing picts:
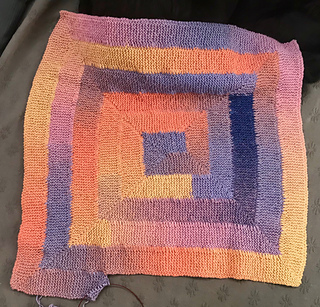
- finished blanket 72” square with a 3 st i-cord edging
- inner rounds: the bands measure ~2 ¼“ in total it measures 48” and took (15) skeins ~1650 yds/750 grams of “autumn”
- the outer border: measures 12” making the blanket 72” across, and took 19.25 skeins (15) skeins of ‘splash’ and (4.25) skeins of ‘blue purple’
4th - post hand washing with eucalan. shows final corner, 3 st i-cord edging, the transition from 10st to 50st (+ 3 st i-cord) and attaching the final corner to the final 10st band. it’s odd but i like it:)
- note: pre-washing this final joint did not lay flat. i thought maybe i picked up too many stitches, but now it’s very nice and lays flat with no problem at all.
5th - 2 skeins ~ 27” square
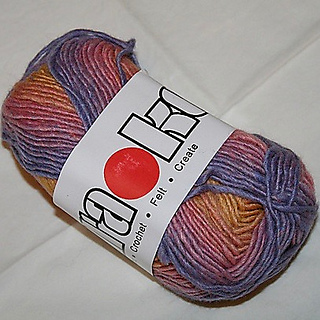
6th - ‘autumn’
7th - ‘slash’
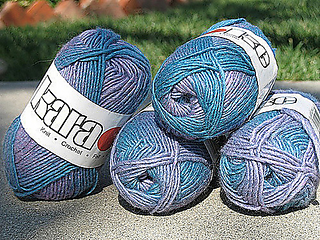
8th - ‘blue purple’
Here’s how I’m knitting this pattern:
Beginning:
- long tail co 10st
- sl1st, k9, turn sl1,k9… for ~18rows
Note on Slipping the 1st st
- To start I slipped the 1st stitches on both edges.
> Once you start joining then there will be only one edge, which 1 slipped, except when it is the last st on my needle, which happens when doing the mitered corner; then I knit it instead of slipping it, turning and knit it again. Otherwise I always slip this 1st st on the front and knit it as the last st on the back. This makes joining easier for me:)
Corner:
- I’ve opted not do w&t the mitered corners and am following “The Nervous Knitter” method of mitered
- The only difference is, because i’m not good at seeing where i need to knit to, i do use 1 place marker.
- When I start a corner: sl1, k8 instead of 9, I turn my work k1, pm, knit to end. Then I simply knit to the marker, turn and remove marker, k1, replace marker, knit to end. Repeat, moving the marker 1st towards the outer edge each time.
Joining:
- I’m using the ‘Simple Join’ method, instead of the chain method (which creates a raised chain), because it produces a smoother, flatter look, which I prefer.
-- so once I got to the point where I was joining new rows to previously knit rows of ten stitches (after 2 mitered corners back to back):
> sl1, k9, then join by knitting into the space between 2 ridges (into the opening created by slipping the 1st st throughout) making sure I pass my needle behind both loops of that edge stitch, now you will have 11 stitches, turn work, k2tog, k9, turn and repeat.
Note on Joining:
- The pattern has good illustrations and it’s important to note that the 1st join is a bit tricky to get right, as are the turns, i.e. the last rows right before starting the corners.
> For me I found when I was not careful I inadvertently missed a row, because the yarn gets pulled and the last row sort of gets hidden/squashed. So be sure to really look and make sure you knit into each and every space between the ridges; this way you won’t end up with holes. Once you get use to looking and find these spaces it becomes very easy - just a bit of a learning curve:)
Final Round
when i finished with the original color “autumn’ i opted to change the width of the rounds from 10st /2 ¼” to 50st/12” +3 st i-cord edge. what i did to change from 10st to 50st was “funky” so no real need to share:) but i will;) :
-
instead of turning the corner i just kept knitting straight out until it measured 12”, because i wanted a 72” blanket. At the moment i forget exactly what i did but i believe i used a 3st i-cord bind off. when i bo all but 3sts i turned and knit back across picking up 50st - i had 3st for the i-cord edge plus the 50st from the edge of the 10st extension i just knit. i then continued knitting just like i did with the 10st rounds just with 50st + the 3st i-cord edge.
-
this isn’t the most elegant solution but it works fine for me:) when i finished the 4th and final side i knit the last corner. once the corner was completed i was left with joining it to the other side of the extension i had knit to begin the 12” border. i don’t enjoy sewing so i opted to knit it in a similar manner to the other joints. this left me only 3st to sew (:bd:)


 handspun
 queue
queue favorites
 friends
 needles & hooks
 library