This is my first test for designer Hailey Hodge. She’s got talent.
My sister wanted this pullover to be tunic length, so it required a lot more yarn than the pattern suggests for this size.
Janny’s finished length from underarm to bottom edge - 18” (45.7 cm)
Janny’s finished sleeve length from underarm to wrist = 17.5” (44.5 cm)
Janny’s full bust circumference (as of 10/6/23) is 52” (132 cm).
Pattern suggested body length from underarm - 12” (30.5 cm) -sizes E, F, G, H, and I
Pattern suggested yarn for size F - 1544 yds (1412 meters)
Most of the testers of the larger sizes made their pullovers a bit longer than the 12” (30.5 cm) stated in the pattern, so you might want to allow a little more yarn if you want to lengthen yours.
I did not find this size to have any waist shaping, nor did Janny want any. There is no decreasing or increasing from underarm to bottom edge. However, the wrapped stitches MAY create some shaping, if you do them tighter than I did. Janny’s sweater only measured an inch less (in circumference) at the bottom than it did at the underarms - so basically, it’s straight all the way down. The very slight tapering is mostly caused by the twisted rib stitches of the bottom border which tend to pull the bottom inward.
Total number of stitches around for body = 226 (size F)
Sides: 19 + 19 = 38 sts
Front: 94 sts
Back: 94 sts
The stated pattern gauge is 4.25 sts per inch (2.54 cm).
226 sts divided by 4.25 = 53.18” (135 cm) which is larger than the 50” (127 cm) bust measurement stated in the pattern for size F. This is because the gauge is for stockinette stitch only (swatch knitted flat). When knitting in the round, stitch gauge tends to be tighter, and the front panel (Bloom Chart) stitches and side panels (Root and Seed Charts) tend to pull in the sweater a bit as well. So this is why the sweater bust (and body) circumference will measure several inches less than 53” (135 cm). If you match stockinette stitch gauge, your sweater bust circumference will be close to what the pattern states for size F or perhaps a little less.
Needles used:
Size 4 US - Neckband
Size 8 US - Everything else
Weight of finished sweater: 22.7 oz. (643.5 grams)
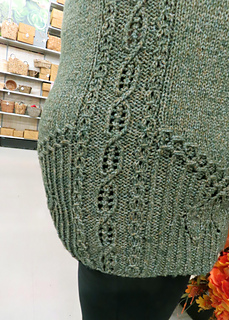
The designs on the front and back charts vary greatly between the smaller and larger sizes. So take a look at some of the finished sweaters in various sizes to see the differences. On the smaller sizes, the “leaves” almost touch at center front (bottom), while the larger sizes have wide strips of plain twisted ribbing separating the leaves in front. Smaller sizes have 2 leaves in back, while larger sizes have 3 leaves in back. I was surprised by this because it was not evident in the designer’s sample photos which show one of the smaller sizes. All of the design details are very attractive. Just know that each size looks a bit different near the bottom edge with substantial differences in the larger sizes from the smaller ones.
There’s a narrow “Root Chart” strip on BOTH the outer and inner part of each sleeve. These run the entire length of the sleeves, including the cuffs. This was also a surprise to me, because it was not evident in the designer’s sample photos (test pattern).
“Body Length” on the pattern’s measurement chart = Length from underarm to bottom edge of sweater.
Short rows on this pullover added 2.75” (7 cm) of vertical distance in back, including additional armhole depth.
This designer did not allow any modifications to the test pattern other than lengthing sleeves and body. However, if knitting the again, I would make some changes:
-
I would not do the wrapped stitch as described in the pattern. I think it looks much better done like this - where the 4 stitches are just wrapped, slipped and worked only on the next round. Slipping the wrapped stitches creates less bulk (and therefore less chance of snagging), requires less yarn and is much quicker to do. I made this tutorial video in 2019 after testing this beautiful pullover designed by Jennifer Wood. Jennifer experimented with both methods of doing the wrapped stitch and agreed with me that it looks better and has other advantages when the 4 wrapped stitches are only worked in the next round.
-
I would not continue the side panels (Root and Seed Charts) all the way to the bottom edge. I would only have a ribbing border all the way around the bottom. That goes for the sleeves as well. This is my personal preference. Sometimes “less is more.”
-
I would only have the Root Chart panel on the outside of the sleeves. I think that having it running on the inside (as well) is a bit much and tends to pull the sleeves in, making them look smaller. At least this is what happened with my yarn. Having this detail on the “inseam” area of the sleeve doesn’t show very much when worn, and adds more snagging opportunities. It’s considerable extra work for something that doesn’t show very much. Again, sometimes “less is more.”
-
If knitting this for myself, I would make it a lot shorter, though I think it looks very cute in a tunic length as well. The designer did not intend for this to be a long pullover. However, my sister refuses to wear any shorter sweaters.
-
When knitting for myself, I would eliminate a lot of the short rows because they add way too much length in back. One inch (2.5 cm) of (short row) added height is about all I normally need. Short rows in this pattern added 2.75” (7 cm) of vertical distance in back. Since my sister has a large bust, if anything, she needs more length in the front than in the back. (As testers, we were not allowed to alter the armhole depth or short rows.) Please note that a lot of the testers found the short rows to be fine. If you have a long torso, the pattern will probably work for you. However, I’m short waisted (as is my sister), and I’m particularly short waisted in back - about 1 inch shorter in back than in front. Everyone has a different shape, so just know that there are a lot of short rows in this pattern which will add considerable length to the back, raising up the neckband and lowering the armhole. See outdoor photo at left. Correct back waist length is particularly important if you are knitting a shorter, more fitted sweater, and doing the wrapped stitches tighter (than I did) to create some waist shaping.
-
If knitting this for myself, I might make a taller neckband - maybe even a turtleneck. You can make the neckband longer, if desired. My sister does not like standup neckbands, so I followed the pattern instructions to the letter.
In spite of these possible future changes (when knitting for myself), I think this is a beautiful design that’s fun to knit. You will not be bored. It’s certainly not mindless knitting, but the extra time spent will be well worth the effort.
Sadly, the LIon Brand Re-Spekt yarn has been discontinued. There is nothing exactly the same, but the following yarns are similar:
Lion Brand Re-Spekt
DK
45% Manufactured Fibers - Polyester
30% Manufactured Fibers - Acrylic
25% Cotton
(131 yds per 50 grams)
21 sts = 4” using size 6 US needles
Hobbii Limonata
Light Worsted, DK
50% Recycled cotton, 50% Recycled polyester
(147 yards per 50 grams)
21 sts = 4” using size 6 US needles
Valley Yarns Hawley
50% Cotton 30% Silk 20% Nylon (heathered colors)
(135 yds per 50 grams)
20 sts = 4” with size 5 - 7 US needles
Cewec Papyrus (from Hobbii)
Light Worsted, DK
78% Cotton, 22% Silk
(131 yds per 50 grams)
21 sts = 4” with size 6 US needles
Hobbii Happy Place Melange
Light Worsted, DK
50% Cotton, 50% Wool
(136.5 yds per 50 grams)
20 sts = 4” with size 6 US needles.
Drops Sky
DK
74% Camelid - Alpaca
18% Manufactured Fibers - Nylon / Polyamide
8% Wool (much more fuzzy than Re-Spekt)
(208 yds per 50 grams)
21 - 28 sts = 4” with size 6 US needles
Fruity Knitting Lace KAL Forum


 kimmyz notebook
  handspun
 queue
queue favorites
 friends
 needles & hooks
 library