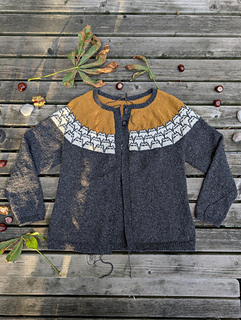
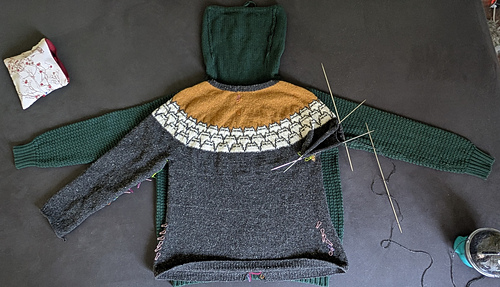
I have two main issues with this pattern.
1 - the neck is much too wide and needs a lot of remedies (the only remedy stated in the pattern is by far not enough)
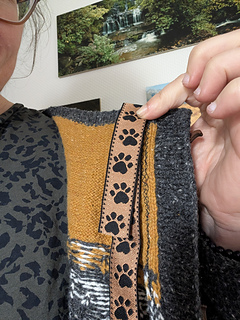
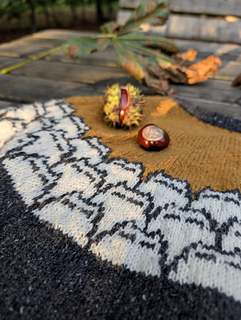
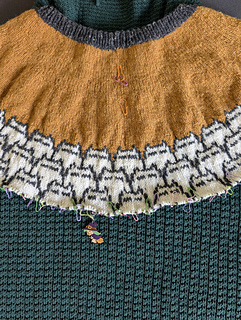
2 - the cats with the very long floats need Ladderback Jacquard to avoid colour blips, yet there is no mention in the pattern
Tipp:
Install a lifeline just before the colourwork begins! This way, if the first attempt knitting with three colours fails, you can go back easily.
What I would change next time:
Not knitting the ribbing of the neck opening in the round, with the steek stitches included. I would knit it back and forth and include the steek stitches when I start with the stockinette.
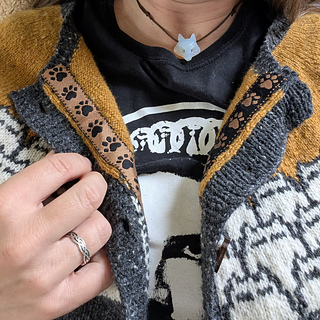
The way it is described in the pattern, it has the result that, after you’ve cut the steek, you have a folded over steek part close to your neck, behind the ribbing (maybe it will even show when you wear the cardigan).
Also - regarding the neck opening:
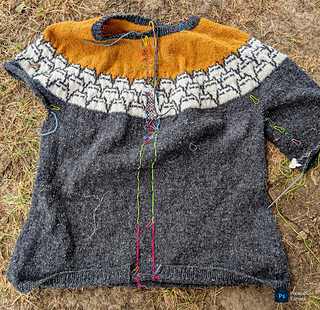
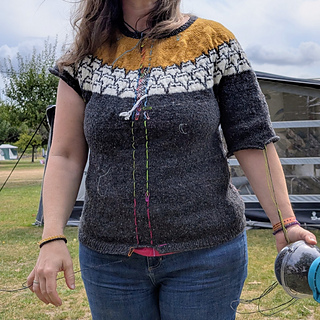
The pattern has a much too wide neck opening for my taste (even if you follow the instructions in the pattern to get a less wide neck opening).
That is why I started with only 120 sts.
But:
As a cardigan, the neck opening falls even wider as soon as you cut open the steek. For me, that is really a problem, I strongly dislike it - I wanted to have a warm cardigan which doesn’t leave my neck cold in winter. The neck opening became even wider after blocking.
So next time, I would cast on even less sts. At least a third less. So, I would try with 90 or 100 sts for the neck opening, I think.
A firmer, less stretchy cast on for the neck opening would also be good, as the neck opening becomes even wider with wear. I had to apply a crochet slip stitch row at the bottom of the ribbing to prevent it from stretching out again (of course, I had to wash & block again first to make the wool remember its original shape).
10.11.2024
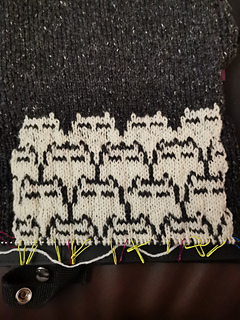
After I started the Stranded part in the swatch, I realized this will not look good unless I incorporate Ladderback Jacquard once again. Especially in the white cats, the woven in strands show on the front, because the floats are too long. Even with my non superwash yarn, even though I took care not to stack the sts where I wove in the floats on top of each other.
Looking at the projects, this also is visible in other projects.
29.12.2024
The first row of cats in my swatch was knitted without Ladderback Jacquard. All other rows were knitted with LBJ. The difference is very visible.
01.01.2025
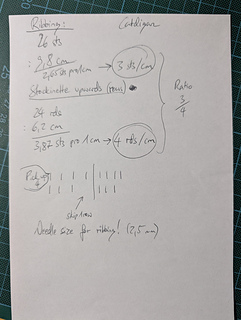
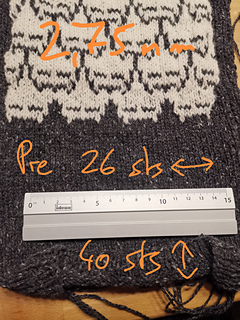
Swatch, Pre-washing:
Stockinette, 2,75 mm needles
26 sts + 40 rounds
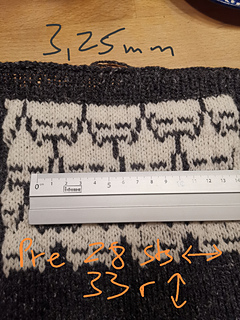
Colourwork, 3,25 mm needles
28 sts + 33 rounds
03.01.2025
Swatch, post-washing:
Stockinette
24 sts + 42 rds (very insecure with the rounds bc the dark yarn makes it hard to see individual sts)
Colourwork
26,5 sts + 33 rds
26.01.2025
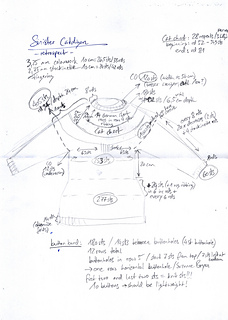
After a lot of calculating, brooding and overthinking, I will go for incorporating “Sunset Highway”, because Caitlin Hunter incorporates short rows for the back of the neck, and her neckline looks great.
Will cast on 120 sts (+ 7 steek sts) with 2.75 mm needles and an elastic CO for the ribbing. this should result in a neckline with a circumference of 50 cm with my gauge of 24 sts per 4 in / 10 cm.
07.02.2025
New start.
(The reason I’m fussing around so much is that I really dislike the very wide neckband, and from what I’ve read in the projects, the directions for the tighter neckband in the pattern result in a very wide neckband too.)
I started with the numbers in Sunset Highway and casted on 120 sts (size 4) for the neckline, should be 50 cm circumference in my gauge. Jeny’s stretchy slipknot cast on, my fav stretchy CO (was hard to keep the sts close together with this non superwash yarn).
8 rounds 1x1 rib.
I didn’t like the idea of making a colour change and increases at the same time, so I knitted 1 straight round with the new colour before knitting the first increase round.
180 sts.
3 rounds before 14 short rows (German short rows).
After that, 1 rd stockinette, to pick up & knit short row remains
1 rd with 12 increases to reach 192 sts because size 5 in Sunset Highway would be more in line with the stitch counts I calculated for my gauge.
After that, I went to the “top down sweaters” book recommendations for yoke sweaters and knitted straight stockinette until the sweater measured 6,5 cm.
Hugely helpful to understand the construction and maths of a yoke sweater was Basics of circular yoke sweaters by Roxanne Richardson Rox
09.02.2025
Increased to 256 sts in round 25.
Knitted 1 round.
Increased to 280 sts in round 27.
16.02.2025
In round 40 I increased every 7 sts, from 280 to 321 sts. Yoke was 10,5 cm deep.
In round 46 I increased 52 sts too (every 7 sts), going up to 373 st. That is the stitch count I need for the pattern repeat for size 7.
09.03.2025
In round 52, I started with the cats.
Will leave lifeline in round 51, am not too happy about quite a lot of fabric gathering in the back which is already visible from trying on what I have now. From what I’ve read, this is a common problem in circular yoke sweaters. Maybe it will remedy itself when the sleeves are separated from the body.
19.03.2025
I’ve found a remedy against the fabric in the back: Simply moving the sleeves! 
This article says that.
28.03.2025
Nah, I simply have the feeling I have too many stitches. Plus, I forgot that during the colourwork there will be increases too. My calculation says that I will have a body circumference in the cardigan of 118 cm, that’s a little too much positive ease for my taste. Especially since I can already see when I try it on that there are far too many stitches in the back, so that the fabric is wavy.
So I’ll go back to the last increase round and increase for size 6, that’s not 373 sts total, but 349 sts.
So I went back to round 44 and have 321 sts before moving forward again. Will increase 28 sts, increasing every 11 stitches.
06.04.2025
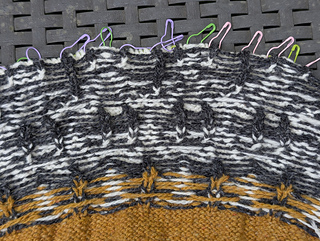
Ladderback Jacquard with three colours is not for the faint hearted… Will have to restart the LBJ setup round because I used the wrong setup for the ladders (a yarnover)… There are visible gaps now 
Plus, I don’t know what to do with the third colour at the ladder stitches. I thought it might be good to knit the ladder stitches with two colours. We’ll have to see if it is…
Next time make a lifeline BEFORE the setup round of the LBJ ladder stitches!
11.05.2025
After trying to knit the first two rounds of the colourwork including my Ladderback Jacquard stitches, I have to admit it’s no joy at all. It knits terribly, there are holes where the LBJ ladders were established, and all of these many stitch markers annoy me, and on top of it, it’s my first time knitting with three colours - it’s a PITA to knit. I’m procrastinating since a few weeks now.
I will have to go back and restart from the point where I established the LBJ ladders unfortunately.
I will reduce the ladder stitches significantly, because in the first few rounds there is only one place where they are really needed because the white space is very long in the body of the first cat. I hope this will reduce the difficulty in establishing these three coloured rounds significantly.
14.05.2025
Okay, so a few reminders / tipps for the LBJ with three colours:
I think for the setup, it’s better to use a backwards loop CO, because the yarnovers still show when you pull the fabric apart
In the first round of LBJ, I anchored both yellow and white in the ladder stitches.
In the second round however, if I had anchored two colors again, black and yellow, it would have twisted the yellow and the white strand. So I only anchored the black and didn’t anchor the yellow at all, but took care that the yellow strand had an okay length to not pull in the fabric.
(As an afterthought, it probably would have been better to anchor the yellow, because it has a longer way to travel than the black.)
In the third round however, I didn’t like that both the yellow and the black now had an even further distance to travel, so I anchored them both in the LBJ stitch.
It is however good to do as Susan Rainey says in her tutorial about LBJ, and I did it that way to not get the yarns twisted (that can result in color blips on the visible side of the sweater):
I only had two colors in my hands, the third (yellow) I had let go of.
Arriving at the ladder stitch:
I had black as the contrast color in my left, white in my right hand. The right hand also dealt with the yellow yarn. Brought them both forward. Then let go of the white and brought the yellow forward too. Then I took care that I first wrapped the black, then the yellow around the needle - this enables the strands to remain in their height / order they have to be in for color dominance and not get them twisted. If you take care to leave the strands in their horizontal height when picking them up, they won’t ever get twisted.
I did like to work with three colours in my hands at the same time (one in the left, two in the right, background colour on my index finger, contrast color on my middle finger), but not with LBJ - that is too fiddly and wasn’t fun. To have two colors in my right hand, I first wrapped both yarns around my pinky finger and then get in the space between both strands with my index finger, to lead the background colour on my index finger and the contrast color on my middle finger, taking care to stay close to the needles with the fingertips, so that the strands don’t become too long.
22.05.2025
I had to switch to 40 cm needles because the increases in the second cat round were too much for my 35 cm needles. Yoke sweaters do have a lot of stitches… And to be able to see the colourwork, I don’t want to bind my knitting together below the needles.
I don’t have 3,25 mm needles in 40 cm length though, so I switched to 3 mm.
29.05.2025
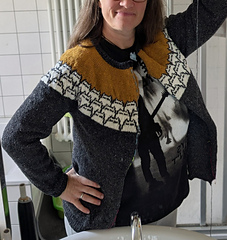
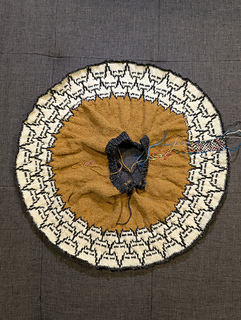
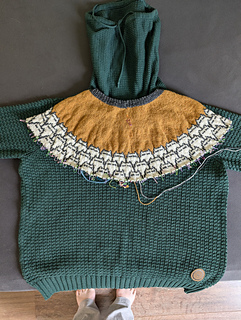
I finished the last colourwork round! 
In my excitement I totally forgot the last increases in round 27, but I think I will have to knit a little more anyway before separating the sleeves and the body, so I still have time to increase.
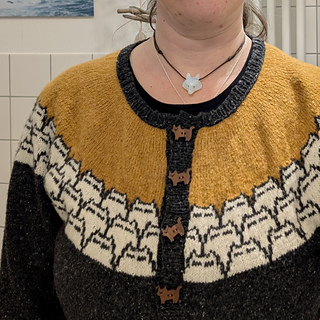
I have put it on waste yarn to be able to try it on, and so far, the Ladderback Jacquard looks good, no puckering! It was a little annoying to knit because of the many stitches on the needle, combined with the LBJ stitches (84) I had 484 stitches on the needles.  Almost too much, even with my 40 cm needles. Didn’t want to tie it together below the needles, because I like to see how the motif grows.
I have 28 repeats of the pattern in one round.
At the end, I have 3 LBJ stitches per repeat.
20,5 cm depth after the last colourwork round.
The yoke is 58 cm wide now. I’m in round 81.
06.06.2025
Since I’m doing a fusion of various yoke patterns here (the original pattern, the stitch count recommendation Roxanne Richardson makes in her video about circular yokes, Sunset Highway by Caitlin Hunter and the recipe for my size and gauge in the book “Top down sweaters” by Ann Budd), today I had to decide where I want the armholes to be.
After putting everything on waste yarn and trying it on, my notion was correct that Ann Budd’s book was closest to the stitch count I feel would be right for this cardi. It has the fewest stitches of all the patterns I compared to each other. It wouldn’t have been right to make that last increase from the original pattern, and I’m glad I didn’t make it.
After reaching a yoke depth of 24 cm (in round 94), I had 405 stitches on my needles (excluding the steek stitches). When trying it on, it looks wide enough, with just the right amount of positive ease.
Buuuuut the amount of stitches set aside in the book for the sleeves, 82 sts, seems to be too few. I will go for 88 sts like I calculated for myself based on my gauge. I have started the sleeves 63 sts (not 60 like in the book) to the left and right side of the steek. This way, the back will have a little less fabric than the front, which felt right trying it on, and my bust will fit in. I will leave the number of the to-be-cast-on sts to 12 sts, because this seems to be enough. The body should have 253 sts then.
09.06.2025
I decided to make the 100 rounds full before putting the sleeves on waste yarn.
12.06.2025
Looking at my “the Oa” and the Icebreaker cardi I will probably knit for 20 cm after the casted on underarm sts before starting to increase along the seam, to make it an A line cardi.
29.06.2025
20 cm below the armholes I started to increase for the A-line, adding 36 sts (+1 for the 1+1 ribbing) in 9 inc rounds every 7th round (edit: after the first repeat I decided that every 6th round is better), going from 253 to 290.
07.07.2025
I have increased six times now and I’ve put it on floss and tried it on:
The length will be just right, I think, when I continue knitting until I have a length of 35 cm below the armhole openings. And then start the ribbing.
Looking great so far! Not too tight either. 
Afterthought: I think six increase rounds are enough.
14.07.2025
Hurrah, I finished the body yesterday!
14.07.2025
I have picked up the stitches of the left sleeve and I have 100 sts for the sleeve.
16.07.2025
For the sleeves, I chose to go with the directions from the “top down sweaters” book, where for my gauge it was recommended to decrease every 8 rounds for 9 times. We’ll see how that looks. K2tog first.
21.07.2025
So, I decreased my 9 times, have 84 sts on the needles, tried it on, the sleeve is at my elbows and I could still decrease 6 times. Will do that. (100 sts were a tad too much for the sleeves to start with, but it’s alright, I don’t like sleeves that are too tight anyway.)
24.07.2025
I can decrease even more 
26.07.2025
I decreased 16 times and have 68 sts on the needles, at the bottom of the sleeves. The width feels right. I still have to add a bit length. About 32-40 rounds.
06.08.2025
Hmmm… I added the length on the sleeve, but the sleeve opening is 13 cm wide, whereas on my reference sweater it’s 11 cm, even though I knitted the ribbing with 2,5 mm needles. Feels a little too wide too, when I wear it. Maybe I’ll reopen and decrease even more…
I am also not a fan of the slim ribbing. Thinking about making it broader.
18.08.2025
For the second sleeve, I now added 4 decreases (2 sts each), so that I decreased 20 times as a whole. That´s much better for the width of the sleeve opening.
I will apply that to the first sleeve too.
After the last decrease round, I knitted one plain stockinette round before starting the ribbing.
25.08.2025
Unfortunately, when I vacuumed our sofa, I accidentally ripped off the thread of one of the sleeves, so that it couldn’t be sewn in anymore, it was too short.
Since I fear that the sleeves will become a tad too short after washing & blocking (usually my knitting projects become wider and shorter after blocking), I added 3 more rounds after the last increase on the sleeve, so it’s a total of 4 stockinette rounds after the last increase round.
27.08.2025
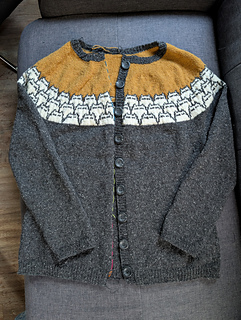
At the bottom of the body, I knitted 14 rows of ribbing before the bindoff row. It’s much better and doesn’t fold itself up as much anymore. When I wear it, it behaves as it should 
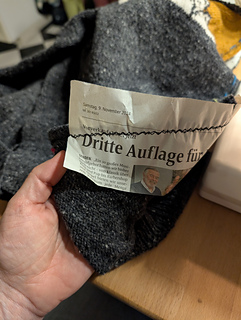
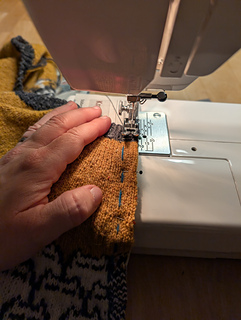
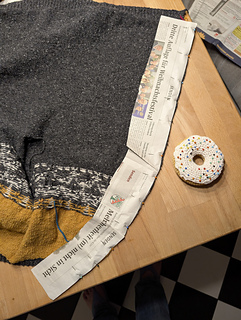
Felted the steek, then cut it, then pinned a sheet of newspaper on the back (otherwise my sewing machine can’t handle knitted fabric) and sewed three zigzag rows with different stitch lengths over each side of the steek, just to be extra sure that nothing happens.
01.09.2025
Buttons are too large for a 9-row-button-band, so I will increase the button band rows and make 14 (buttons look good in size when I lay them on the bottom ribbing).
06.09.2025
Buttonholes:
I have 180 sts for the button band.
In row 5 of the button band:
To distribute the buttons evenly, knit 7 sts from the top. (First two sts are both knit sts!)
{Then 4 st buttonhole. (One row horizontal buttonhole from Suzanne Bryan)
Then 14 sts to next buttonhole.}
Repeat until bottom. There should be 7 sts left. 10 buttons 23 mm (next time I’ll use smaller / more lightweight buttons).
07.09.2025
The knitted part of the cardi is finished!
Reopened the button band I had already finished to reduce it to 12 rows, because the button band with the button holes didn’t need all 14 rows and of course I wanted the two to match.
10.09.2025
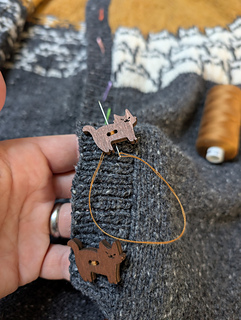
Still waiting for the ribbon to hide the steek edges under, but so far, it’s finished and can be worn!
Found the perfect buttons on Amazon. Lightweight, but a bit fiddly - which doesn’t matter, because I will wear the cardi open most of the time anyway. 
The grey round buttons were too heavy - they were the first buttons I ever bought for a knit project, and I didn’t know that they are more for jackets and such. The button band kept folding over when I attached them provisionally.
I used this tutorial (genius method of threading a knot at the end of the sewing thread!!!) to sew on the buttons.
21.09.2025
Today I sewed on the ribbon and the cardigan is now 100% finished.
22.09.2025
No it wasn’t - I had to sew closed the gaps of the LBJ setup round. But now it’s finished.
07.11.2025
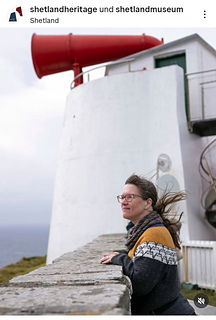
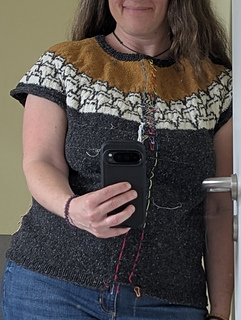
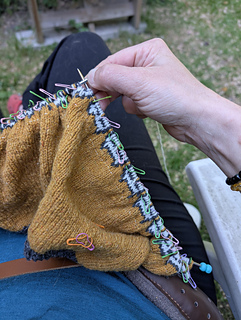
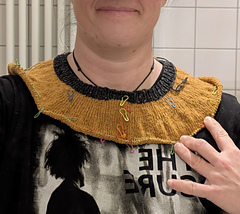
Because the collar became wider with wear during Wool Week, I washed the whole thing again and blocked it on my jumper board, hoping that the wool would remember its original form (which it did).
When I took it off, I applied a crochet chain (with flat slip stitch) on the inside of the collar (on the bottom of the ribbing) with the grey yarn. It’s not perfect, because the crochet chain pulls the knit stitches of the round I applied it to a little inward, creating a ridge on the inside, which makes the ribbing of the collar want to fold itself outward on the right side of the sweater, but when I wear it, it looks fine - and the crochet chain has no give, so hopefully the width of the collar should stay as tight as I want it now.
I got this tip with the crochet in this thread, where I asked the community what to do about the problem.
Here is the sweater of one of the people who replied, having a crochet slip stitch chain on the right side of the ribbing, which looks beautiful.
09.11.2025
Aaand I took the slip stitch chain on the inside off again and reapplied it on the outside.
I’m much happier with it.
The slip stitches should not be too tight, otherwise there will be puckering.
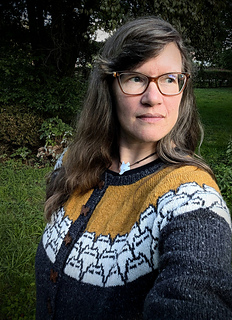
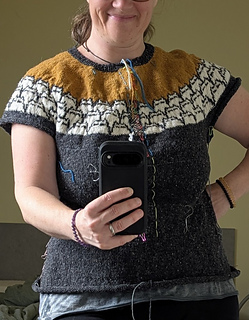
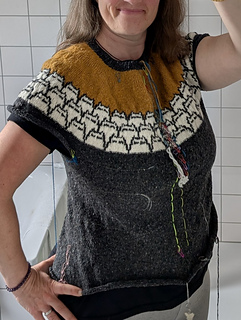
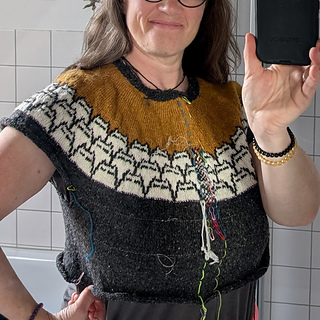
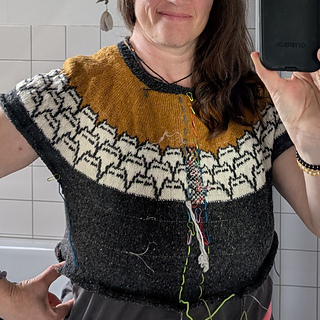
The result can be seen in one of the photos.


 knitwizely notebook
  handspun
 queue
queue favorites
 friends
 needles & hooks
 library