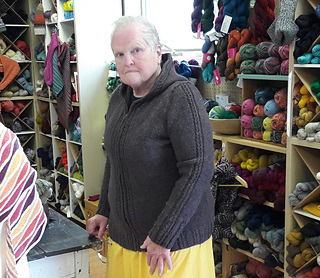
For my CustomFit pattern, using the custom option, I chose crew neck, “other” for bottom finish, 0” front ribbing--although I think there may be an I-cord option now, I used 0.25” for center front ribbing--average fit, and fitted lg sleeve--which I then tweaked, personal preference here, and I like the close-fitting Dorica cuff in book. Keeps it out of the gravy, too.
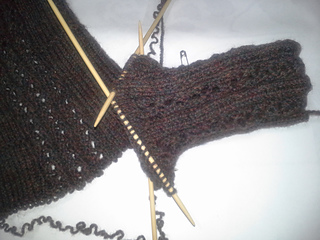
I-cord, all 2.5 tries of it: I ultimately settled on #4 needle, but when wet blocked it flared over sweater edges, so I redid zipper portions, reducing stitch count here by 20%.
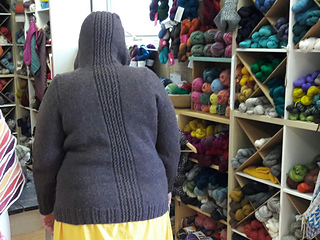
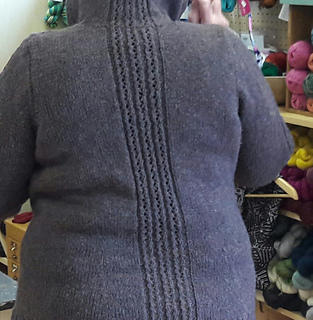
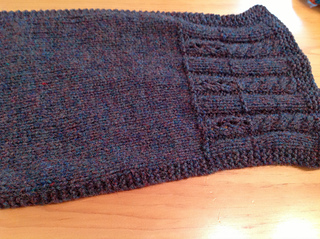
10/22 Hood mods. Dorica hoodie measurements didn’t look like it would fit me well, and anyway I’d made the back cable detail continue up hood. When I measured my head, over the top seam to seam, I got about 24”, so I worked hood to about 10”.
I worked shortrows on the 35 stockinette sts between cable sections: K cable band sts and 27 stockinette sts, wrap & turn; P and work to edge. K cable band sts and 18 stockinette sts wrap & turn; P and work to edge. Work across all sts to other side of hood, picking up wraps; reverse shortrow shaping on other side of hood.
Working over center cable band and 3 stockinette sts at each side increase one st at each end K into st in row below on R side. Work these 25 sts only to about 8.75 “, so it is as long as width of hood sts on holders.
BO so that edge sort of matches face-edge of hood--I used Suspended Bindoff--ready to work the I-cord edging. Pick up sts on side of cable band, matching number of live sts held on side hood, and kitchener together, faking sts on cable bands. I could have just bound off and seamed, but I liked the challenge.
10/20 And now for the hood. Homestretch.
10/10 Fronts also finished added a “K1-seam stitch” to center front to retain the 2-P CF panel when I-cord edging is added later.
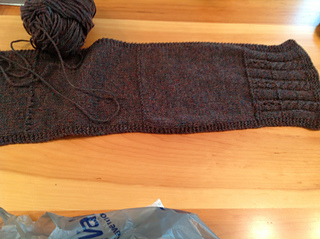
10/4 Back and one ETA first sleeve finished.
Since you are going to ask, the colored ribbons and pins on back are the markers of a lazy knitter. I use the ribbon as a vertical marker, here to mark increases/decreases along princess seam line. Each time I work an increase or decrease, I mark the ladder with the ribbon, then I just have to count ladders to see how many rows have been completed since previous increase/decrease. And, since I knew I had to do 7 decreases, I put 7 pins and marked each decrease as I worked them; when I ran out of pins, I was finished with decreases. Same on fronts where FTF calls for same shaping as on back. My boobs and shoulder blades must be equivalent! ;>) Just what a girl wants to hear from an objective source.
Swatches. Ok guys, cut it out! So what if my swatch IS 35 1/2” long! Also swatched with 2x2 cable, but the lacey cable looks good even with this rustic yarn.
I’m using my first custom pattern from Fit to Flatter and adapting it with the Dorica details. Tweaked sleeve cuff, using Dorica numbers
I freaked out a bit when I looked at the CO numbers for my custom pattern because I’m used to picking pattern size from upper body measurements and then adding stitches to make hip area wider. Since the CustomFit pattern takes measurements into account, the CO number right off the bat is huge. Sigh.
Because the Dorica bottom edging is a cable rib with a 10 st + 2 repeat AND there’s triple cable motif continuing from the rib up the center back and a single cable motif along the zipper edge, it was important to use the designer’s stitch numbers precisely for the hip size I was CO’ing for. Looking back, I see that it would have worked really well (and saved that dratted seaming of ribbing which I’m never happy with) to have worked the body using the “almost seamless’ option; but I did it in pieces because the motif placement didn’t become clear until later. Adjusting stitch numbers to match the repeat resulted in my back piece being several sts narrower and the fronts being several sts wider than CustomFit pattern. Final stitch count was very close to the CustomFit pattern, but my side seam is shifted 2 sts to the back of the garment. No biggie, just have to shift sleeve seam location when sewing in by a couple of sts.
Because, did I say this already?, I hate seaming ribbing and the Dorica cuff is 5” of ribbing, I worked the cuff in the round using an even multiple of 50 sts. I deviated from CustomFit here because I wanted a snugger cuff than it called for. Then I switched to finishing the sleeve with a seam, adding a seam st at each edge at this point, because my flat and in-the-round gauges differ by quite a bit, and I didn’t feel like messing around with compensating by changing needle size. Sleeve ribbing was worked with #5 rather than #6 like rest of sweater for a little greater stability.
Then, as I’d tweaked the CO and cuff width, I moved the positions of the increases to make the sleeve get wider faster above the ribbing. Every 4th row 7 times, every 6th row 3 times, and every 8th row 3 times. This repositioning was determined by trial-and-error. Ahem. this sucker has had 4, or is it 5 (!) sleeves--the price of tweaking, not a result of CustomFit…and thus the name Kali.
I found as I worked up the body that my row count slowly diverged from the measurements. Although I meaured my blocked swatch very carefully, I didn’t measure gauge before blocking. I’ll bet the row gauge changed subtly with blocking. Sigh. Live and learn about working with CustomFit. Note to self: next time, measure gauge before AND after blocking swatch.
Knitting sweater took 5-6 wks. Finishing took 3+ years. Sigh.


 knotjusthats notebook
  handspun
 queue
queue favorites
 friends
 needles & hooks
 library