I used the March/April 2014 directions, with the project being a mitten. I started in June 2014 and passed in January 2015. What a lot of work! I am so glad I did this. My knitting is so much improved, and I am far more knowledgeable about the craft.
Photos included here passed.
Working Binder
I created a working binder/planner just for Level 1, using the M by Staples system. I printed the instructions, punched them out, and added empty planner pages to the binder. Every question and SIS was first written in here, in pencil. I did most of the work away from the computer (using my iPad for Internet research), and then typed & formatted the written work later. The working binder was crucial to preserving the thoughts and references I found while knitting.
Submission
I finished and mailed my original submission in late October; it came back with comments in early December; I sent off resubmits, including swatches, just before New Year’s; received new comments about an error on a Swatch Information Sheet in January; sent the new sheet via email in January; emailed the latest resubmit in January. And I passed!
Bibliography and Resources
I added bibliography references to the list in my working binder every time I used a new resource (in pencil), whether it was a book or a web site. I didn’t worry about specific URLs at this point; domain names would do. My very last step before submitting my binder was to go to easybib.com to format and alphabetize the reference list. At this point, I googled every web site resource to copy & paste specific info.
My greatest resource was the Provo, Utah library. Without that resource, I couldn’t have done the research required for the project. They have an incredible knitting section, with over a hundred books. I checked out dozens of knitting books, and sometimes the same ones over and over again, all for the cost of the out-of-city library card.
Knitting Style
I am a non-traditional knitter, so I didn’t rely on any yarn shops or teachers for help. They always tell me I knit wrong. The best information on my knitting style came from The Principles of Knitting by Jane Hiatt.
I did a lot of experimentation, and actually made a change to my knitting style. I am still non-traditional, for better or worse.
Yarn
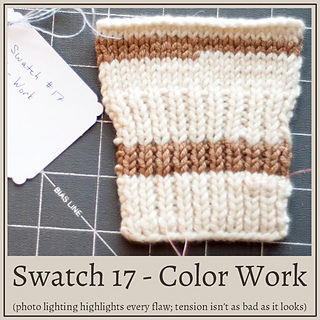
I tried both Plymouth Galway and Patons Classic Wool but didn’t like the results. I finally settled on a Superwash wool, which helped even out my stitches. I really enjoy working with Superwash yarn. I went with cream and used the same needles and yarn throughout for consistency (though I changed needles for the mitten project).
For level 2 I won’t use a superwash yarn, because it turns out superwash makes edges curl, which is a problem almost all my level 1 swatches showed. I won’t use Galway or Patons wool either… I will hunt for something much better.
Report
I put a lot of work into my report on Blocking and Care of Hand Knits. I spent a couple of weeks on it alone. I included a few of my own personal experiences, such as accidentally felting a scarf when it got mixed up in the wash, and having a sweater grow several inches after final blocking. I wasn’t sure it would be allowed, but the reviewers didn’t seem to mind. I did use a lot of references, and I did a lot of rewriting. The work paid off. My reviewers commented that they liked the report and the writing style I used.
Swatches
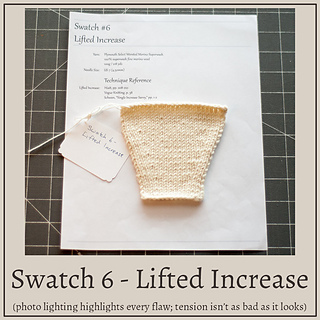
I knit all of the swatches at least twice. I found myself knitting, ripping, knitting, and ripping some more. I’d make the swatch, looking up techniques along the way, block it, and then type up the swatch info sheet. Usually, after making the swatch info sheet and answering related questions, and looking at my swatch with a critical eye, I wanted to redo the swatch. It was some extra knitting, but it helped me learn the best.
Swatch Info Sheets
I included at least two references for every technique I looked up for each swatch. These references were almost always books, simply because they are proven sources and the information was at least “vetted” by editors. My go-to books here were The Principles of Knitting, The Knitter’s Handbook, and Vogue Knitting’s Ultimate Knitting Book. I am including a simple sheet in a photo.
Pattern
I made adjustments for cable flare in my pattern, so the thing would turn out square after being blocked. I was taking a chance, because that wasn’t in the original instructions, but it turned out okay. I made some grammatical errors in my pattern and forgot to add the instruction for blocking at the end, so I did have to resubmit the pattern.
Mitten Project
I blocked the mitten wrist out to points, and I was taking another chance here, but it passed too.
Blocking
My blocking method left something to be desired. I used lots of pins, like others did before me. But when they were turned in, the edges of many swatches were curled back too much. It may actually have been a tension issue, but looked like a blocking issue. I had to re-block Swatch 15, which had curled back severely. The second time didn’t look much better than the first, so it was back to the drawing board. The third time, I threaded 6 wires into the swatch AND pinned the whole thing down at the edge as well as a couple of stitches in from the edge. I left it for two days, and when I liberated it, it looked much better. (I did more research, and it turns out the CO and BO edges were distorted by the wires, so it’s best to not use them there. I updated the photo to reflect this.)
Superwash yarn contributed to the poor blocking.
I used Inspinknity ultra fine blocking wires, made with very thin flexible memory wire, available on Etsy.
Tension
My tension also left something to be desired. Getting consistent tension in Stockinette Stitch was tough for me! There was a lot of rowing out and guttering, and the back of the right-hand side of my swatches were the worst. This is why I did most of my swatches over again at least once before submitting them. I only had to re-knit and resubmit Swatch 4; I think they simply chose the worst swatch and only asked me to re-knit that one. I hope I have the hang of it now, since I have had plenty of practice, so Level 2 won’t be as difficult.
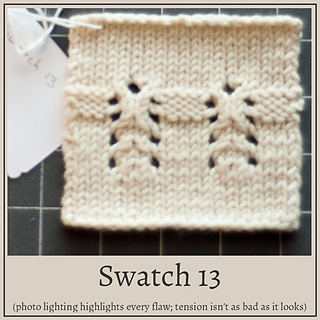
The photos show a terrible tension. I shot the photos in window light and color-corrected them, and boy did the tension issues pop out! When you look at the photos, please don’t judge too harshly.
Tags
I tried printing my tags, and tested them in water just in case they were thrown in the blocking water. My printer ink ran, so I found an archival pen (a scrapbooking pen) and wrote the tags out by hand. I thought about laminating them to protect them, but didn’t want to spend the time on it.


 marybeshaw notebook
  handspun
 queue
queue favorites
 friends
 needles & hooks
 library