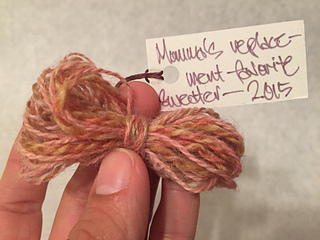
10/19/2015 In an exhausted, but unable to sleep haze, I started knitting a swatch for this. Holding 1 strand of each thread.
10/20/2015 I c/o this swatch on sz 8 straights entirely b/c I wanted to to use my fancy wooden ndls, but the fabric is weird at this gauge. I can’t decide if I should hold 2 strands of the alpaca and stay on 8s, or if I should stay with 1 strand of each and move down to 7s… Will make this swatch a little bigger to see the color better before I decide.
10/24/2015 Gram looked at swatch and said she thought it was perfect as is. She suggested me going up a ndl size if I wanted to leave room for shrinkage. In light of her assessment and my observations, I’m staying with this gauge.
10/25/2015 Starting at the wearer’s right shoulder, then going to the right front.
- c/on waste yarn 10 sts
- switch to project yarn, k1p1 row
- 82 rows in moss st
- c/off waste yarn
- pick up 4 sts and with uncut yarn, p across
- turn, k across
- ** turn, p across, pickup and p 4 more sts
- turn, k across
- rep from ** until you have made a stocking st triangle the full length of the moss st shoulder piece
- last st pickup was only 1 st
- turn, p back to wearer’s right armpit seam
10/26/2015 In an attempt to not forget how I am doing this and make all things even, stop here. Start the wearer’s left shoulder and the left front.
- c/on waste yarn 10 sts
- switch to project yarn, p1k1 row
- 82 rows in moss st
- c/off waste yarn
- pick up 4 sts and with uncut yarn, k across
- turn, p across
- ** turn, k across, pickup an p 4 more sts
- turn, p across
- rep from ** until you have made a stocking st triangle the full length of the moss st shoulder piece
- last st pickup was a full 4 sts so clearly I did something slightly wonky between the 2 shoulders, but I’m pretty okay with that shit - nothing is perfect - least of all me or my creations…
- turn, k back to wearer’s left armpit seam
Closing the evening with 2 right triangles with moss st shoulders attached.
10/27/2015 Picking back up at the wearer’s right shoulder and right front piece.
- ** p row
- k1, kfb (creates one st increase to round the neck out), k rest of the row
- rep from ** until you have 57 sts on ndl (yarn will be neck side)
Back to the wearer’s left shoulder and left front piece.
- ** k row to last 2 sts, KFB, K to increase neckline
- p row
- rep from ** until you have 57 sts on ndl, k row to last 2 sts, KFB, K one last time to leave yarn neck side
Things were looking confusing and it was super late at night so I steamed what I had and took the pic dated 10/27.
Note: I really liked the look of the KFB increase on the right side, and researched thinking that I should PFB the left increase. Turns out that required more sampling than I was willing to do in the middle of a week night when I have to be at the office in the morning, so I bagged the idea and stuck with what I knew. There’s a closeup if the increases next to each other for reference. I think it’ll be alright.
11/4/2015 Aparently I am not writing this as an actual someone-else-could-follow-it-pattern. This is where I am so far.
FRONTS
- stocking stitch knit the front pieces down to where I plan to attach fronts to back under the armpits = X rows total from the outside edge of the shoulder
- add last 6 rows before armpit connection as increase rows using KFB in same manner as neckline but with the increase in the armpit = 3 st increases per side for a total of 60 st width on each front piece
BACK
- make back piece attach to shoulders in same manner as front pieces did with the exception that I added 4 stitches neck side (c/on waste yarn, 4 sts added as set up row in stocking st) for 3 rows, 4th row got 4 sts and then picked up the opposite back shoulder
- now that all of back is connected with neck, keep picking up 4 sts of each side of the back shoulder until I’ve worked all the way to each shoulder’s end
12/21/2015 Somewhere along the line, I stopped keeping notes. I swear I am going to finish this damned thing for Christmas if it kills me.
12/22/2015 Even if I am not going to keep seriously detailed notes, it is worth reminding myself how I made these pockets. I like them.
- Straight wooden (yay!) ndls completely separate from the now-joined vest - for a mental picture, you’re knitting from the top of the pocket to the bottom and then adding the moss st border that will be where you put your hands in
- c/on 40 sts w/ waste yarn
- k row
- stocking st knit 35 rows
- put the last row onto waste yarn to leave the sts live for later pick up
- w/o breaking actual knitting yarn (not the waste crud), turn, p/u 1, skip 1, p/u 2, rep from until you’ve reached the top of the pocket (NTS: you did this once just p/u every other st and once p/u all sts - both were wonky and ugly - this is the correct ratio)
- moss st 4 rows
- either k or p a row depending on which side is up (you want the row to be k on the “right side” so your bind off makes that nice chain that obscures the row beneath it)
- if you k that row, bind off pwise but if you p that row, bind off kwise - MARIAH, BIND OFF HERE WITH A 10.5 NDL; your bind offs are too damned tight
For the other pocket, set up row is p and last 2 steps are opposite.
- joined top of pockets to the body of the vest on a random k row so as not to confuse myself any further
- hold regular body’s left hand ndl in back
- hold pocket’s ndl in front but in the same left hand
- active k ndl is in right hand
- k through both sts queued up on left side ndls
I will need to do this lots more before my hands get it easily, but I managed to make it work and it looks super clean. Yay, me!
Also noteworthy: when p/u sts at the arm holes for border, I started in the arm pits and only p/u every other st. I did this mostly b/c I only really understood how to p/u every other st with the loose loops tricking me as to what is going on at the side edge of stocking st, however it worked splendidly to taper the arm holes closed. 2 rows moss st, 1 row k, b/o sz 10 ndls (again with the tapering…).
12/31/2015 Final NTS:
- Picked up edge of stocking st for placket every 4 sts, skip 5th - came out tighter than perfect, but I redid it 2 or 3 times and I’m not doing it again.
- Pocket join at top on k row and p row on bottom. P is cleaner and (unexpectedly) easier to manage the double ndls in left hand. In the future, I want to do this expressly on p rows.
- FO came out 200 sts from placket to placket
- This alpaca is extra shitty, but the wool is nice.
- This fabric is nicer post washing than I had dared to hope for. I am happy with this wool.
- Swatch gauge is 17 sts and 25 rows for 10 sq cm.
- Post-not-so-delicate-washing gauge is 18 sts and 25 rows. How does that make sense?


 mjteodori notebook
  handspun
 queue
queue favorites
 friends
 needles & hooks
 library