Second attempt:
Needles used for ribbing: 3.5 mm
Needles used for rest: 4.5 mm
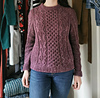
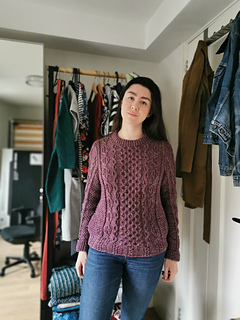
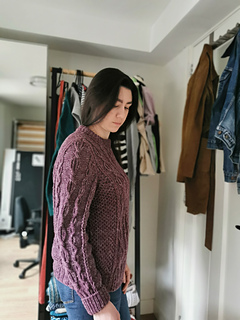
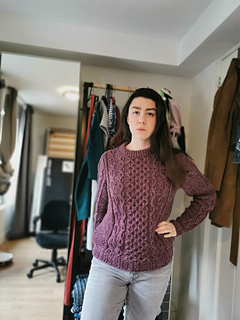
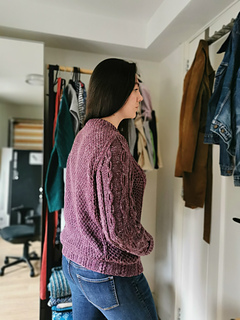
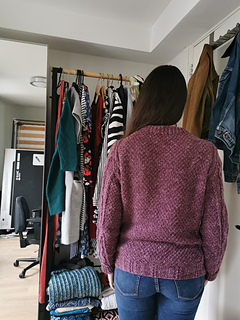
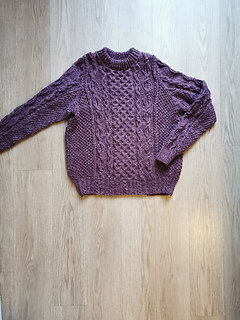
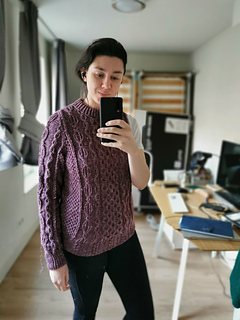
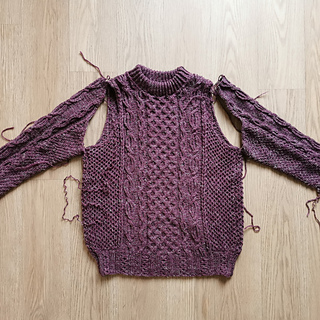
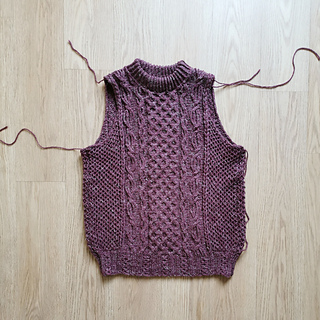
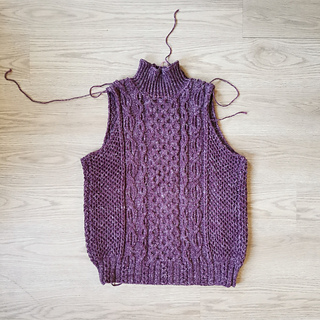
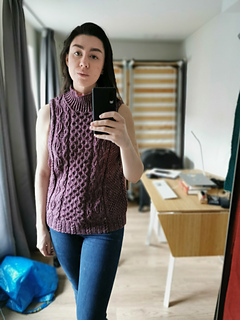
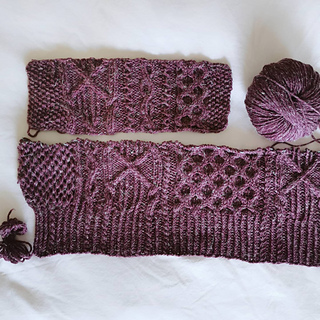
Note that I mirrored the cables down the centre throughout. So sleeves are the same exact the central cable twists the other way. On the front panel the cables cross in opposite directions on each side.
Body starts with 86 sts on 3.5 mm. Mostly 2 by 2 rib (chart 222 from Japanese Knitting Stitch Bible).
Front panel:
Increase 10 sts for main part of body (96 sts). 1 stockinette selvedge stitch (NOT slipping at start/end of row!), 14 sts honeycomb brioche. Braid is knitted as 2 sts stockinette right next to the honeycomb brioche, then at end drop these stitches all the way down to ribbing and use a crochet hook to ‘re-knit’ the stitches using the yarn from 3 rows at a time.
Background for all cables is just reverse stockinette. Central panel is 24 stitches of classic honeycomb cable. The larger cable next to this with 4 ‘strands’ is a modified version of pattern 159 and the smaller 2 by 1 cable is from pattern 156.
Shoulder shaping:
CO 4
CO 2
Dec every row twice
Dec every other row 3 times
Dec every third row until there are 70 sts remaining (decreased 13 on each side).
Work straight approx. 14 rows.
Neck shaping:
Leave middle 20 sts on holder.
Dec 1 at the neck edge next 3 rows, then every other row twice, then every 3rd row until there are 18 sts. After last decrease, work 2 rows, then CO 6 for the shoulder and dec 1 at the neck edge. Work 1 row, CO6, work 1 row, CO6. All stitches cast off or on holder (same on the other side of the neck).
Back panel:
Ribbing as before. Honeycomb brioche, stockinette selvedge and braid as for front panel. 53 sts moss stitch (increase 1 in centre after ribbing, 87 sts total).
Forgot to take notes for the shoulder shaping here - it’s the as for the front until you get to the neck shaping since the back neck is higher than the front neck. Also, since you have fewer sts/10 cm in moss stitch because of lack of cables, the number of sts put on hold in the middle and CO on each row is smaller.
Sleeves
CO 44 sts with tubular cast on, join in the round. Twisted rib approx 18 rows. Increase to 49 sts.
Division of stitches:
BOR, 9 sts moss stitch, 2 stockinette for braid, 2 reverse stockinette, 5 sts for smaller 2 by 1 cable, 2 reverse stockinette, 8 sts for larger cable, 2 reverse stockinette, 5 sts for smaller cable, 2 reverse stockinette, 2 stockinette, 10 sts moss stitch. 49 sts total.
Increase two stitches every 7 rows to a total of 77 sts (28 sts increased in total, 14 increase rows). Increased in the moss stitch (around the ‘central stitch’, which is the final stitch in the round as defined above) AND by expanding the reverse stockinette sections between the cables/braids. At the end the moss stitch panel was 35 sts (8 increase rows), and each of the 4 reverse stockinette ‘sections’ (originally two stitches wide) was increased to being 4 or 5 stitches wide.
Shaping sleeve cap (started 2 rows after final increase row):
Row 1 (RS): CO5
Row 2 (WS): CO6
Decrease on each end of the row for the next 10 rows.
Decrease every other row 11 times. (braid turns into one stitch so on this decrease row you are actually decreasing 2 on each side)
Decrease every row 4 times
77 - 11 - 20 - 24 - 8 = 14 sts left.
CO7 at the start of the next 2 rows.
Below this is attempt 1 which was all frogged!
Front panel coming out too wide: ~63 cm when it should be about 56 cm. Will make back panel narrower so seam runs slightly up the back -- I.e. both ‘sides’ of the armhole will actually be on the front panel.
Honeycomb brioche + selvedge measures 8.5 cm on both sides. Want 3.5 cm from each side moved onto back panel = 5.7 sts.
This means width of back panel is 56- 7 = 49, maybe 1 cm for seams?
10 cm Stockinette gauge on 4.5 mm = 16 sts. With same honeycomb panels, need 49 - (2 x 8.5) = 32 cm = 51 sts.
51+15+15 = 81.
Increase ratio rib -> main body for front = 132/113 = 1.17.
Cast on for rib = 83/1.17 = 71.
Waist shaping on back panel: trying on front panel, smallest point of waist occurs around row 29 after the ribbing.
On back panel, decrease 1 sts on each side (in stockinette next to ‘braid’ on rows (count starting after ribbing):
29
25
21
17
13
19-10-2020
Honeycomb brioche ridges up to armhole cast off: 40
On the front, started with 134 sts. Decrease 6 (armholes for both front and back, seam will be offset towards the back).
Then decrease every row for 22 rows: 78 sts.
Should decrease 28 sts over same number of rows for back to decrease same fraction of sts.
Front: Total of 46 decrease rows. Decrease every row for 22 rows.
Back: decrease on 2 out of 3 rows for 21 rows. 54 sts. 1 plain row. Need to decrease 26 more sts over 24 rows: every other row.
29/10: everything so far frogged! Was way too big
New design for front: 96 sts. Target width 50cm. Rib: needs to be odd number, CO 83. Maybe smaller needles (used 4mm previously).


 phoebemay notebook
  handspun
 queue
queue favorites
 friends
 needles & hooks
 library