Updated May 12, 2019
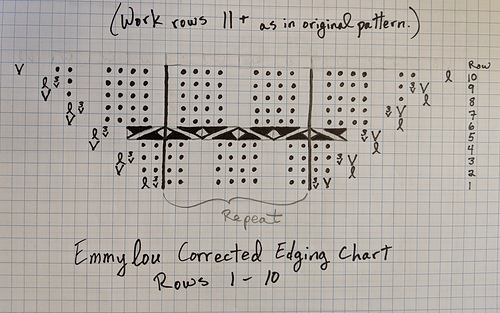
To make a long story short, the Edging Chart for this pattern is utter garbage (at least, the first 10 rows). I have uploaded a corrected version as an image on this project. Hopefully it will help anyone else having issues with this shawl.
~ ~ ~
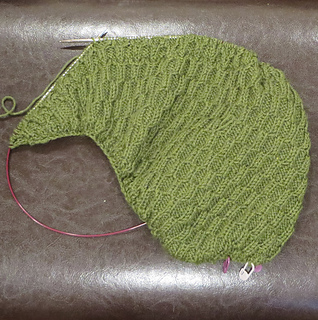
The body of the shawl went okay, but the edging chart is messed up. Row 6 doesn’t have any increases, yet row 7 has 6 extra stitches that appear out of nowhere.
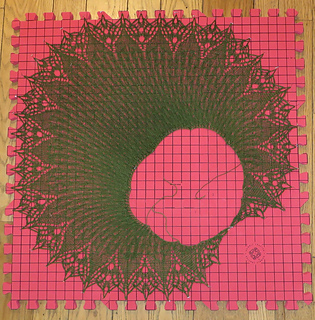
Also, the honeycomb pattern doesn’t match up with the shawl body; it is shifted by exactly 3 stitches (half a pattern repeat). I thought maybe this was intentional, but it looks odd, and it doesn’t seem to be that way in any of the pictures.
I wish I had time to go back 6 rows and start the edging over, but I can’t if I want to get it done in time to send. I’ll just have to fudge the Row 6 pattern to add extra stitches.
12-02-2018
Here’s how I fixed Edging Chart Row 6:
Slip 1, P2, (K1, YO, K1) in next stitch, YO
continue with pattern until last 4 stitches
YO, (K1, YO, K1) in next stitch, P2, P tbl
This makes Row 7 work out okay.
12-03-2018
Okay, so I had to add 6 stitches to row 6 to make it match up with row 7, and that worked. However, the pattern changes from a 6-stitch repeat to a 12-stitch repeat in row 11, and the stitch count is now off by 6 stitches (there’s an extra half-pattern left over at the end of the row). I’m going to have to give fixing this some thought, because I don’t want to have to do all those cables all over again…
12-05-2018
I finally decided the best way to deal with this issue is to rip it back and start over from row 6.
Row 6: Work according to chart.
Row 7: Slip 1, (K1, YO, K1) in next stitch, P2, K2
P4, K2; repeat from to last 4 stitches
P2, (K1, YO, K1) in next stitch, K1 tbl
Row 8: Slip 1, P1, K4
P2, K4; repeat from to last 2 stitches
P1, P1 tbl
Row 9: Slip 1, (K1, YO, K1) in next stitch, P4
K2, P4; repeat from to last 2 stitches
(K1, YO, K1) in next stitch, K1 tbl
Row 10: Slip 1, P3
K4, P2; repeat from to last 2 stitches
P1, P1 tbl
12-05-2018
So, here’s the problem.
My adjusted pattern from Rows 7-10 get rid of the extra 6 stitches, but they were evenly divided (3 on the right edge and 3 on the left edge). Arriving at Row 11, the pattern is now 3 stitches out of sync…that is, the cables are set to twist in the wrong direction, which would throw the whole pattern off.
Coincidentally, I was already bothered by the fact that Row 1 started 3 stitches off from the body pattern.
I think I have to give up on saving time and rip the edging all the way back to Row 1 and start over again, moving the pattern repeat by 3 stitches. That should solve both the problem of matching with the body pattern and getting Row 11 to work.
12-08-2018
Starting over at Row 1 and shifting the whole pattern over by 3 stitches seems to have done the trick. Once I adjusted through the first 10 rows, I could go back to the chart at Row 11 and it worked fine.


 weyrbrat notebook
  handspun
 queue
queue favorites
 friends
 needles & hooks
 library