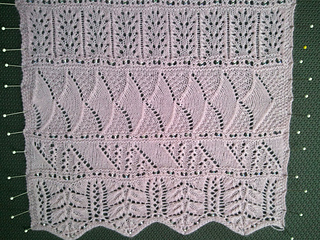
Day-by-day photos, errata and stitch helps in notes. All 24 patterns knitted, with all repeats.
Knitting w/ 2-strands of my recycled 100% cashmere yarn from a sweater I bought for $6. Sheer luxury for only pennies per gram! I have so much yardage from one sweater that I will be able to knit this scarf and still have about 70 grams left -- plenty to knit a luscious matching hat or fingerless gloves! The beads, (2 tubes of #6), cost far more, at $8, but when the yarn’s so inexpensive, beautiful beads are in the budget. Yeah!!!
I like the lace to look “tight” so I am knitting on quite small, size US 1, 2.25 mm needles.
Am doing seed stitch on border rather than garter stitch, as it’s prettier. Look at close-up of Day 1 picture to see seed stitch border.
~~~~~~~~~~~~~~~~~~~~~~~~~~~
Days 1-3: Just saw someone else doing this!
Day 4: 21 grams used, 172 grams left
Day 5: 26 grams used, 167 grams left
Day 7: 36 grams used, 157 grams left
Day 8: 43 grams used, 150 grams left
Day 9: 48 grams used, 145 grams left
Day 10: 56 grams used, 137 grams left
Day 12: 66 grams used, 127 grams left
Halfway done!!!
Day 15: 80 grams used, 113 grams left
Day 25: 127 grams used, 66 grams left
~~~~~~~~~~~~~~~~~~~~~~~~~~~
Note that there are eratta on the daily project pages that don’t get corrected, so you must go to the 2012 Advent Scarf group page to find them. First read the top of each day’s page to see what’s listed there and make note of it on your day’s pattern. Then definitely scan the day’s thread, as there are sometimes more eratta there, but especially because there are loads of helpful tips, adaptations, and pictures to help you along.
My DAILY NOTES: Not for all days…just when I thought something merited comment.
Dec 3: Don’t increase the 3-stitch borders to 5 stitches, as the pattern suggests. (I followed the pattern as written, but realized too late that it looks “thick” and out-of-place.) Rather, simply knit those two extra stitches in stockinette, as you can see in my Dec 6 close-up photo of the border. Much nicer!
Dec 5: Watch the last pattern row, as the pattern for the YO’s and k2tog’s change to accommodate the middle triple stitch. It looks straightforward enough on the chart, but it had me scratching my head for a minute.
Dec 6: As I indicated in Dec 3, don’t increase the 3-stitch border to 5 stitches. Keep those two extra stitches on each side of the charted pattern in stockinette. Look at my Day 6 close-up pic to see how keeping stockinette prevents the pattern from smushing into the border. After all was said and done, (and after I had knitted another day and am about to start knitting yet another), I took it into my head to swatch the different ways of making this stitch to get a better handle on it. You can look at the Day 5 swatch test photo and read my comments on this forum post.
Dec 7: Oh dear! No one else had posted pics of the dropped stitches when it was time for me to try it. I saw my one column and how wide and loose it got and just panicked. I crochet-hooked them back up, and left the column un-dropped.
Here’s how to change the pattern if you don’t want dropped stitches:
EDIT PATTERN THUS: To modify the pattern to not have the dropped stitches, note that you can eliminate Charts A and C. Knit six repeats of Chart B, but start with rows 5 & 6, and then knit rows 3 & 4. That is the order of the design. Knit those four rows, (in the 5, 6, 3, 4 row order), for 6 repeats, and you will have completed the Day 7 pattern. This edit will eliminate the hole at the bottom of those “run” columns. Too late for me, but if you haven’t started knitting Day 7 yet… ;)
Dec 9: See my post instructions to modify this day’s pattern to eliminate the double yarn-over and the resultant large holes that it leaves in this design. I like my same-sized lace holes throughout the pattern!
Dec 10: Hint: If you’re used to using stitch markers, try doing without them for this pattern. It’s quite easy to see right where you are in the chart. I never used them with this pattern, but other knitters reported that when you get up a little past halfway, s2k1/psso stitch will be tromping right over your markers and cause you to have to keep moving them. This is a loooong pattern to begin with, and with all those lifted stitches, it uses quite a bit more yarn than the other patterns so far.
Dec 11: You can read my tips for successfully knitting this pattern with ease on the group Day 11 forum page. Super-easy day, as long as you follow the tips!
Dec 12: I changed the 4 yarn-overs in a row to two. Read my post, here to find out how to make this change. It results in a neater-looking hole. :) Here’s another post of mine with more hints/tips.
Dec 13: Don’t go by my photo of this day! I only used the bottom half of the chart!!! There seemed to be a lot of triangle motifs so far, so I decided to go for a diamond this time around. Here’s how I did it:
1) Knit rows 1-12 as charted.
2) Knit in reverse order, starting with row 11 and going backwards to row 1.
3) To get the more pronounced ridge up through the triangles, I slipped the first two stitches knitwise rather than purlwise, knit the third stitch, and then slipped the two knitwise stitches over.
Dec 14: Don’t knit the last two rows of the last pattern repeat, (rows 3 & 4), or else you will have too much stockinette at the top, and the design will not match the bottom two rows.
Here’s how to do the k4 tog and the k4tog tbl with a crochet hook:
The first four stitches are the k4 tog, (so as if you were to slip the right needle through the left-most stitch first, and then through all four stitche towards the right, wrap yarn, and knit through the four at once). To crochet these stitches oriented this way, first you will slip all four stitches to your right needle. Pivot the right needle behind the left needle, so that both needle tips are pointing to your right. Holding both needles with your left hand, use a small crochet hook to slip through all four stitches that are now on the back needle. (This will draw the yarn through in the same direction as if you were knitting them together through the front loops.) Draw the yarn through the four loops, and place the drawn loop on the back (right) needle. Bring the needle back into knitting position. Giving a tug on the working yarn, make sure the stitch is oriented/sitting on the needle in the proper position. The working yarn will pull at the back of the stitch just worked. (If you can’t see this, don’t worry about it now. When you work the purl/back side, it is easier to tell, and if the stitch is twisted, you can just flip it in the right direction before working it.)
The second four stitches are k4tog tbl. This is the easier stitch, but you must remember to keep the last yarn-over on the right needle in place while you make this stitch. Drop the right needle, and holding the left needle in your left hand, use your crochet hook to slip four stitches onto the crochet hook. Keeping the yarn wrapped over the top of the right needle for that yarn-over, pull a stitch through all four stitches on your crochet hook, and place the stitch back on the right needle. Again, tug the working yarn and be sure to orient the worked stitch so that it is seated properly on the right needle, with the working yarn pulling at the back of the stitch just worked.
Dec 15: English directions are incorrect. See my explanation for making this butterfly stitch, below.
Row 7: 5-stitch should read: Put right needle tip through the yarn-over hole created on Row 1, (the lowest, right-most hole). With tip through hole, wrap yarn around tip and bring stitch back through hole to front, pulling it quite large and loose. (You will keep all stitches through this hole very loose.) Make a yarn-over by bringing working yarn in front of needle, over top, and hold to back of needle. Put tip of needle through same hole, wrap yarn around tip and bring stitch back through hole to front, (exactly like the first stitch). Make another yarn-over. Put tip of needle through same hole a third time and bring up one more stitch. You now have five stitches on the right needle. Drop the next three stitches on the left needle off the needle, and using your fingers or the tip of your right needle, pop them all open until they drop down to the yarn-overs below. They will be very loose and look messy, but you need them “unraveled” before you start the next row. Knit the next two stitches and you are to the end of the pattern repeat.
Row 8: You will purl this row, but when you come to each 5-stitch butterfly, work the knit and yarn-over stitches carefully and in order. Don’t yet worry about the floppy, dropped stitches. When you’re done purling this row and you turn your work, you can finger-adjust each butterfly until the horizontal stitches lie smoothly underneath the vertical “holding” stitches. You’re done!
Dec 16: The decreases on the purl/back side are p2tog, but that doesn’t properly lean the stitches. They should all lean on the purl row in the same direction they lean in the knit row. I found it much easier and faster to leave the knitting right side facing me and knit backwards, and thereby work the decreases in the usual manner on the front side of the work. This is the perfect pattern to learn and practice knitting backwards, a very useful skill particularly when knitting short-rows. Have fun!
Dec 18: This pattern is far too restricted for the width of this scarf! Note that if I could do this over again, I would add the stitches required to do two full additional cable repeats, (and three would be fine), so that I didn’t have to yank/torque/pin the daylights out of this section to block it. That can’t be good for the yarn, but I had no choice. Don’t worry at all about adding and then removing all those extra stitches. Youneed them* to get gauge for this day’s pattern!*
The cable stitch is done this way…
There are 6 knit stitches that will be worked in the cable. (It looks in the chart like the first and last are just knit, but they are the “moving” stitches in the cable.) To make the cable, first slip the first 5 knit stitches onto a cable needle and hold it in the back. Knit the sixth stitch. Now move the LEFT four stitches on the cable needle back onto the left needle. Move the cable needle with the stitch that was originally on the left-most side of the original 6 stitches to the front. Knit the four (originally middle) stitches that are now on the left needle. Knit the last remaining stitch on the cable needle. You’re done! (With the cable, anyway… Here’s one more tip.)
Okay, I have noticed something while going along on this scarf. There are some patterns that have too much “stockinette” at the top of the pattern if you knit a complete repeat of the design at the top. This is because the first row of the spacer section is knit. So for this and some of the other sections, the solution is simple. Leave off the last two rows of the pattern repeat, and your cables will be centered top and bottom, without the top cable looking too stretched/long on the top. GORGEOUS!
Day 19: If you want all your decreases to lean in the direction that the “swoop” is already headed towards, simply knit all decreases on the front side as K2tog, and all the decreases on the back side as p2tog. Note that this differs from the chart on rows 7, 9, & 11, where you will change the left-leaning decrease stitch to a right-leaning (k2tog) stitch. The good news is that this is also simpler and faster to knit, so you’ll be done with today’s pattern in no time! See Day 19 close-up progress picture and notice that all decrease stitches swoop/lean to the right. :)
Day 21: Once again, this day’s pattern has p2tog stitches on the back side that cause the directional decreases on the front side to “jog”. To avoid this, I knit today’s pattern with the front side always facing me, by knitting the even rows backwards. This enabled me to knit the leaning stitches in the same left-facing direction as the front, rather than the p2tog, which leans in the opposite direction.
Day 22: The top of this design will look much better if, when you finish knitting the last repeat, you knit Row 1 again, rather than Row 1 of the spacer row, (so knit in pattern rather than plain knit). Then do your spacer stitch count change row on the purl, row 2 of the spacer section. Adding this row 1 will “gather” the top of the last repeat design so that it isn’t left “open”. This looks more finished at the top. Look at others’ pictures to compare and see why I made this change.
Day 23: As designed, today’s pattern looked a lot like Days 3 & 19, so I got a little creative! I knit rows 1-11 as charted, and then changed the design on rows 12-22, to give a completely different look. I like it!
Alternate stitch to “2” (purl 2 together), so that the leaning stitch leans in the same direction and exactly replicates the front-side left-leaning stitch…
With yarn in front, slip first stitch as if to knit, put left needle through back of slipped stitch and purl. Slip next stitch as if to knit. Return both stitches to left needle, then lift left (slipped) stitch over right (purled) stitch. Slip completed decrease stitch to right needle as if to purl. Done!
Day 24: To make the bottom of Day 24 match the scallop on Day 1, I did a 4-section short-row border, which I will block to match the beginning end of the scarf. If I had it all to do over again, I would substitute another day’s pattern for Day 1 and move the leaves on Day 1 into the middle somewhere, so that both beginning and end of the scarf would be straight rather than scalloped. But…I finished!!! And all between Dec 2 and the 23rd, (on account of US time being earlier than Germany).
Scallops created at end of Day 24 to match Day 1:
On last row of Day 24, put stitch markers to divide the stitches between the border stitches into 4 sections. You will have a stitch marker right next to each border, one stitch marker in the very center of the scarf, and one more stitch marker centered between each border and center stitch marker. The easiest way to do this is with the “safety pin” stitch markers, so you can count and move them if you need to. Don’t worry if you have one stitch more or less in a section, (you will), as it won’t show.
Keeping in stockinette pattern, knitting on the front and purling on the back – note that directions from here will always say “knit” but you are keeping to the stockinette on the front, you will be making short-rows between each stitch marker to create each scallop. To begin, knit the 3 border stitches, pass the stitch marker to the right needle and knit/purl to 3 before next stitch marker, in 3rd stitch from marker, make a double stitch, shown here. Slip double stitch to left needle, turn. Knit/purl to 3 stitches from marker, make a double stitch, slip double stitch to left needle, turn.
You have completed one double stitch in each direction. You will repeat this two more times, but now rather than knit to 3 sts from the stitch markers, you will knit to 3 stitches from the previous double stitch. So in other words, you are building up the center “scallop” rows. When you have a total of 6 double stitches between the two markers, you will knit/purl to the next marker where you will build the next scallop. To do this, you will knit/purl over the 3 double stitches that are closest to the next marker, (remembering that each double stitch is treated as one stitch, and you knitpurl] them together). There will be 3 double stitches on the border stitch side of each scallop that will remain until you start knitting the spacer section, after the scallops are created.
Continue knitting the second scallop exactly like the first, between the next two stitch markers. Then knit scallops 3 and 4 in the same way. When you’re done, knit the final spacer/bead section, and you’re done!


 SocksRmyThing notebook
  handspun
 queue
queue favorites
 friends
 needles & hooks
 library