

 MarinJa Knits Ravelry Store


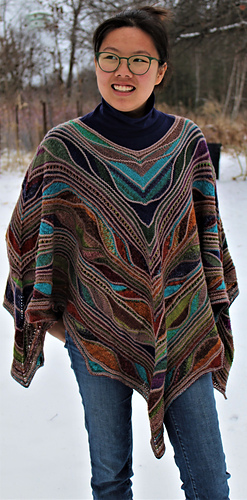
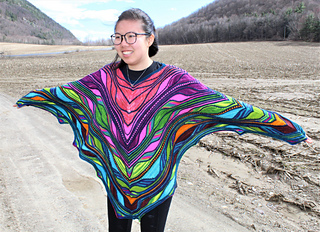


Aflutter Poncho
ERRATA - 10.06.2020
Section 3-2
there was an extra set of ws/RS rows right before
ws- P9 W&T
(remove the 2 rows directly above the P9 row)
this is fixed in the new OCTOBER 2020 update.
ERRATA - 2.19.2020
there is an ERROR on the THIRD section…
I inadvertently used the text from Section 3-8 in Section 3-9 …
the repeat of 3-9 should READ:
RS- K45 DS
Red Square
RS- K40 DS
Orange Square
RS- K78 DS
Red Square
RS- K40 DS
Orange Square
RS- K56 - repeat three more
times and end
fixed in the APRIL update
A natural extension of the popular Butterfly/Papillon Shawl. This works your short rows in the round in an ever expanding series of short rows for a magical, seamless poncho.
The LINES are worked in GARTER (ridges) and the SHAPES are worked in STOCKING KNIT (flat) - so there is a lovely texture to the piece and it has more drape.
BLOCKING should be conservatively done, to keep the piece from becoming too large. I pinned the collar to keep it smaller, before flattening and pinning out the bottom edge.
THIS WOULD BE A FANTASTIC STASH BUSTER…!!!
If using stash/scraps might suggest that you tie either each section or the entire thing together with ONE line color (CC) yarn. One tester used a different LINE color for each section and it is FABULOUS!
It is wonderful in the 2 yarns I tried…
HAND DYED YARN SAMPLE: URTH YARNS
MC: 3 skeins UNEEK FINGERING 100g = 435yds/400m
I used 2 skeins #3002 and 1 skein #3012 (300g / 1305yds)
CC: 2 skeins MONOKROM FINGERING 100g = 435yds/400m
I used 2 skeins 3062 (200g / 870yds)
INDIE DYER SAMPLE: DONE ROVING YARNS
MC: 1 x PONCHO Minis fingering (370g=1600yds/1463m)
I used BRIGHTS Poncho kit
CC: 2 x Frolicking Feet fingering (113g = 480yds/439m)
I used 2 skeins Maritime Blue
*** for color placement with mini skeins, see second PDF.*
Gauge: using US 04s and stocking knit stitch – this gauge is in pattern and after blocking.
Gauge is not crucial and will be impacted by blocking. 24 sts to 4” & 32 rows to 4”
Needles: Needles, round, size 40” (or larger) US 04. The piece starts small with magic loop and gets very big.
Notions: many regular/plain stitch markers, 8 fancy/different markers for the POLES, and needle or hook to tuck in ends
MARKERS – I like using ‘calabash pins’ (a type of safety pin) which can be purchased from yarn shops or Amazon. They come in a lot of colors and are relatively inexpensive. They are also removable – which in this project means they can also be placed when counting and not just when knitting.
In my project, I used them as follows (this is ONLY an example):
NORTH pole is RED, then I used I used blue for stitches between North & West.
WEST is YELLOW, then I used I used purple for stitches between West & South.
SOUTH is WHITE, then I used I used green for stitches between South & East.
EAST is ORANGE, then I used I used gold for stitches between East & North.
Please remember – Markers are kept in place (at POLES & every 10 sts) to help counting & maintain alignment with shape. Additional markers are added with increases at corners when appropriate (every 10 sts).
Notes in the pattern help to know where your markers and stitches should lie.
Hints:
Remember to carry the second color (CC) color on the ‘seam’ (aka- start point, ALSO called the NORTH stitch or North pole). I have noted this in the pattern. If this is not working well for you, you may wish to CUT your CC yarn and weave in the ends in these places. Color changes for the mini skeins (or a STASH BUSTER project) are made AWAY from the row start to help that center back seam be more attractive. Often you are asked to knit until the yarn runs out and switch colors. Switching colors anyplace, but on/at a pole or in a short row section is recommended.
Increases used were M1R & M1L AND M1R-P/M1L-P. ANY increase you like can be used, please be consistent in your increases so your work looks purposeful.
Additional information is often within parentheses. These bits of information are to help confirm stitch counts and other information to help ensure correctness within the pattern.
There are a lot of visual clues in this pattern. It is often the case when a count is not working that a previous shape was worked in the wrong spot. It might be beneficial to lay out your work and look at it when it is not all scrunched up on the needles. Take a photo. Sometimes this perspective, in an image which changes the scale, shows what is off, especially when you have counted a millions times or pulled back and re-knit. Honestly, most of the problems people come to me with relate to a mis-count. When a knitter has made a mistake, it is common to remake that mistake repeatedly, without being able to change it and getting more and more frustrated. You are welcome to reach out to me. You might also put your work down for a day or two and come back to it. PLEASE know that if you are having a problem, I will most often ask you to LAY YOUR WORK OUT FLAT and send me an image of ALL of it, this is one of the only ways I can figure out via e-mail what is wrong with the project. This may involve putting it on multiple needles, etc. But if you cannot do this, I may not be able to help you. If you send me a visual (by e-mail) when you ask for help, I might be able to help you faster.
4963 projects
stashed 5255 times
8182 projects
stashed 7119 times
1140 projects
stashed 1262 times


