

 WoolTribe Yarn

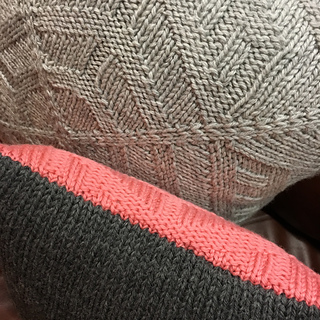
Center City Pillow Covers
This pattern is for a 10” square pillow cover and a 14” square pillow cover. This pattern is suitable for the intermediate knitter and above. It’s perfect for practicing a variety of techniques including Magic Ring Cast On, reversed Bar Increases (reversed KFB), and incorporating increases into your bind-off! (Yes, it’s totally possible!) Putting these creases in the corners of the square during the bind-off keeps those corners nice and pointed rather than totally rounding them off. The pattern includes a chart containing instructions for both sizes.
Have fun with the colors you use for this pattern! You can certainly do a whole pillow in one color, or you can use two or more colors! Experiment and have fun with it!
Level - INTERMEDIATE: This pattern uses techniques including knitting in the round, reversed Bar Increases, and increasing in the bind-off. Written instructions are provided along with the chart for the pattern. The square is worked from the center out, finishing at the outer edge.
MATERIALS
Yarn: 1 (2) skeins CASCADE 220 – We used color 7804 Shrimp. For large size sample we used CASCADE 220 color 8401 Silver Grey Heather. Backs done in CASCADE 220 color 8400 Charcoal Grey Heather.
Needles: US 7/4.50 mm needles in preferred style for small circumference knitting in the round, and circular needles 16”, 24” and 32” long.
Tapestry Needle
Stitch markers
Pillow form 10 (14)“ square
SIZE
Pillow measure 10 (14)“ square.
Note: Before stuffing, the pillow cover will be slightly smaller than the finished measurements. This allows the cover to stretch over the pillow form, providing a nice, snug fit.
GAUGE
17 sts and 30 rows = 4” in charted pattern*
17 sts and 24 rows = 4” in Stockinette st
ABBREVIATIONS & TERMS
k – Knit
p – Purl
kfb - Knit into the front and back of the stitch
rev kfb - Reorient the stitch on the left needle, knit the stitch, and move the newly knitted stitch off the left needle onto the right needle. Then, using tip of left needle, lift the loop at the base of the just-knitted stitch onto the left needle, and knit through the back of the loop. To see a photo tutorial for this increase, visit https://tinyurl.com/ych2rftd
pm – Place Marker
rep - Repeat
sm – Slip Marker
202953 projects
stashed 111882 times
89608 projects
stashed 47607 times


