

 Elena Maltseva's Ravelry Store
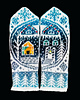
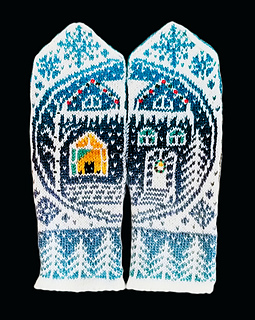
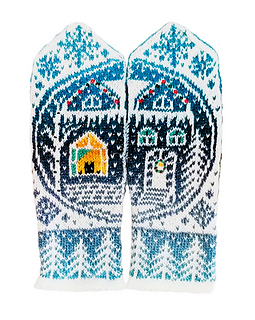
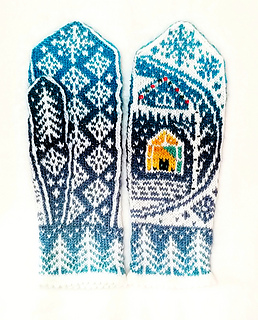
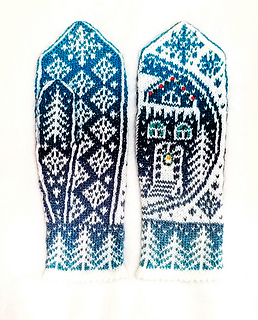
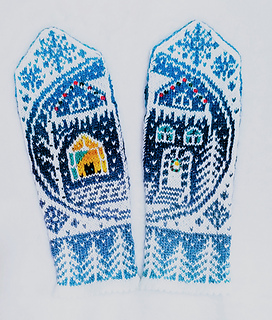
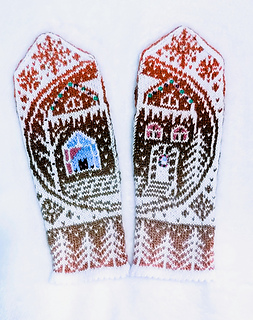
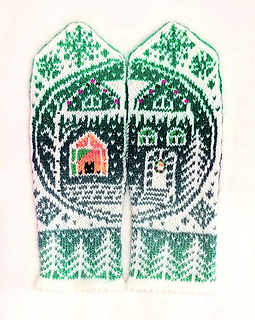
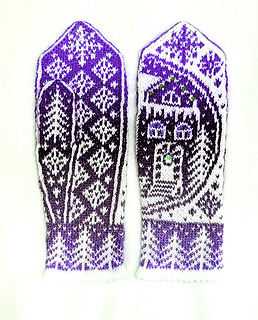
Snow Globe Mittens
“Snow Globe Mittens” have so many of the things I love: delicate snowflakes, snow-covered trees, a cozy cottage, a curious kitten, and anticipation of a Christmas miracle - all encapsulated in a snow globe!
I just LOVE snow globes! I love the magical little worlds inside them and the glitter snow that slowly falls when you shake them. For me, a snow globe is a symbol of home, peace and happiness. Wishing you all good health, peace of mind, and lots of happy moments in the new 2026! ♥♥♥
Use coupon code “snow” to get 25% off this pattern. Valid through January 1st, 2026.
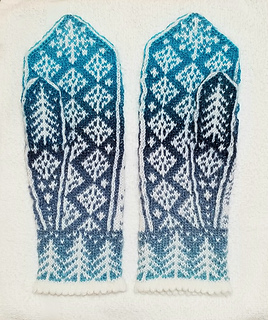
If you like this design, check out my previous design on this theme “Snow Globe Mitts”. The mitts are 50% off until January 1, no coupon needed.
Materials
1. US Size 0 (2mm) set of 5 dpns or circular needles (for Magic Loop method)
2. Light fingering weight yarn 231y/50 g (211m/50g)
You will need about 325 y/70 g total: Color 1 (solid) – 162y/35g, Color 2 (solid or gradient) – 162y/35g. Plus small amounts of black, yellow, green or color of choice for embroidery
3. Size 6 beads and a small crochet hook: 6 clear or white, 10 red and 8 green
4. Tapestry needle (for duplicate stitch and/or embroidery)
Notes
1. Size: The mittens start with 60 stitches and are then increased to 70 stitches after the gusset. With recommended yarn, needles, and gauge the mittens should fit an 8” circumference hand. To make larger size mittens use larger needles or thicker yarn.
2. Stranded colorwork: Follow the charts from right to left. Make sure to catch longer floats using preferred method.
3. Options: You can choose how you want the full snow globe image to present itself. Option 1: the snow globe connects when the thumbs are put together (the wearer sees the full image). Option 2: the snow globe connects when the sides of your hands are put together (this way it is easier to show the full image to other people). Once you decide which option is best for you, follow the corresponding set of charts.
4. Beads: Adding beads is optional. The stitches with beads are marked B on the chart. To add a bead, first knit the marked stitch with color 1, place it pack to left-hand needle; then using a small crochet hook slide a bead over the stitch; finally, slide the stitch with the bead back to the right-hand needle. If not adding beads, knit these stitches with Color 1.
5. Duplicate stitch: A few details are added after the knitting is completed with duplicate stitch and/or embroidery. Experience suggests that it is easier to do duplicate stitch and embroidery while both ends of the mitten are still open. For that reason, I recommend that you do the embroidery before you start decreasing for the tip of the mitten. See further notes on embroidery in the Finishing section.
6. Thumbs: The chart for the left and right thumbs is the same. However, there are two options to choose from. Option 1 with snowflakes on the front and back. Option 2 with snowflakes on the back and a tree on the front. There are also charts for a shorter version of the thumbs. Choose what works best for you.
86740 projects
stashed 64296 times
40483 projects
stashed 29646 times
3752 projects
stashed 4240 times
293 projects
stashed 389 times


