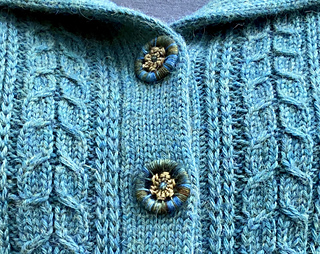
I found the perfect pattern for the Dorset button set I created! For more about these buttons: https://www.ravelry.com/projects/cckillingsworth/threaded...
Yarn
This Knit Picks Andean Treasure 100% baby alpaca yarn is described as like “knitting kittens” which sounds a little creepy, but I love the color name “Tidepool Heather.” It has blues, greens and a touch of gold just like my buttons. Couldn’t believe the luck of getting such a good match.
Ribbing replacing cabling at beginning (bottom) of body and sleeves
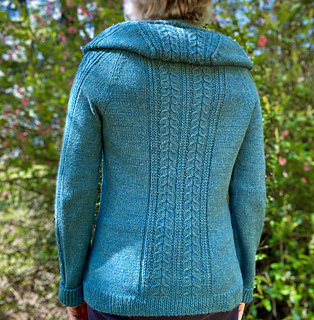
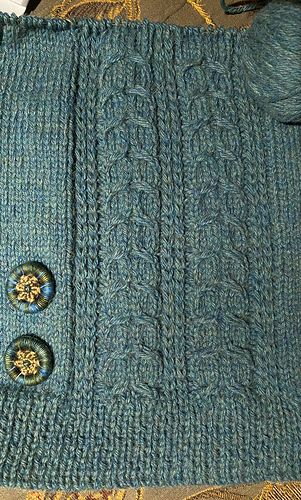
I noticed the rolling edges at the bottom of the body in pictures of completed projects and opted for 2” of K1P1 ribbing after alternating cable cast on with US 3 needles. As part of this change, I left out the cabling band between the three full length cable patterns (back and two sides). This meant that I could skip to casting on the stitch count right after the decreases in the pattern. For me using the small size, this was a 247 stitch cast-on based on the following calculations (only important if you are using my modifications and a different gauge yarn) :
- Cable pattern stitches = 39 (center) + 23 + 23 (sides) = 85 stitches / cable gauge of 6.75 per inch = 12.6 (rounding down to 12) inches.
- Cardigan cast-on inches desired = 43” - 12” cabling = 31” stockinette / 5.44 per inch stockinette gauge = 168.64 stockinette stitches.
- 168.64 stockinette stitches + 85 cable stitches = 253.64 total stitches.
- Closest size = Small at 247 stitches (shown after cabling band and decreases in the pattern instructions, which I’m leaving out). This should result in a 42+“ cast-on edge. Swatching was especially critical for planning this sweater because of several things: changing the pattern, using thicker yarn and I knit looser than the average knitter.
Finished a two inch waist band and liked how the cable pattern aligns perfectly with the K1P1 ribbing.
Raglan and sleeves changes
Switched the SSK’s and K2tog’s on the armhole decreases. Just prefer this look.
I’m very tall so needed 20” sleeves to armholes. Did 14 k1p1 ribbing rows plus 23 repeats of cable pattern before starting armholes.
Double knitted button band:
I felt that this sweater needed a sturdy button band and used this video of the double-knit button band for the Champagne Cardigan by Petit Knit to learn the technique.
First, I swatched the band and loved the extra thickness and fantastically perfect buttonholes. Settled on 17 stitches (doubled over with double-knit) with a US 1.5 needle. My Dorset buttons are 1.25 inches and fit perfectly.
Using the US 1.5 needle, the pickup for the band was 1 for 1, which made this part a breeze. I need to stress that the rest of the double-knitted band does take a LOT of extra time, but every HOUR was worth it with the final results! The technique wasn’t hard to learn, but just a lot of stitches…. I also had a perfect opportunity to use my new button gauge to work out the best spacing.
This quick video clip shows the basic process for the double-knitting on the button band and why these 1344 rows took so long. Every regular row needs to be knitted as two rows to get the front and back sides.
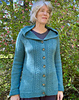
These Dorset buttons are quite special to me and I couldn’t be more pleased with how this sweater came out for showing them off! Also, have to share Tom Rush’s song Merrimack County!


 cckillingsworth notebook
  handspun
 queue
queue favorites
 friends
 needles & hooks
 library