I have a lovely Ravelry friend who makes the world a better place by being her kind, intelligent, and wickedly funny self. She’s having a baby soon, and I am so excited for her.
Knishes, Eudy! Squishes, Baby Eudy!
Ok. Technical info. Well. I started out with the idea of knitting Mrs. Brak’s Drawstring Bottom Baby Kimono. It’s super cute. However, since I am incapable of following a pattern as written (at this point, i think a rift would open in the cosmos if I tried), I ended up having a bit of a brainstorm and knitting something quite different.
March 8, 2010:
The thing about weaving in your ends as you go is that when you have to tink a project, it makes it REAL. HARD.
Am knitting this over to make a few things juuuuust the way I want them. Will be back in a few with ze details.
Ides of March: Lessons have been learned, people!
March Something-or-other: Waiting for more yarn. Patiently? Eh.
The Details:
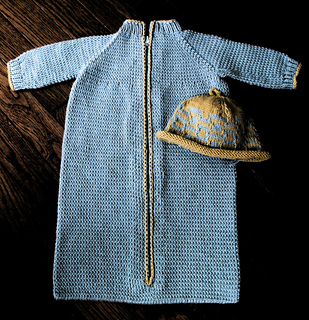
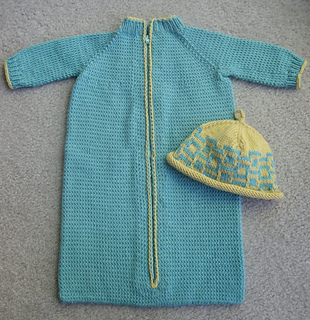
I really wanted a couple things for this garment.
1) I wanted it to have a retro feel.
2) I wanted it to be unisex without making it out of yellow yarn.
3) I wanted it to have a zipper opening that went the length of it for ease of donning and doffing.
4) I did NOT want a drawstring.
5) I wanted the bunting to have some shaping to allow more room for the legs to kick than most of the tubular-shaped garments I saw patterns for.
6) I wanted a cotton-blend yarn so it wouldn’t be too warm for a spring baby.
And so I designed a simple raglan employing the use of steeks to allow ease of knitting in the round.
My gauge was somewhere around 6 st = 1” and 7.5 rows = 1” in twisted stockinette. I say “somewhere around”, because it changed somewhere along the line. Twisted stockinette is a lovely stitch that gives wonderful texture. In the round, it is simply Row 1: KTBL Row 2: Knit. Super easy.
With a size 4 needle, I cast on 70 stitches in my main colour. 60 of these stitches are main stitches, the other 10 are for the steek allowance. The 10 steek stitches were marked off with stitch markers and knit in stockinette stitch. They were centered so that the midline of the garment was at the 5th stitch. So, technically, 5 stitches were at the beginning of the row, and 5 at the end of the row.
I knit 1x1 ribbing for roughly an inch. I just do it until it looks good. On the last row, I followed Techknitter’s great instructions for ribbing transitions.
Switched to size 6 and knit (KTBL) and divided my stitches thusly: (not including the steek stitches!) 12 front | 8 sleeve | 20 back | 8 sleeve | 12 front.
On the next row, I began raglan increases. I didn’t want any holes, so i did KFB (knit into the front and back) on each side of each stitch marker. Increases were on every other row. This made it so that the increase rows correspond with the regular knit rows. I increased until I had 164 stitches (not including steeks).
Then on the next round, I put the sleeves onto stitch holders. They had something like 32 stitches a piece. Don’t hold me to that. When I put them onto their holders, I cast on 6 new stitches under each underarm to span the gap, if you will.
On the very next row, I did a bunch of evenly spaced increases. If you take the sleeve stitches off the count, then the number of body stitches I had allowed for a chest measurement (before blocking) of 17 inches. That’s great for most little babies. But baby hip measurements are always an inch or so bigger--and moreso when they’ve got a diaper on their wee bum. So, I wanted to bump up the stitch count to account for all the room that is needed below the empire line, so to speak.
And so, as I said, I did a row of increases (EZ tossing-one-on-backwards-loop thingies) mostly evenly spaced around the whole row to bring me up to a total of 132 BODY stitches. This gave me a grand total of 22 pre-blocking inches of diaper and leg-kicking room.
Then I knit and knit and knit and knit and knit and knit and knit and knit and knit and knit and knit.
(And I knit the sleeves, too. I decreased down those extra stitches that i picked up. When I got to the cuff, I decreased a few more stitches and then once again used Techknitter’s ribbing transition method. I knit 1x1 ribbing on size 4’s and bound of with EZ’s sewn bind-off.)
Then it was time to bind this baby off! So, I used Techknitter’s AWESOME kitchenering with knitting needles method. GENIUS. Word.
And then I realized that in order to sew and cut the steek, I needed that bottom to be open. DUH! (That’s what happens when you knit at 3 in the morning watching House). So I undid all that genius kitchenering. And cried a little.
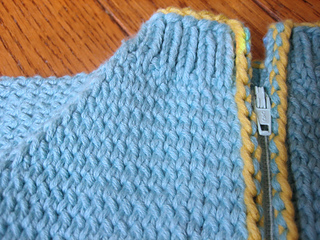
Then came the BIG. MOMENT. I sewed two double rows on each side of the center line of my steek. I did this with the tiniest machine-stitch setting possible. And then I cut.
Now. A word to the wise. You know all those awesome steek tutorials online? The ones with the gorgeous Fair Isle sweaters used to demonstrate the technique? The ones with the perfectly even line of cut stitches lazily stitched down into a perfect line? Huh. This was my first ever steeking experience (i know, i know--never try out new techniques on a gift) and let me tell you, what happened to my steek hole is not what the pictures led me to believe. At. All.
I think it was a combination of the mostly cotton-blend yarn and the leaning stitch pattern. But after I cut the steek, everything went all wonky. Like, whoa. Like I thought I’d fracked something up, because one side of the knitting suddenly was huger than the other side, and it wouldn’t line up for love nor money. So, like EZ says, I had to be the boss of my knitting and make it work. I sewed down the steek stitches and trimmed them up. And prayed to the Teapot that it would all work out. My steek isn’t as tidy as I would have liked, but it worked.
Then came the zipper. Yes, I put the zipper in while I still had live stitches on the bottom. This part was easy. I love putting in zippers. I followed the same method as I did on my Northfield cardie.
And magically, the wonkiness disappeared. So I continued my knitting in the round for another 3/4” or so, and then redid the Kitchenering to close up the bottom. It was genius the second time, too.
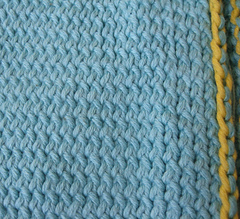
I was going to embroider some cute shit on here, but it just didn’t want it. So I did some simple crochet chain edging. I’m convinced that crochet is some kind of sorcery, and what you see here is literally the extent of my crochet skillz. LOL. But, Eudy, I worked real hard at it. So don’t laugh.
At my Gran’s request, I left the row of increases untouched. I was going to cover it with some more edgingy stuff, but she said no. Gran likes the organic look of the structural elements of knitting, and doesn’t think they should be hidden. So, there they are. Gran knows, for she is the Haggencrone and there is magic in all she touches.
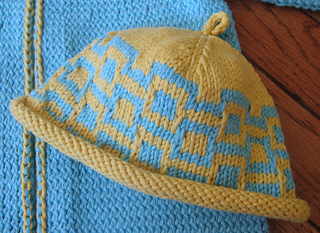
And then I knit a hat to match.
The end.
:D
Techknitter’s Kitchener Stitch Method
Techknitter’s Ribbing Transitions
Sewn Cast-off
Handy chart for sizing (from the Yarn Standards website).
Knit while listening to/watching:
Dr. Who, by which I mean David Tennant
Эдуард Хиль
Joanna Newsom’s Have One On Me
Syren, Angie Sage
Lirael, by Garth Nix (read by Tim Curry!)
Skulduggery Pleasant: Playing With Fire, by Derek Landy


 grackleandsun notebook
  handspun
 queue
queue favorites
 friends
 needles & hooks
 library