

 Pope knits


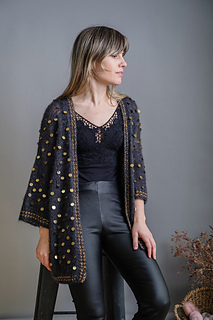
Clay Cardigan
About the pattern
The “Clay Cardigan” is knitted top-down, seamlessly. The back and the front are worked with a pattern of plastic sequins inserted previously in the yarn. The knitting begins with a provisional cast-on at the back. The back is worked flat until the desired armhole depth is reached. Stitches are then picked up from the provisional cast-on for the shoulders. After completing the yoke, the front and the back are joined to knit the body using the same sequin pattern. Next, the hem is worked by a ribbing 1x1. Stitches are picked up around the arm openings to knit the sleeves from top to bottom in the round, using the same bead pattern as the body. The knitting is finished by picking up stitches from the fronts and back to knit ribbing.
SIZES
1 (2, 3, 4, 5) (6, 7, 8, 9)
Recommended ease: positive ease 20 cm / 8”.
The pictures show a size 1, with an 80 cm / 32” bust.
Finished garment measurements
A) Bust circumference:
93 (100, 113, 127, 133) (140, 153, 160, 173) cm approx.
37.25 (40, 45.25, 50.75, 53.25) (56, 61.25, 64, 69.25)” approx.
B) Armhole depth:
22 (22, 24, 24, 26) (26, 28, 28, 30) cm
8.75 (8.75, 9.5, 9.5, 10.5) (10.5, 11.25, 11.25, 12)” approx.
C) Total length:
57 (57, 59, 59, 61) (61, 63, 63, 65) cm
22.75 (22.75, 23.5, 23.5, 24.5) (24.5, 25.25, 25.25, 26)” approx.
D) Length from armhole to hem:
35 cm / 14” approx.
E) Sleeve total length:
37 (39, 39, 41,41) (43, 43, 45, 45) cm approx.
14.75 (15.5, 15.5, 16.5, 16.5) (17.25, 17.25, 18, 18)” approx
F) Sleeve circumference:
37 (37, 40, 40, 43) (43, 47, 47, 50) cm approx.
14.75 (14.75, 16, 16, 17.25) (17.25, 18.75, 18.75, 20)” approx.
SUGGESTED NEEDLES AND CABLES
Main Needles: 4.5 mm / US 7, or the size needed to obtain gauge.
Ribbing Needles: 4.0 mm / US 6.
Cable lengths: 80 cm 32” / Sleeves and Cuff: preferred needles for small circumference knitting (Magic Loop or DPNs).
NOTIONS
- Crochet Hook for Provisional Cast On: 4mm / G-6.
- Row counter (recommended).
- Stitch marker.
- Tapestry needle.
- Tapestry needle for beading.
- Waste yarn or stitch holders.
GAUGE
18 stitches x 22 rows = 10 cm / 4”
Measured over stockinette stitch after blocking, worked flat with main needles and Main color.
YARNS
Lace and Fingering Weight
MC: Lace weight / 100 (125, 150, 175, 200) (225, 250, 275, 350) g / 600 (750, 900, 1050, 1200) (1350, 1500, 1650, 1800) m / 656 (820, 984, 1148, 1312) (1476, 1640, 1804, 1968) yd.
Suggested yarn: Woolerton Estate / The Cousin Burley, 74% Baby Suri Alpaca, 26% Silk /
(300m / 50g) (328yd / 1.75oz) / 2 (3, 3, 4, 4) (5, 5, 6, 6) skeins / colorway: Billie.
CC: Fingering / 20 (30, 40, 50, 60) (70, 80, 90, 100)g / 80 (120, 160, 200, 240) (280, 320, 360, 400) m / 88 (131, 175, 219, 263) (307, 350, 394, 438)yd.
Suggested yarn: Woolerton Estate / The Engineer 85% Merino SW, 15% Neps / (400m / 100g) (438yd / 3.5oz) / 1 (1, 1, 1, 1) (1, 1, 1, 1) skeins / colorway: Winnie.
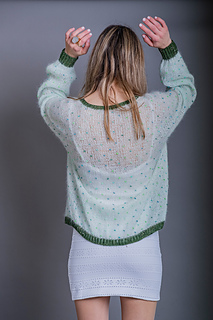
Note: this design is knit with one strand of the cousin burley for a light and airy effect. If you want a more opaque look, knit the design with two strands held together.
BEADS
Mix color: I used Clay beads size 6 mm, green, blue, petrol, light blue, and turquoise: 50 (60, 70, 75, 80) (85, 90, 100, 110) g approx.
PATTERN NOTES
Note 1: If you prefer, you can knit with or without beads.
Note 2: The total grams of beads needed will vary according to their size.
Note 3: Before starting your project, make a swatch to ensure you get the correct gauge and that your sweater will come to the correct final measurements. If you have more stitches per inch than indicated, your tension is tighter, and you must go up a needle size or two. If you have fewer stitches per inch than indicated, your tension is looser, and you need to go down a needle size or two.
Note 4: If you changed the size of your main needles to obtain a gauge, you would also have to change the needle sizes of your ribbing needles to 1 time smaller, respectively.
Acerca del patrón
“Clay Cardigan” se teje sin costuras de arriba hasta abajo. Tanto la parte trasera como la frontal se trabajan con un patrón de lentejuelas de plástico, que se insertan previamente al hilado. El tejido comienza con un montaje provisional en la parte trasera. La parte trasera se trabaja en plano hasta completar la altura de la sisa deseada. Se recogen los puntos de los hombros desde el montaje provisional. Después de tejer el canesú completo, se unen tanto la parte frontal como la trasera para tejer el cuerpo siguiendo el mismo patrón de lentejuelas. Luego se trabaja el ribete con un punto elástico. Se recogen los puntos de las mangas alrededor de las aberturas de los brazos y se tejen las mangas de arriba abajo en circular con el mismo patrón de cuentas que el cuerpo. Se finaliza el tejido recogiendo puntos de los delanteros y los puntos del cuello trasero para tejer un ribete.
TALLAS
1 (2, 3, 4, 5) (6, 7, 8, 9)
Holgura recomendada: positiva de 20 cm / 8”.
El cárdigan fue tejido en talla 1 (el busto de la modelo mide 80 cm / 32”).
MEDIDAS FINALES DE LA PRENDA
A) Contorno de busto total de la prenda terminada:
93 (100, 113, 127, 133) (140, 153, 160, 173) cm aprox.
37.25 (40, 45.25, 50.75, 53.25) (56, 61.25, 64, 69.25)” aprox.
B) Alto de sisa:
22 (22, 24, 24, 26) (26, 28, 28, 30) cm
8.75 (8.75, 9.5, 9.5, 10.5) (10.5, 11.25, 11.25, 12)” aprox.
C) Largo Total:
57 (57, 59, 59, 61) (61, 63, 63, 65) cm
22.75 (22.75, 23.5, 23.5, 24.5) (24.5, 25.25, 25.25, 26)” aprox.
D) Largo del cuerpo, desde abajo de la sisa hasta la pretina:
35 cm / 14” aprox.
E) Largo de manga (sin contar el puño):
37 (39, 39, 41,41) (43, 43, 45, 45) cm aprox.
14.75 (15.5, 15.5, 16.5, 16.5) (17.25, 17.25, 18, 18)” aprox
F) Parte superior del brazo:
37 (37, 40, 40, 43) (43, 47, 47, 50) cm aprox.
14.75 (14.75, 16, 16, 17.25) (17.25, 18.75, 18.75, 20)” aprox.
AGUJAS Y CABLES SUGERIDOS
Agujas Principales: 4.5 mm / US 7.
Agujas Punto Elástico: 4.0 mm / US 6.
Cables: Canesú: 60 cm / 24” hasta 100 cm - 40”/ Cuello: 40 cm - 16” / Pretina: 100 cm - 40”/ Mangas y Puños: puedes trabajarlas con cables pequeños, la técnica de Aro Mágico o con agujas de doble punta.
MATERIALES
1) Aguja lanera.
2) Contador de vueltas (recomendado).
3) Enhebrador de mostacillas.
4) Ganchillo 0.75 mm (no.10).
5) Ganchillo para Montaje Provisional: 4mm / G-6.
6) Lana de descarte o imperdibles de punto.
7) Marcadores de punto.
MUESTRA DE TENSIÓN
18 puntos x 22 Filas = 10 cm / 4”
Medidos sobre punto jersey después del bloqueo, trabajado en plano con las agujas principales y color principal.
HILADOS
175, 200) (225, 250, 275, 350) g / 600 (750, 900, 1050, 1200) (1350, 1500, 1650, 1800) m / 656 (820, 984, 1148, 1312) (1476, 1640, 1804, 1968) yd.
Hilado Sugerido: Woolerton Estate / The Cousin Burley, 74% Baby Suri Alpaca, 26% Seda /
(300 m / 50 g) (328 yd / 1.75 oz) / 2 (3, 3, 4, 4) (5, 5, 6, 6) ovillos / color: Billie.
Color Contrastante: Grosor Fingering / 20 (30, 40, 50, 60) (70, 80, 90, 100) g / 80 (120, 160, 200, 240) (280, 320, 360, 400) m / 88 (131, 175, 219, 263) (307, 350, 394, 438) yd.
Hilado Sugerido: Woolerton Estate / The Engineer 85% Merino SW, 15% Nepas / (400m / 100g) (438yd / 3.5oz) / 1 (1, 1, 1, 1) (1, 1, 1, 1) ovillo / color: Winnie.
Nota: Este diseño se teje con una sola hebra de Cousin Burley (Suri o Mohair) para lograr un efecto ligero y aireado. Si deseas un aspecto menos transparente, puedes tejer el diseño con 2 hebras juntas.
LENTEJUELAS CLAY
Mezcla de colores: Utilicé lentejuelas plásticas (CLAY) de 6 mm en colores verde, azul, petróleo, azul claro y turquesa aprox: 50 (60, 70, 75, 80) (85, 90, 100, 110) g.
Notas del patrón
Nota 1: Puedes tejer sin o con menos mostacillas si prefieres.
Nota 2: La cantidad de mostacilla en gramos varía dependiendo del tamaño de ellas.
Nota 3: Hacer la muestra es esencial para que tu cárdigan quede del tamaño indicado, si tu muestra es más chica te recomiendo que aumentes el númeri de las agujas. Si tu muestra es más grande, disminuye el número de las agujas.
Si cambiaste el tamaño de tus agujas principales para alcanzar el valor de muestra, también tendrás que cambiar el tamaño de las agujas de punto elástico a agujas de tamaño un número más pequeña o más grande, respectivamente.
42 projects
stashed 83 times
46 projects
stashed 48 times


