

 WOOLFOLK COLLECTION FW14
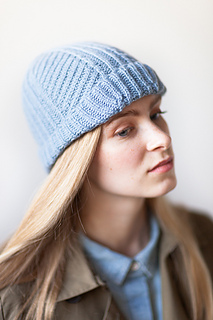


KNOP
Be the first to know about upcoming design releases, exclusive introductory discounts, classes and events by subscribing to OLGAJAZZY newsletter http://eepurl.com/dCbz8X
KNOP (danish) - bud, head
LEVEL
Intermediate
SIZES
Beanie (Slouch)
FINISHED MEASUREMENTS
Circumference 19”
Depth 9.5 (11)“
YARN
Woolfolk Får (100% Ovis 21 ultimate merino, 142 yds/130m per 50g skein)
2 (2) skeins
Beanie in color no. 01 and slouch in color no. 09
NEEDLES AND NOTIONS
US 6 (4mm) 16” circular needle
US 7 (4.5mm) 16” circular needle and set of double-pointed needles
Stitch markers, row counter, 2 cable needles
GAUGE
16 sts and 48 rows (24 visible rows) = 4” in relaxed Fisherman’s Rib on larger needle
Fisherman’s Rib is compressed vertically, and what looks like one row is actually two. If you stretch the fabric lengthwise you can see the “hidden” rows.
NOTES
Thanks to the Fisherman’s Rib pattern, this hat is thick, stretchy, and reversible. The shaping gives an earflap effect to the brim, which can be worn folded up or down.
Change the length by working more or fewer rounds even before beginning the hat body shaping.
ERRATA:
Instructions given in Techniques were for Crochet Chain Cast on but they need to be the following instead:
Long-Tail Tubular Cast On for 1x1 Rib
Using working yarn, make a slip knot and place it on the needle (counts as first st CO), leaving a tail approx. 3 times longer than the width of the piece to be cast on. Hold needle in right hand with the tail to the back and the ball end of the yarn to the front. Slip left thumb and index finger between the strands, so that ball yarn goes from the needle over the top of your thumb, and the tail goes from the needle over the top of your index finger; hold the ends against your palm, just as for working an ordinary long-tail CO.
Step 1: Put the tip of the needle over, then underneath both strands from behind. Put the needle over the thumb strand only, hooking it so that 1 loop is added to the needle, then bring needle to back under both strands (1 purl st CO).
Step 2: Put the tip of the needle under the thumb strand, over the index finger strand, then bring it back under both strands to the front, so that 1 loop is added to the needle (1 knit st CO).
Repeat Steps 1 and 2 until required number of sts are cast on.
As you CO, make sure that you keep the loops over the top of the needle, and the twists and nubs running along the underside of the needle.
Abbreviation:
p1b - purl 1 below (purl into the stitch 1 row below)
8413 projects
stashed 6635 times


