

 Shawna Morath's Ravelry Store
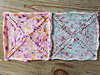


The Weasley Burrow Blanket
The Weasley’s home, also known as “The Burrow”, was the inspiration for this blanket made of yarn leftovers. It was designed for a Harry Potter blanket knit-along hosted by Shawna of Adelaide Cottage Yarns and podcast as well as Jilly of The Knitting Broomstick podcast…both on YouTube. It was a year-long knit and crochet-along that started September 1, 2018.
Use #HPBlanketKAL on Instagram to share your projects there!
Yarn used is Adelaide Cottage Yarns - Harry Potter Minis sets.
This pattern is a work in progress. After completing just a couple of squares, the pattern was shared in case any KAL participants wanted to make this. Photos of the squares as they are knit and seamed together will be added here along the way.
These squares are knit individually and then seamed together as you go, or all at once. Each square uses about nine grams of fingering weight yarn at the specified gauge. They measure approximately 6.5 inches (after blocking) and they’re worked from the center out. The pattern is written using DPN’s but can be easily knit using the magic loop technique. You can make this blanket as large or as small as you wish!
You can apply any knitted or crocheted edging when all of your squares are seamed together.
There are two cast-on methods recommended. First, is my preferred method, which prevents a big hole in the center. It is called the “Invisible Circular Cast-On” (tutorial link below). The second method is a standard long-tail cast-on with dpn’s. This does leave a small hole in the center of each square, which you may be able to tighten up a bit when you weave in your ends.
Invisible Circular Cast-On (ICCO):
YouTube tutorial:
https://www.youtube.com/watch?v=eAZ1zk5ajFU
Directions for ICCO:
Make an open knot and hold it with the loop on the left side and the tail at the bottom. Working yarn should be on top. Using one double-pointed needle (dpn), wrap the working yarn over the top of the dpn to create your first stitch. Insert the dpn into the loop you made, from front to back, and draw the working yarn through to the front to create your second stitch. Repeat this process until you have 8 stitches cast on. Pull the tail to close the loop.
Abbreviation Key:
CO= Cast On
K= Knit
YO= Yarn Over
PM= Place Marker
Kfb= Knit through the front and back of stitch
st= stitch
SM= Stitch Marker
sl= slip
BOR= Beginning of Round
Attaching squares together:
Place two squares together, wrong sides facing eachother (note: the edges will curl outward when opened up, giving the blanket squares a decorative edge). Using a tapestry needle and the yarn tail from a square, sew a running stitch, every three or so stitches, into the last row of knitting before bind-off row. Even the tension with your fingers as you sew to prevent puckering.
19 projects
stashed 43 times
