I did NOT do the dropped YOs at the edges as many people are doing. The top edge is supposed to be firm so that the shawl curves into a crescent, and fits nicely around your neck and shoulders. Making the edge too loose will change the shape of the shawl, and while it might look nicer laying flat, it won’t fit as well when it’s worn. It isn’t designed to have a straight top edge.
However, my edge stitches tend to be a little loose anyway, and I also used kfb increases, which are a little looser than the M1L and M1R. As a result, my edge without the YOs might be similar to someone who knits tightly who did do the YOs.
But I also know there are also a lot of people were very unhappy with their results without the YO, and wish they had done them.
If you’re trying to make a decision as to whether you want to do the YOs or not, here are a few things to consider:
-
Do you want to knit it with the crescent shape as designed? Not everyone does. If you don’t like that shape and want it to have more of a straight top edge, then you’ll definitely want the edge stitches to be very loose.
-
Are you a loose knitter or a tight knitter? If you knit tightly, or if you tend to pull your edge stitches very tight, you may need the YOs. If you knit loosely, you might not. Everyone knits differently, so there’s no single answer.
-
If the top edge is looser, the shawl will stretch out more lengthwise, and be less deep. This is probably why many come out like a long, thin scarf.
-
I’m guessing that the tighter the top edge, the more the ends will spiral when hanging down. You may or may not like that effect. My ends have a gentle curve after blocking, but I’ve seen some on other projects that have such a tight edge that they’re very curly.
-
How are you planning to wear it? Depending on how you wear it, you may want more or less of a curve. Here are some other ways people are wearing it:
Worn as a scarf (I think this is a great way to wear it, especially if it turns out a bit smaller than expected):
Worn tied in front or just tossed over the shoulders with the ends hanging straight down.
Worn crossed in front like a Danish shawl.
Worn lower around the shoulders instead of higher around the neck - this helps prevent the gaping neckline.
Additional tips and thoughts:
There’s a good tip in a forum post on how to block the shawl if the top edge seems too tight.
Color choices: If you’re planning to wear the shawl the way I am, be aware that the first color won’t be in the back, it will be close to your face, so you’ll want to have that color be one that is flattering to you.
If you want a little more depth without increasing the wingspan, Veera had a suggestion for doing that, which is listed in this forum post.
More comments about this pattern can be found on my blog post here.
Project Notes:
Since I was only using two colors, I followed the pattern but just used the darker color as both CC1 and CC2.
To make the kfb increases symmetrical, I worked them as follows:
Double inc: k1, kfb, kfb, k to last 4 st, kfb, kfb, k2
Single inc: k1, kfb, k to last 3 st, kfb, k2
For the MC section, it’s handy to note that your stitch count should always end in a 7 after you’ve finished each full set of rows. (Stitch count increases by 10 for each repeat.)
Thoughts on my project:
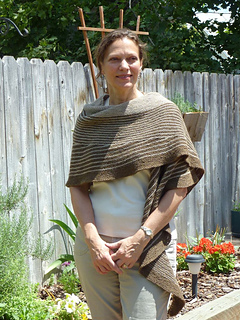
Despite not doing the YOs, I did try to keep the edge stitches a bit on the loose side, and I probably over-compensated. I ended up with the top edge being not as tight as some of the others I’ve seen, and the shawl gapes a bit around the neck when worn (this is why it should be tight - so it fits nicely without gaping open). I also stretched out the top edge more than I probably should have when blocking.
In the upper photos, I’ve tucked the sagging neck piece in to make it less noticeable. In the bottom photo, you can see how saggy it really wants to be otherwise. The looser and straighter the top edge, the more the top edge will sag when worn this way.
I’m not thrilled with my yarn choice (I was stash busting). It doesn’t have much springiness to it which may have affected the size and shape, and it’s a little scratchier than I would like for something that’s around my neck. I think the shawl is much nicer when knit in a springy sock yarn like the Primo yarn in the Plucky Knitter kit. I’m also not thrilled with the colors - the brown has a bit of a greenish cast, and I don’t have much that I can wear it with.
Oddly enough, it turned out considerably smaller depth-wise than indicated in the pattern. I used slightly heavier yarn, and my gauge after blocking had fewer stitches and rows - which means it should be bigger, not smaller. Other than changing the increases, it was knit exactly to pattern. But as I mentioned above, a tighter top edge would help keep it from stretching lengthwise, and shrinking depth-wise.
I blocked the bejeebers out of it trying to get as much depth as possible, but the best I could do (after it came off the blocking board and relaxed a little) was 18.5” in depth. My blocked gauge is about 17.5 sts and 32 rows over 4”.
I really dislike the starting point of the shawl and the way it humps up. Blocking helps, but it still wants to come back. There’s just too much yarn there, by at least 4 or 6 rows. I also don’t like the way the first couple of rows look.
If I made it again:
-
I would use a nice bouncy sock yarn, like the yarn called for in the pattern.
-
I would start with a garter tab to make the starting point flow better into the garter stitch edging.
-
I would probably eliminate the first few rows, and instead, do more increases, probably adding them more towards the center, to see if I get less of a hump.
-
I would not try to keep my edge stitches loose - just work them as I normally would, but still using the kfb increases because I like how they look better.
-
I would probably modify it to get a little more depth, following Veera’s suggestion in the tip listed above.


 CabledSheep notebook
  handspun
 queue
queue favorites
 friends
 needles & hooks
 library